My first stranded colorwork knit: the Bowfell jumper
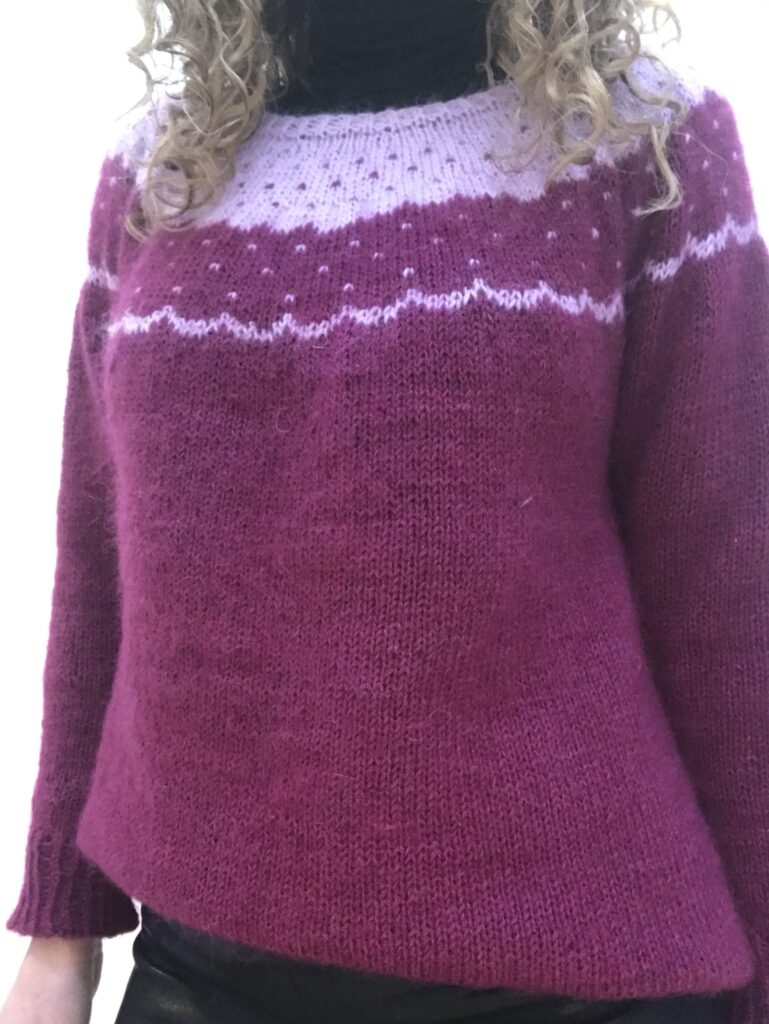
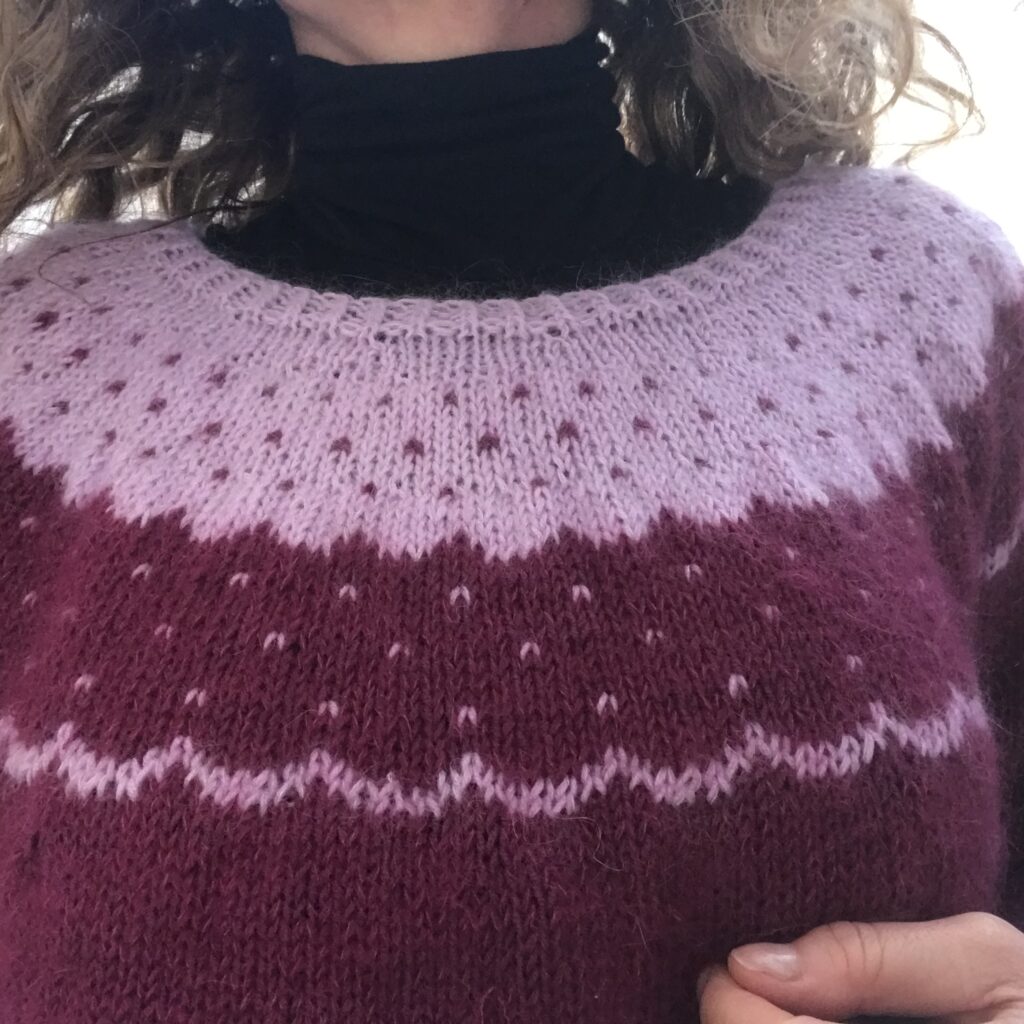
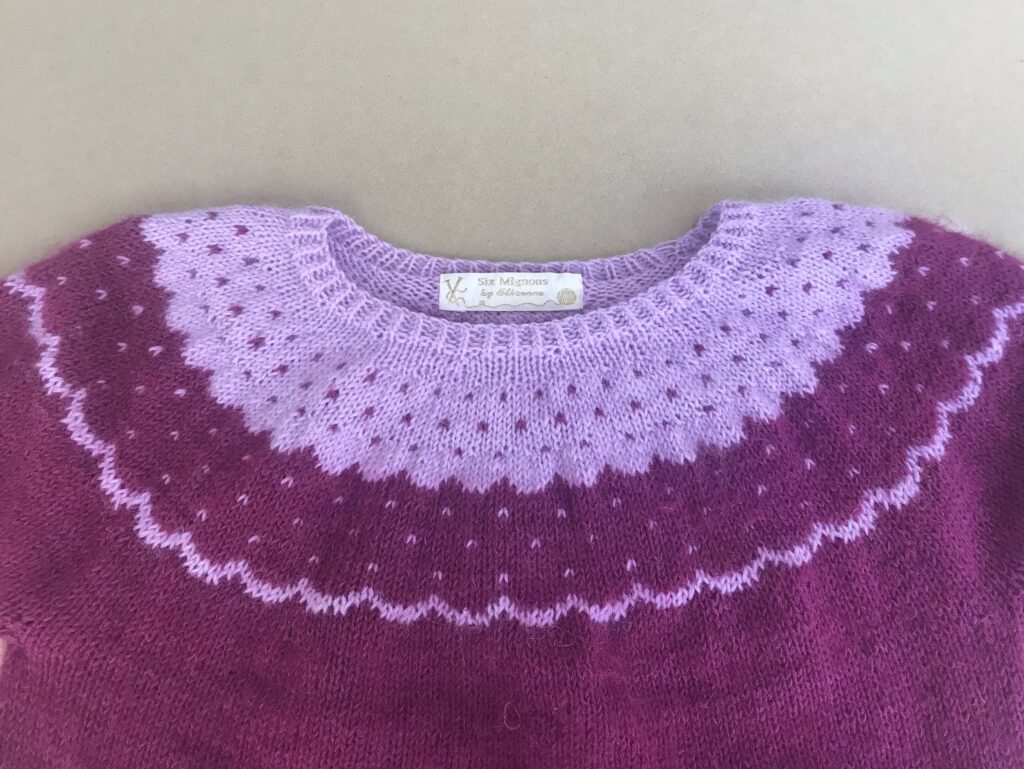
One of my (untold) resolutions for 2021 was to learn stranded colorwork (also called Fair Isle) knitting. And even though it took me until December, I did it! Let me introduce you to my first ever (and definitely not my last) stranded colorwork knit: the Bowfell jumper by AlongAvecAnna.
Knitting colorwork: where to start?
Although I am pretty good at managing double strands, even when knitting lace, creating patterns with different colours is a completely different kettle of fish! I must admit I was a bit at a loss as to where to start initially.
My salvation was Anna Dervout’s excellent book: « Tricoter le jacquard en rond »:
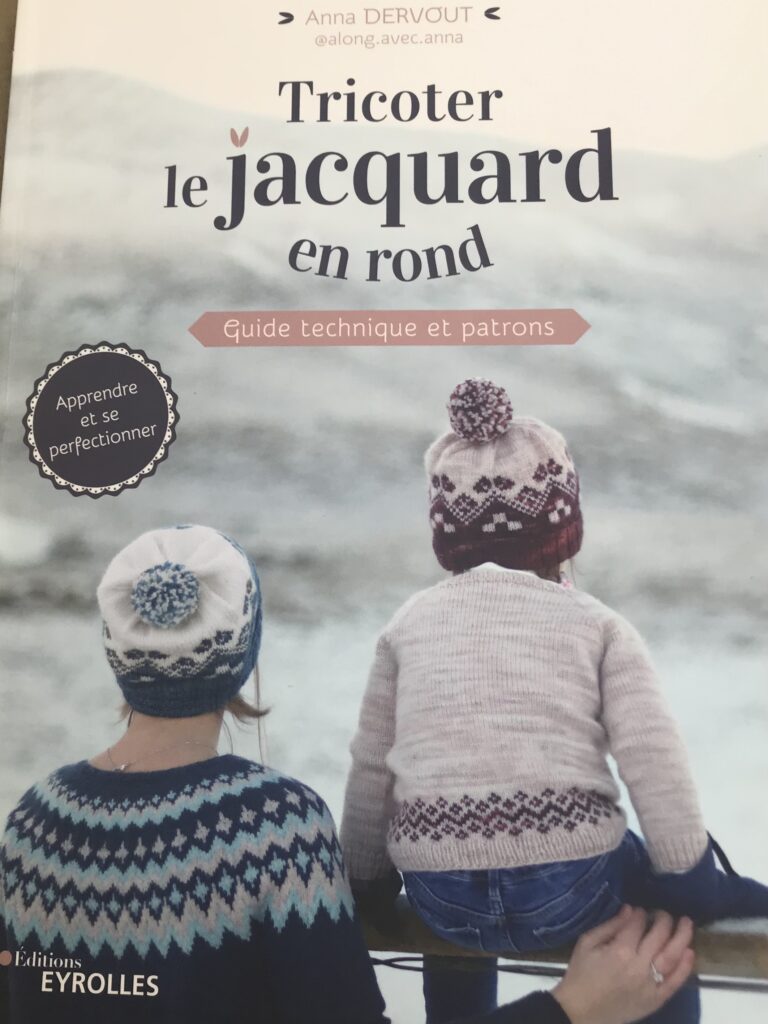
Sadly for English speakers, this book is available only in French at this stage. But if you can read (even only a little bit of French, I strongly recommend you get it, as Anna highlights a number of important issues I was very pleased to be aware of before starting.
So after reading Anna’s book (several times!) and experimenting with three jumpers (this one is my first, the two others will hopefully follow on the blog), here is my advice to stranded colorwork beginners:
- Take plenty of time to chose your colours. I am always in a hurry to move to my next project but this is not a good idea here, as you need colours that you like and that will contrast enough so that the jacquard pattern is completely visible. Anna advises to use a colour wheel and either go for colours that are opposites on the wheel; or adjacent but with very different brightness. I am definitely more into the second option.
- Start with a pattern that only alternates two colours on the same row– understanding how to alternate colours in by no way intuitive, so two colours are far enough to start with! This is the case of Bowfell but its pattern is only available in French in the book; but Marieke is available in many langages and also fits the bill.
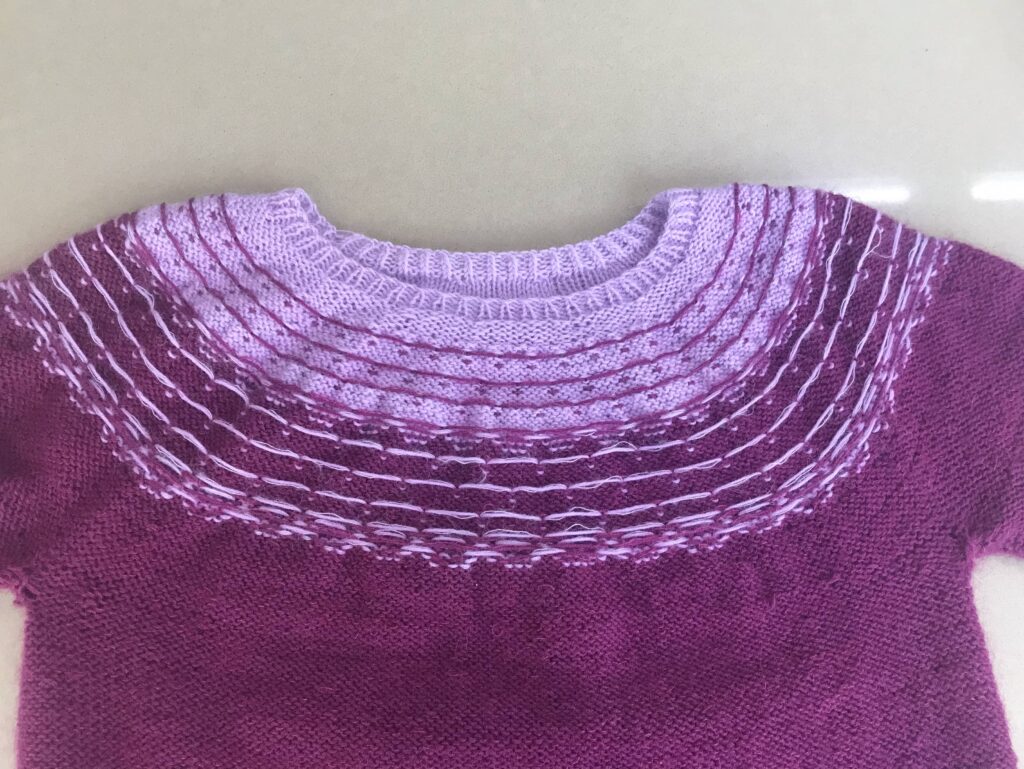
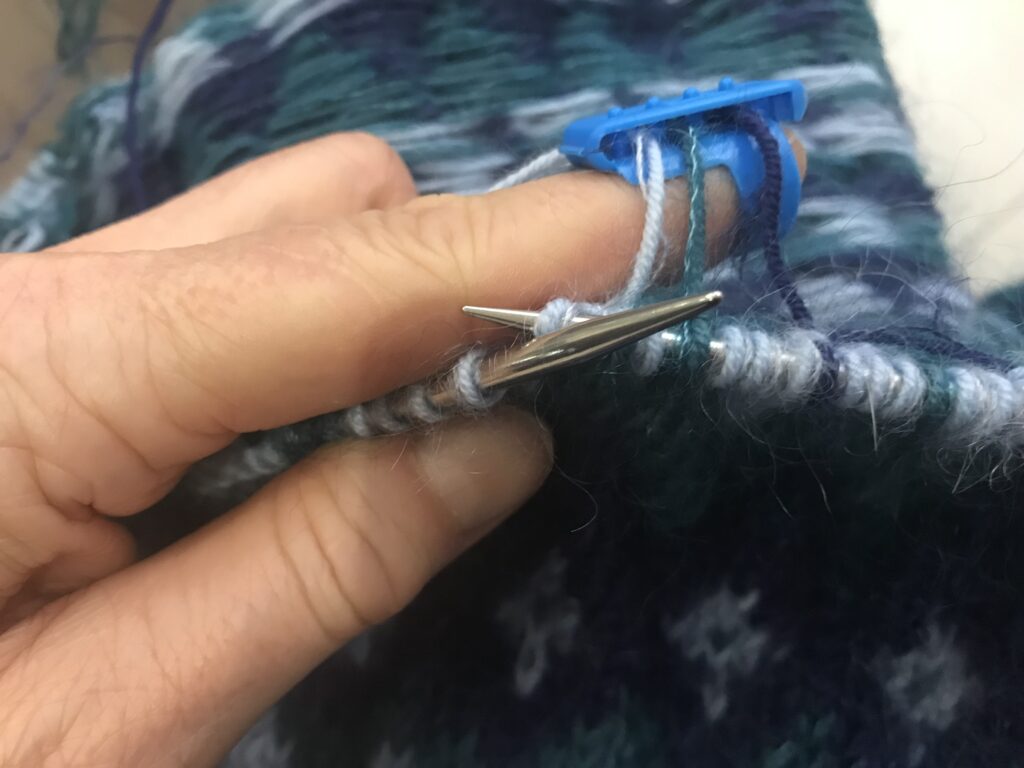
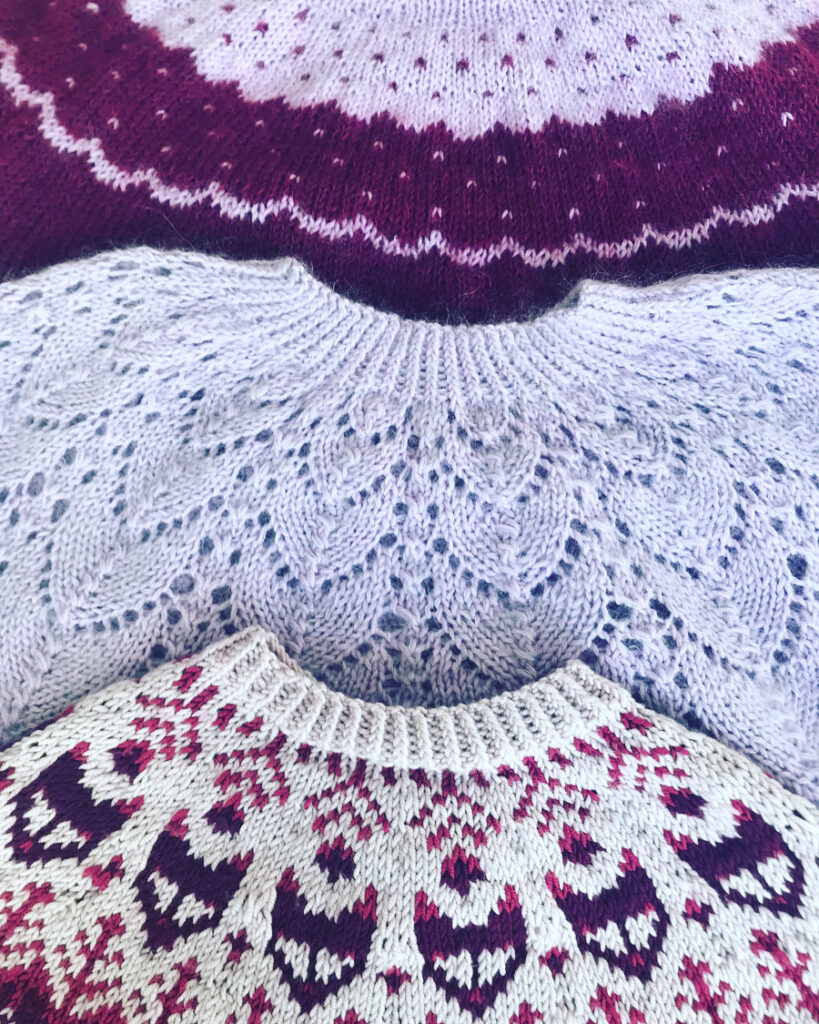
- Control your tension constantly. The hardest thing I find with stranded colorwork is not to mess up the tension of the yoke, as there is always at least one strand running free on the back of the works (those in the know call them « floats ») and it is extremely easy to make them too short. Here is the inside of my yoke so you can see what I mean. My tricks for controlling the tension are: 1/ to knit inside out, so that the float is on the larger curve of the yoke; 2/ extend my previous stitches when I insert the new colour, to make sure the float is the right length; 3/ allow for plenty of thread when I make increases (as for me this is usually whenmy tension goes wrong.
- Get yourself a yarn guide – absolutely definitely best purchase ever! For Bowfell, I knitted with one strand in each hand. But I am a continental knitter at heart and for my following projects, a yarn guide allowed me to keep all my yarns in the left hand.
- Do not make each of your colours a double-strand. I am so addicted to the Drops Kid Silk/ Baby Merino combination that I just couldn’t resist using it for Bowfell… And God what a mistake! It effectively means that you are working with four strands, increasing massively the possibility of knots. And if you decide the wind te same-colour strands together, you quickly realise that they have totally different tensions and that you always have extra Kid Silk hanging around. A nightmare!
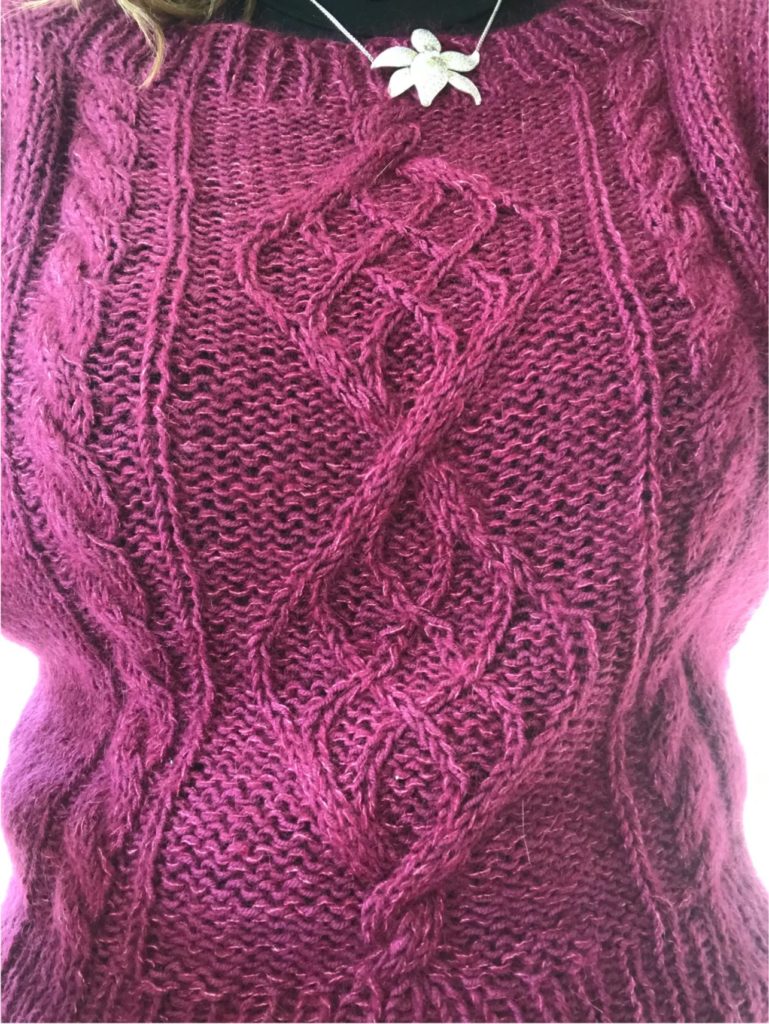
Knitting Bowfell: pattern review
All that said, I enjoyed knitting Bowfell a lot.
Technically, the pattern is perfectly suited for a stranded colorwork beginner: only two colours to alternate overall and a diagram that is quite easy to follow.
Aesthetically, it does not shout out « beginner » at all. I was actually pretty impressed with myself to manage to achieve something so pretty!
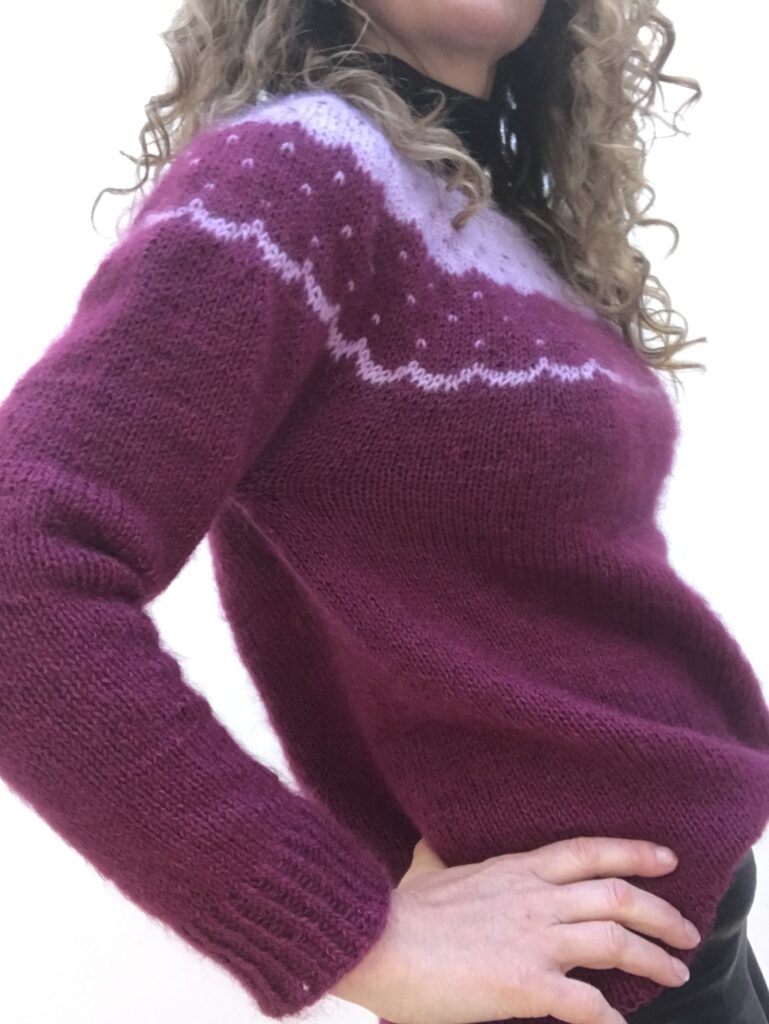
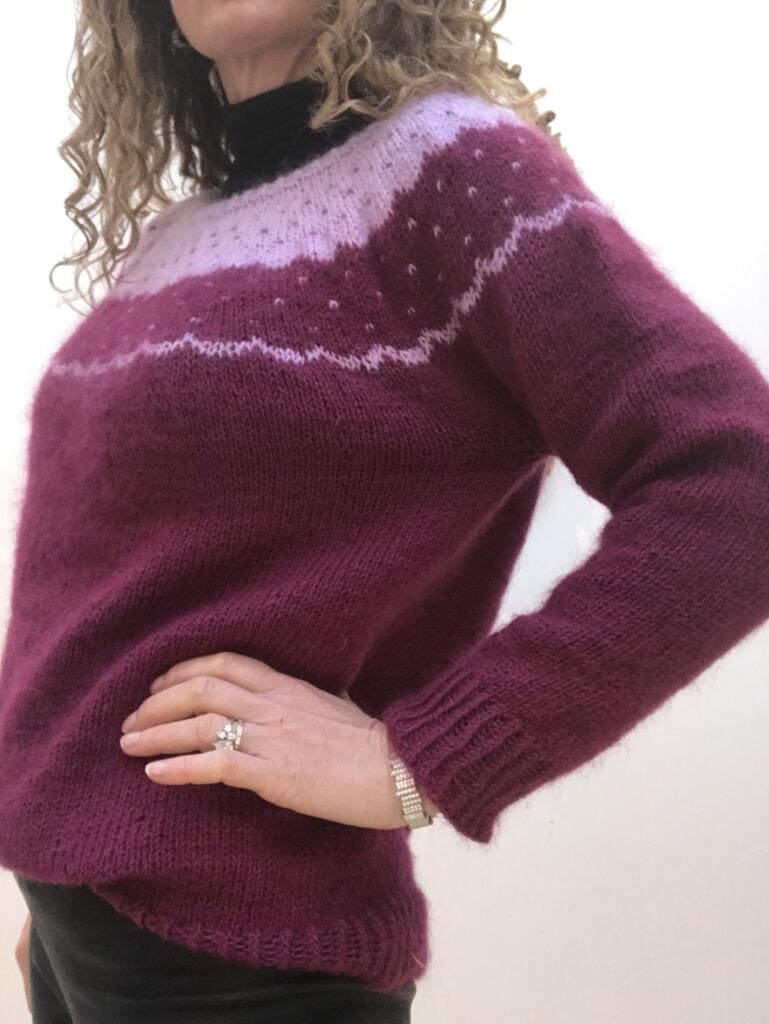
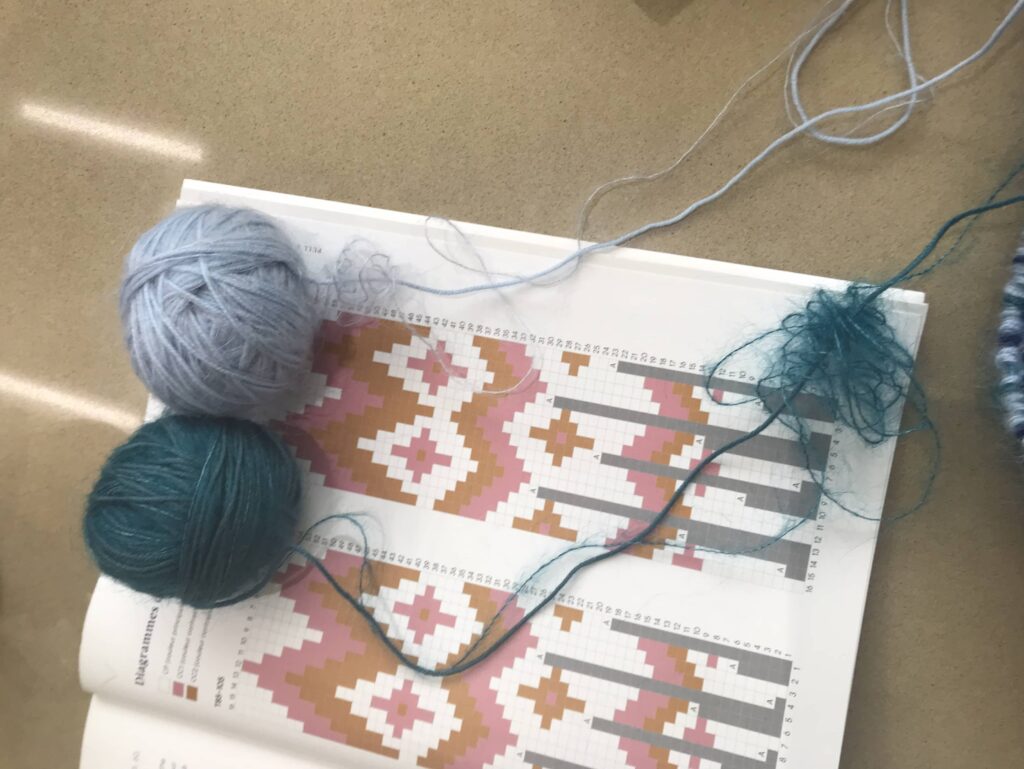
I knitted in size 4 needles and used two combinations of Drops Kid Silk and Baby Merino, already used separately for my Chuck jumper and my Belladonna cardigan:
- the dominant wine colour is made up of Baby Merino 34 Heather and Kid Silk 17 Dark Rose
- the contrasting lilac colour is made up of Baby Merino 14 Purple and Kid Silk 11 Lavender
I really like how these colours compliment each other.
This jumper is for my daughter, who at 13 is now taller than me (!!). So I knitted the second size and it is a touch big as my gauge wasn’t exactly the same as the pattern – nothing that she cannot fill while growing more though!
Conclusion
I was so excited with this first stranded colorwork experience that I immediately knitted a second jumper; and a third is still under my needles. Here is a little preview of a soon to come article I hope.
Knitting Hetty by Andy Satterlund
Although my sewing mojo has been on-and-off, my knitting has gone full team over the past two months. Here are my latest two makes, hot off the needles:
You know by now my love for the patterns created by talented Andi Sutterland of Untangling Knots. Although Belladonna is by far my favourite (see my fifth version here), I do sometimes like to venture into the unknown and try a new pattern.
Hetty was the perfect occasion, as it gathers all the conditions to join my knitting pattern Hall of Fame:
- It is a cardigan – I know it is weird but I actually rarely wear jumpers.
- It has lace and I am absolutely addicted to knitting lace, as it very elegantly hides my somewhat rushed and irregular knitting.
- The shape is fitted and cropped (as the large majority of Andi’s pattern), perfect to go with my high-waisted, mostly circle skirts.
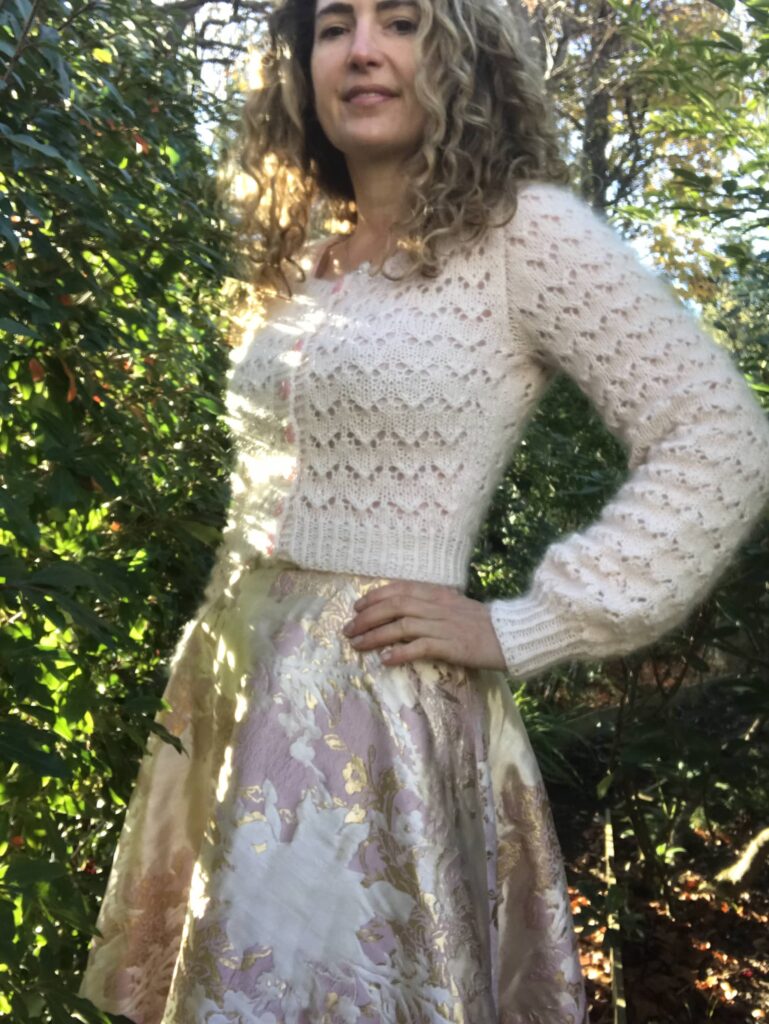
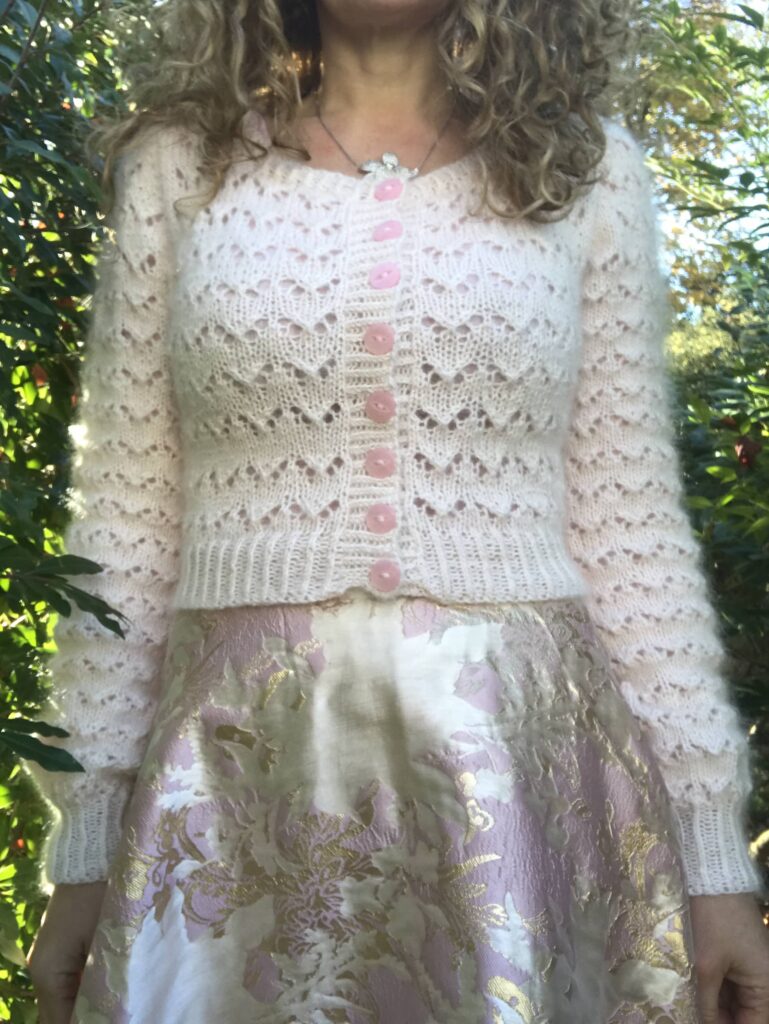
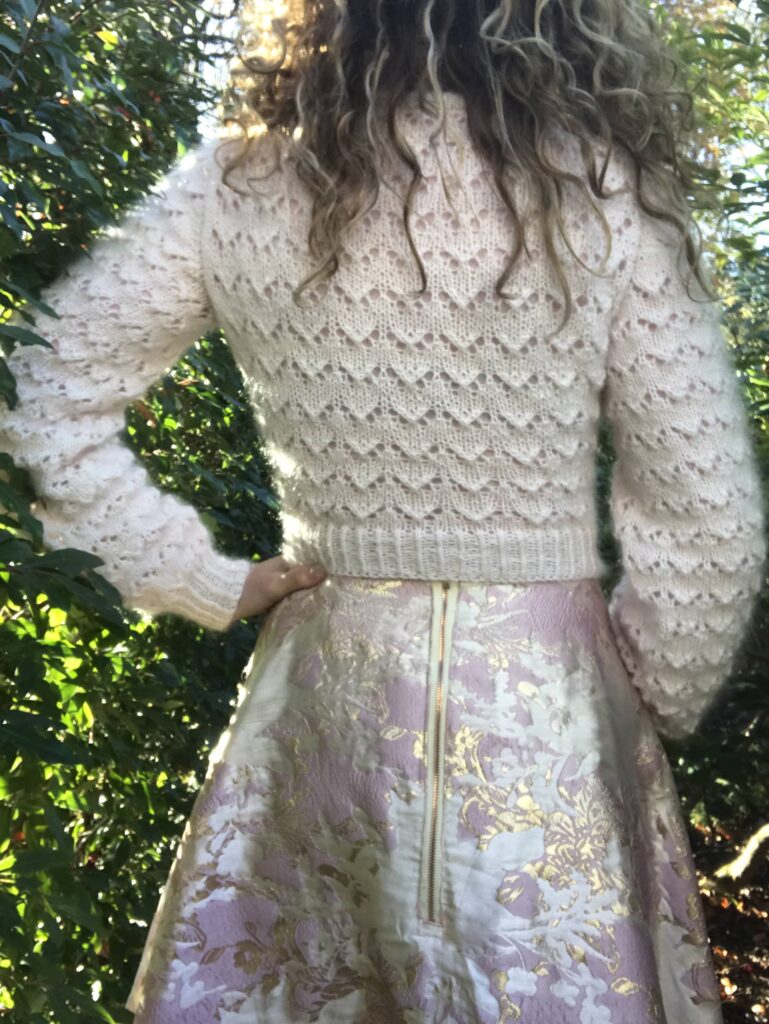
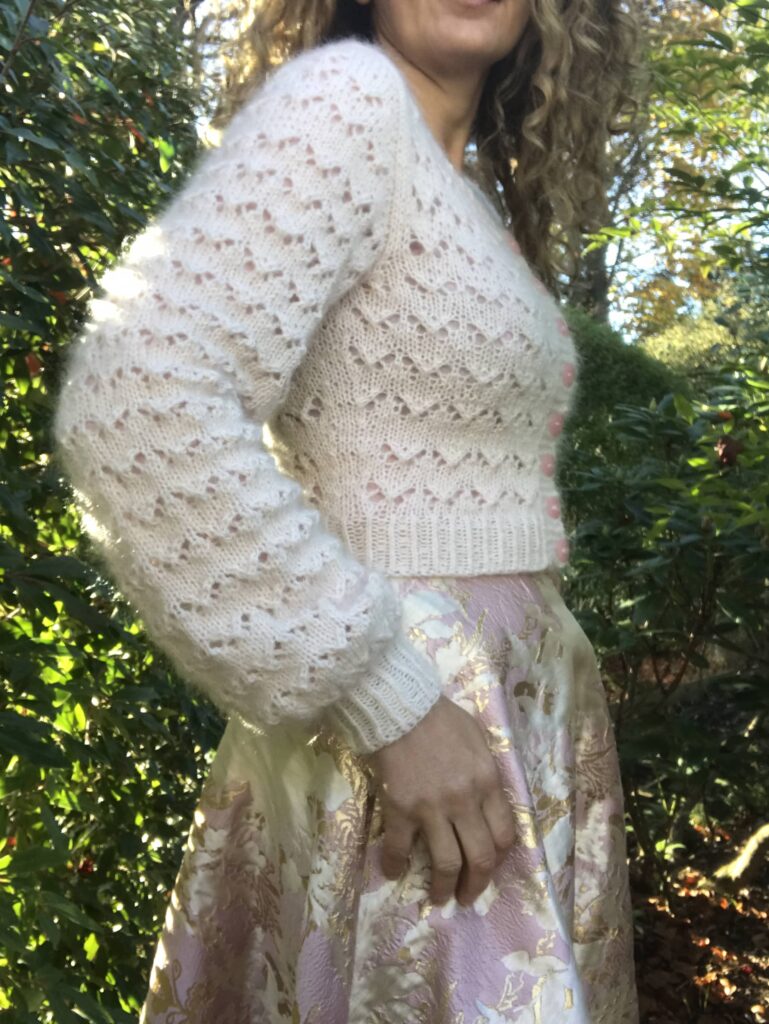
Hetty version 1 in power pink
I started with a powder pink version, using the same combination of Drops Baby Merino 54 Powder Pink and Drops Kids Silk 01 Off White I had used for my Whitmoor sweater. I truly adore this colour, with just the right amount of pink to give this subtle powder effect.
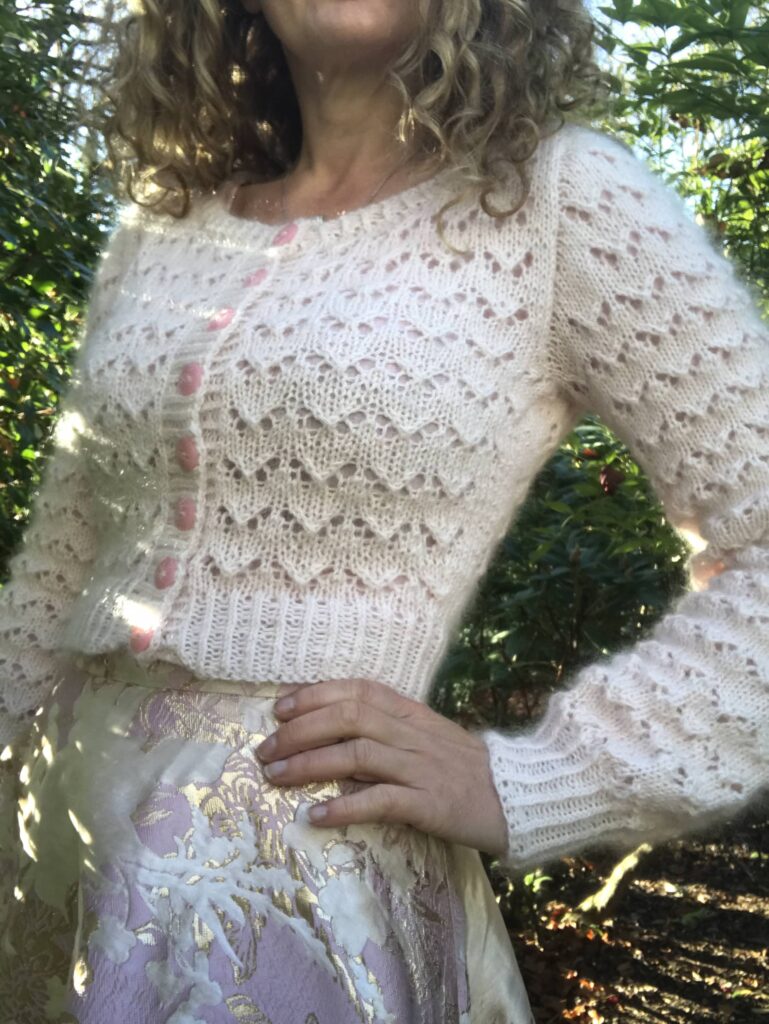
I used 5 balls of Baby Merino and 4 of Kid Silk, knitted in size 4 needles. It took me about 2-3 weeks to knit and I was extremely pleased with this cardigan, as the lace is easy to memorise and looks lovely.
I made two changes to the initial pattern:
- I knitted bishop rather than tapered sleeves. To do this, I made no decrease to my sleeves up to the cuffs, where I halved my number of stitches; and I knitted much longer sleeves (50cm from underarm to cuff, then 6cm of cuff). Beware, it does take ages to knit!
- I made the button placket slightly larger to accommodate my bust, but stupidly I somewhat did not follow the instructions properly at the bottom of the placket and you can very obviously see the resulting mess. Oh well…
My only dislike with this cardigan is that it is extremely short. It sits slightly above my skirts’ waistline and it drives me crazy (you can’t tell on the picture as I cheated a bit by pulling the cardigan down just before – the girl is so vain…). I think is it probably because my E cup bust pulls everything up so if you are a lower cup size it might be OK.
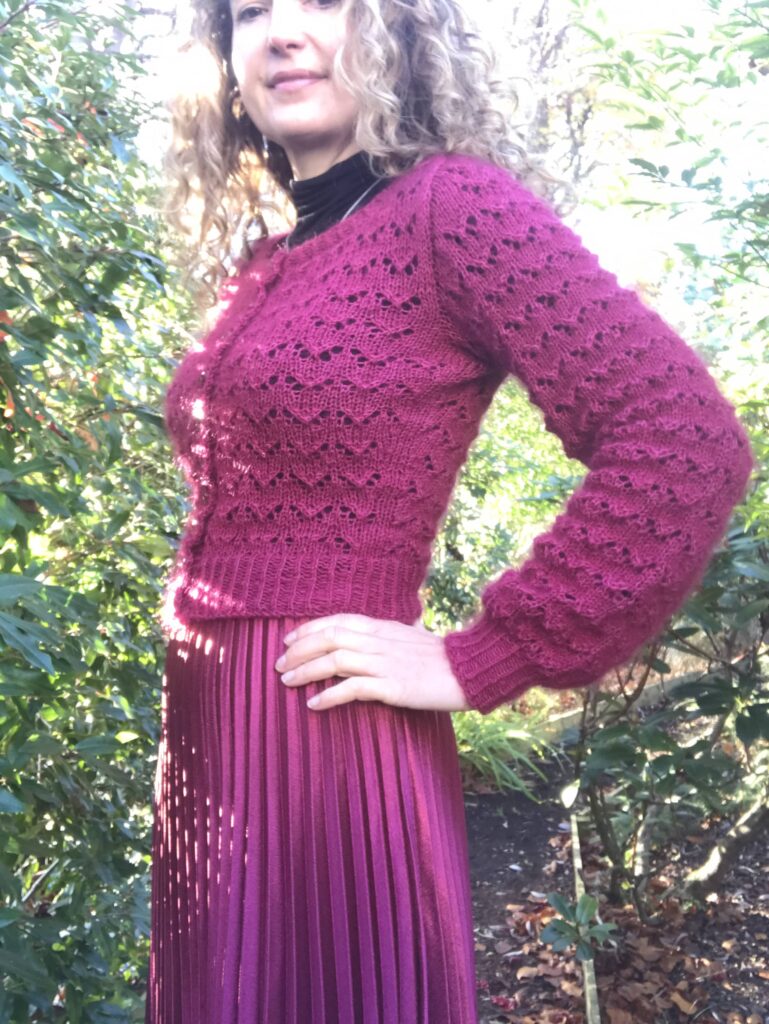
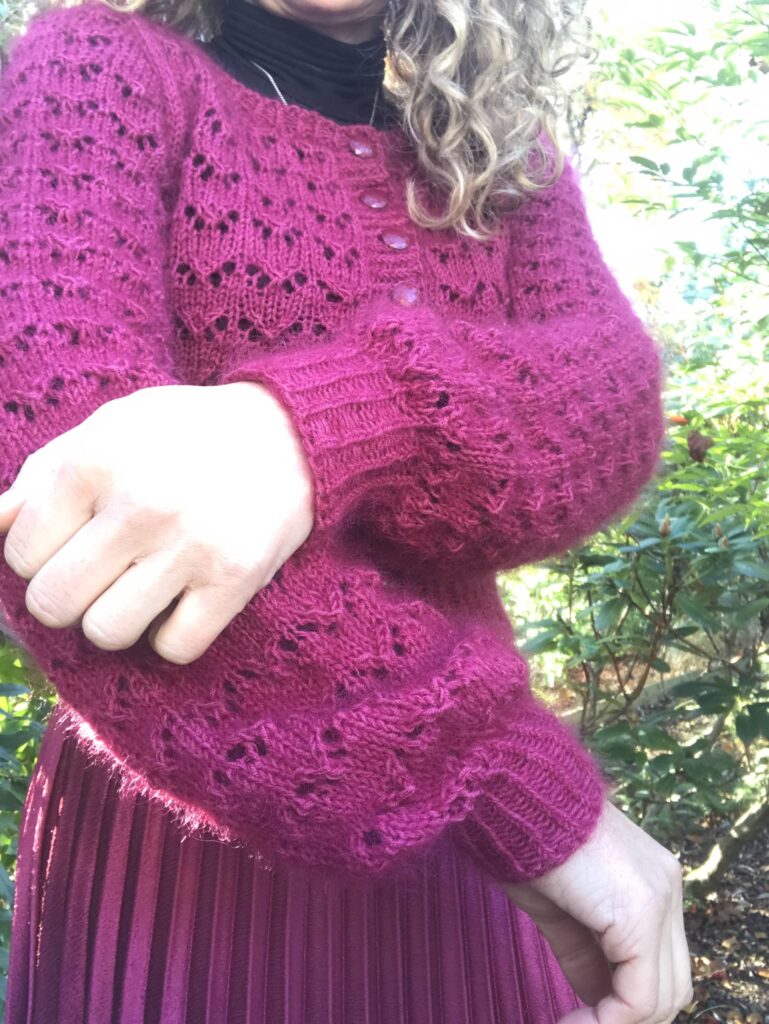
Hetty version 2 in strawberry pink
So I obviously needed to have a go at a second, longer version of Hetty (preferably without messing-up the button placket). This time I combined Drops Baby Merino 41 Plum and Drops Kids Silk 17 Dark Rose.
To increase the length, I just added one row of lace before starting the waist ribbing and this length is absolutely spot-on!
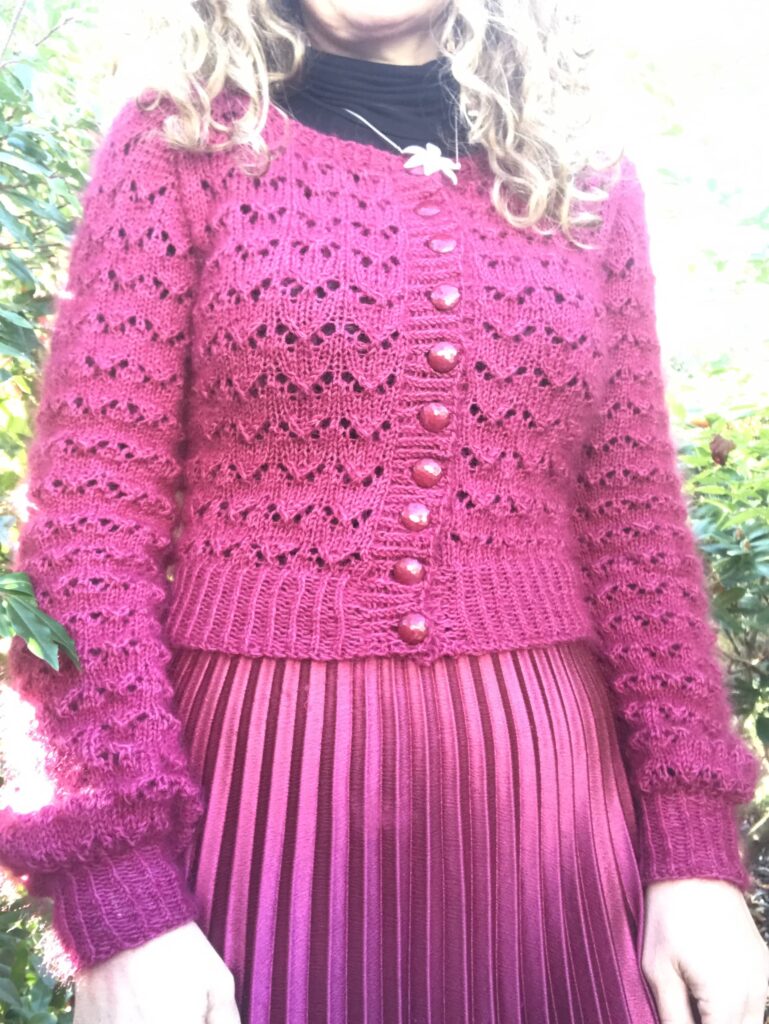
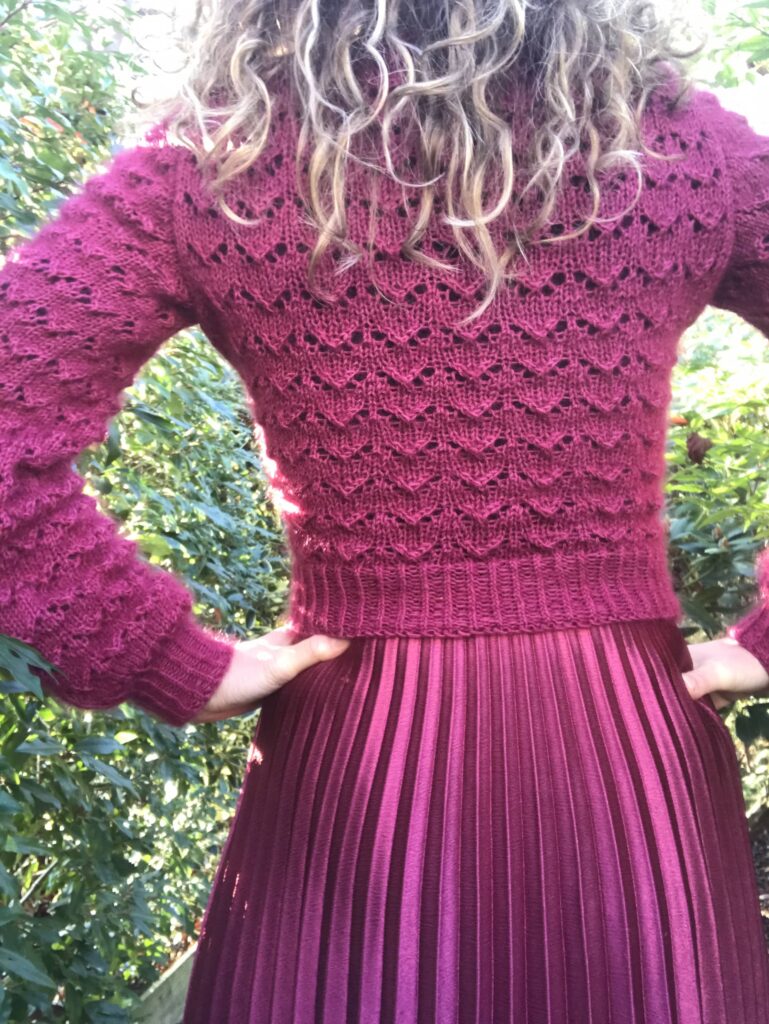
I also went for a larger button placket and bishop sleeves here – these sleeves are so much more comfortable than the tapered one, they are really worth the extra knitting effort!

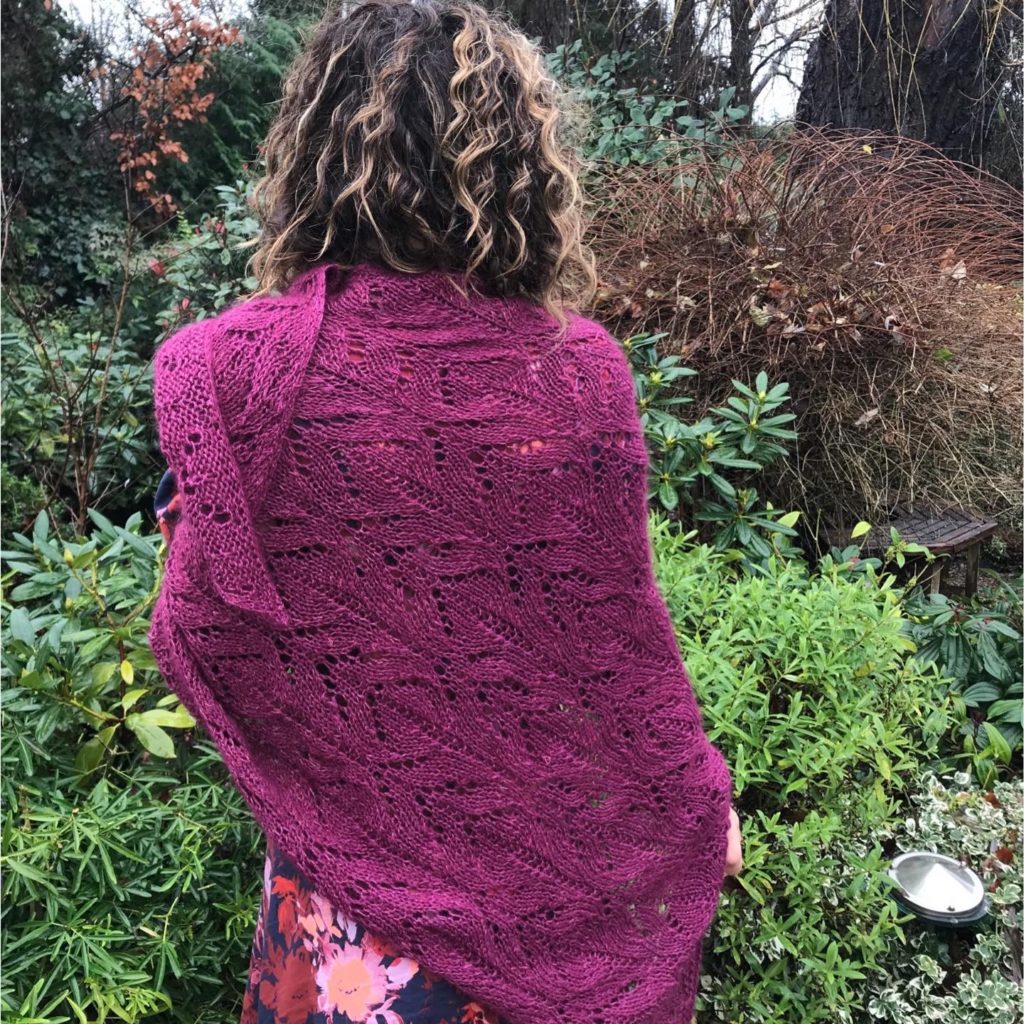
I am very pleased with this colour, which is just this little bit brighter than the one I used for my Icon dress, my Chuck sweater and my Blossom Shawl (for this I used Drops Baby Merino 34 Heather and Drops Kids Silk 17 Dark Rose).
Conclusion
I am extremely pleased to have found a new pattern to add to my favourites, so don’t be surprised to see a few other versions in the coming months…
All my favourite patterns in one dress
I love sewing dresses and although I am not so keen on self-drafting, I have reached the stage where I have a few tried and tested patterns which I can comfortably manipulate to create new designs. So let me introduce you to shirt dress of my dreams, which is the result of mixing, matching and hacking three of my favourite patterns.
Inspiration: a more feminine take on the shirt dress
The inspiration from this dress comes – yet again – from Bittersweet Colours. Veronica wore several versions of this dress over Spring and I immediately fell in love with the shape.
I have had quite a fancy for shirt dresses since Spring 2021 and have sewn a surprising number considering my fear of buttonholes (largely healed since my sewing machine went for its long-overdue maintenance).
All of them were based on the McCall’s M6696 bodice, combined with the Butterick B6702 skirt for the two midi dresses. I really like these dresses and have written blog articles on all of them (here, here and here).
I was always ambivalent about the collar though: on the one hand I find it quite masculine and definitely not my style; but on the other hand a shirt dress without a collar is not really a shirt dress anymore, right? So seeing Veronika’s dress was a revelation: a shirt dress collar could actually be made much more feminine!
Realisation: combining three of my favourite patterns
To make this dress, I mixed, matched and hacked three of my favourite, tired-an-tested patterns: V8630 (on the blog here and here), V9327 (here and here) and M6696 (here, here and here). All of these fit to perfection and have never failed me.
V8630 for the collar and the bodice
Except for its asymmetry and its width, V8630’s collar shape is quite similar to that if this inspiration dress.
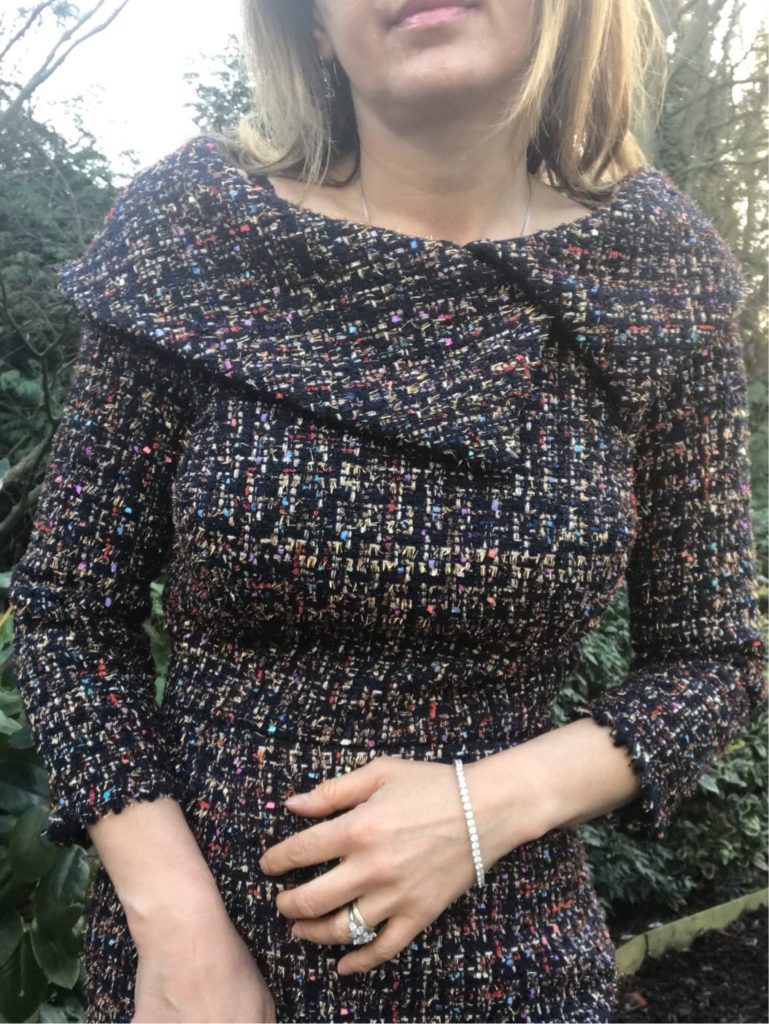
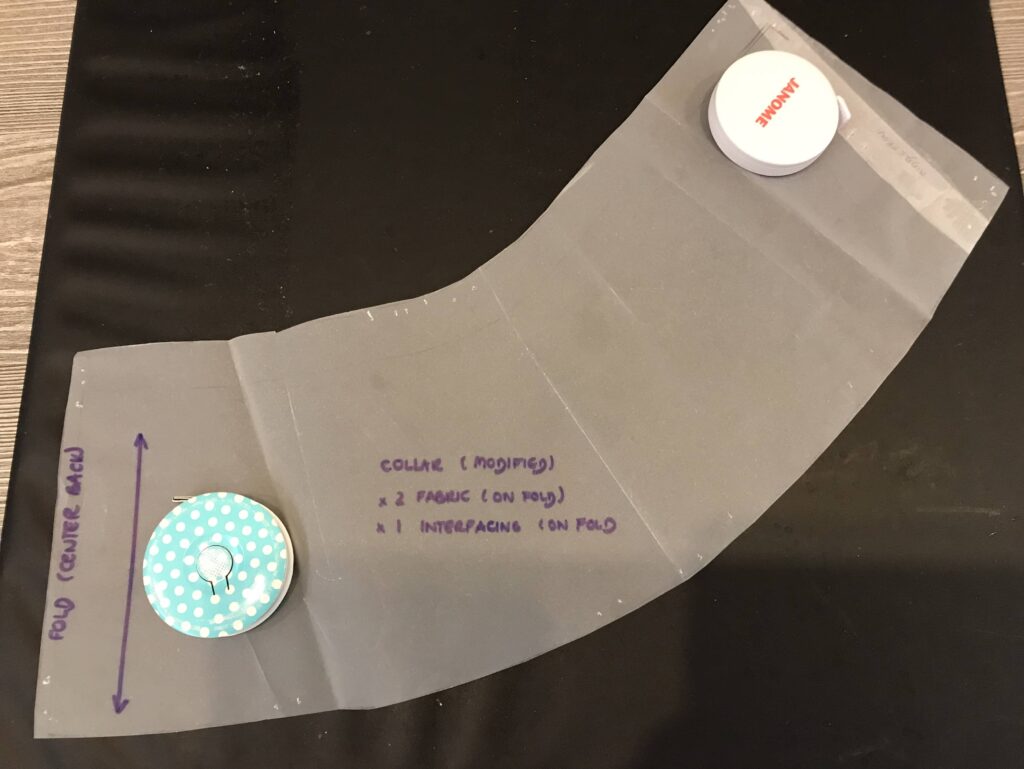
I used the right side of the original collar piece (the longer, overlapping at the front), which I reduced to the centre front (indicated on the pattern) and shortened in width by 4cm. I also slightly reduced the collar point projection after checking on a quick muslin.
The new collar (on the left) versus the old one (on the right) looks like this.

As for the bodice, V8630 is one of the best-fitting bodice I have ever encountered, thanks to its numerous darts, so I was very keen to use it.
The only change I made to the bodice was that instead of cutting the front piece on the fold, I cut two pieces, without adding any seam allowance in the middle.
V9327 for the skirt
V9327 has a simple midi semi-circle skirt, with only a front and a back panel.
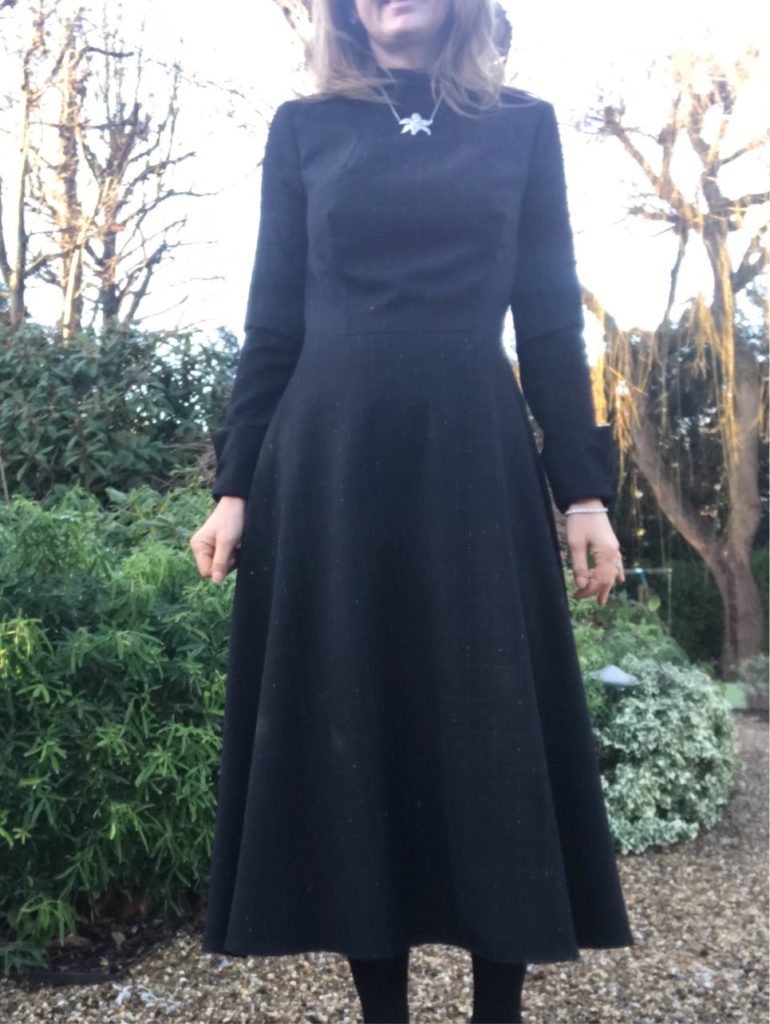
So for the sack of simplicity I thought it would work better than the multi-panel B6702 midi skirt used in my Spring 2021 shirt dresses. Here as well I cut two pieces for the front skirt with no extra seam allowance.
M6696 for the button placket and the sleeve cuffs
I used the M6696 button placket for inspiration, as I wanted to make mine slightly narrower and it also needed to be longer to accommodate the midi skirt. I also used the sleeve cuffs, by adjusting the width and length of my V8630 sleeves to match the M6696 three-quarter ones.
Fabric used and final touches
For this dress, I used a gorgeous cotton suiting fabric, which has similar weight and drape to wool suiting but without the itchiness. I found it on my first ever (but definitely not last) trip to Goldhawk Road, which I really should have documented as it was such an amazing experience – I promise I’ll document the next one!
I lined the entire dress by simply replicating the pattern pieces, with a cotton chambray leftover for the bodice and with antistatic lining fabric for the skirt.
I spaced the buttons quite close to each other (there are 16) and added a waist-stay (see this article for more details on what a waist-stay is and how to make one).
Conclusion
The conception stage took me ages for this project, as I wasn’t quite sure where to start. I am pleased I spent so long thinking about it though, as I am thrilled with the result, this dress is exactly how I envisioned it.
Making tops: a Belladonna cardigan and a Libra bodysuit
I am notoriously bad at sewing tops, as I always think it requires a similar effort to sewing a dress for half the benefit – you end up with only half the outfit, why bother! However, my new passion for knitting cardigans has led to more skirt sewing, which is itself leading to more needs for tops. That’s exactly the process I followed here.
First, there was a lilac skirt…
The skirt was sewn in Spring 2021. I did not document it at the time, as it is a very basic full circle skirt, using the bottom part of my beloved M7081 pattern. It looks quite special though, as I receive compliments from complete strangers every single time I wear it.
The fabric truly makes the skirt: it is quite a rigid cotton, perfect for the circle shape; the Japanese floral print with touches of gold is extremely pretty; and this lilac colour is exactly to my taste. You can actually still buy it (and many other similar prints) here. One word of caution: you can put it in the washing machine but always on a low temperature (30 C), low spin (600) cycle, otherwise the gold will go!
… which led to a lilac Belladonna cardigan…
I initially bought a RTW purple cardigan to wear with this skirt, which you can see on the above pictures. But it did not fully satisfy me, as I have become as fussy with knitted tops as I am with other garments. So obviously a hand-made cardigan had to happen! And obviously it had to be lilac.
I had a go at a self-drafted wrap cardigan, but after completing the all thing (sleeves included!), I never managed to design a nice wrap closure – arrgghhh! After this very frustrating experience, I reverted to my tried-and-trusted Belladonna pattern by Untangling Knots – this one in my fifth version (the first three are here, here and here, the fourth still needs to be photographed) and I am so pleased with it!
I am a huge fan of the Untangling Knots knitting patterns and Belladonna is by far my absolute favourite. The fitted and cropped shape is perfect to wear with my high-waisted skirts; the lace pattern, which appears both at the front and at the back, it stunning and not overly complicated; and the cardigan knits in size 4 needles, my favourite size – I am too impatient for anything smaller but I dislike chunky knits so cannot really go any bigger.
To get this vibrant lilac colour and this fluffy effect, I used a combination of Drops Kid Silk (09 light lavender) and Drops Baby Merino (15 light purple), which I knitted in double yarn. There are quite a few lilac variations within the Drops range and this colour combination is perfect – well, if you like lilac of course!
I knitted the smallest size of the pattern and I made two small changes:
- I raised the neckline, as I find the original low neckline quite unpractical to wear with dresses. This is easy to do, you just have to start making increases for the neckline earlier than indicated in the pattern (after one repeat of lace in this case).
- I knitted bishop sleeves instead of tapered sleeves. I discovered them while knitting my Whitmoor Sweater and I find them way more comfortable. Here as well very easy: you just omit the decreases indicated by the pattern, make the sleeve about 10cm longer then half your number of stitches at the cuff.
… which led to a lilac Libra bodysuit
Obviously I was still not fully happy with this outfit as it missed a key piece: a top to wear underneath the cardigan. I wear mostly bodysuits in the winter, to avoid any draughts (!!!). After looking desperately for a lilac bodysuit on all the online clothing shops I could think of and not finding anything in that colour, I had to accept that sewing one myself was the only way forward.
I used the Libra bodysuit pattern by French Poetry. I was looking for a streamlined shape, a reasonably modest neckline and, most importantly, long sleeves! – and this pattern perfectly fitted the bill. I had never sewn any French Poetry pattern before and I was extremely pleased with this one:
- The explanations are very clear and detailed, which somewhat compensated my displeasure of having to sew this type of garment.
- It takes no time to put the garment together, as there are only three pattern piece. What took me much longer was the neckline and sleeves finishes, as I was using my cover-stitch machine for the first time and… well… a few hair-pulling scenes happened here and there…
- The fit is amazingly good, even for my long torso, as there is a specific section explaining how to adjust for torso and crotch length. I sew a size 38 and added 1cm both at the crotch and at the torso and here we are!
The only thing I dislike is that the back is designed in two pieces, resulting in a very visible seam, but it makes the swayback fit perfect so I am not sure how to get rid of it. Oh well…
In any case I was so pleased with this bodysuit that I ordered fabric for another… four! And I have already managed two, I’ll write a specific article when there are all done. By the way the fabric is a rib knit of unknown fibre content, found on E-Bay for next-to-nothing and surprisingly comfortable to wear.
Conclusion
A bit of a convoluted article but at least it shows you how I go from one project to another to create a co-ordinated outfit! – I’m very much a matchy-matchy girl I’m afraid!