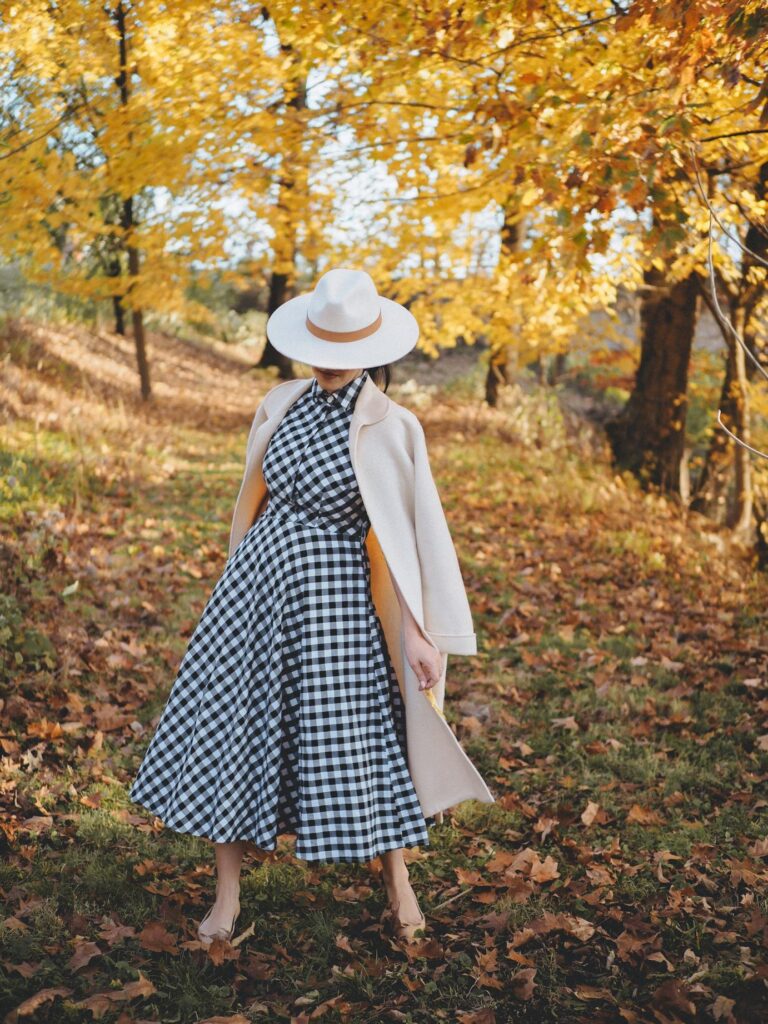
My little gingham dress
Black and white gingham seems to be everywhere this Spring. Having no shame to follow the crowd, let me introduce you to my latest Spring make, a very simple knee-length, fit-and-flare, black-and-white gingham dress:
Gingham dresses inspiration
I had been wanting to sew a little gingham dress for ages and this Spring the stars finally aligned: I managed to find not only the inspiration but also the right pattern and the right fabric, all at the same time. Hurrah!
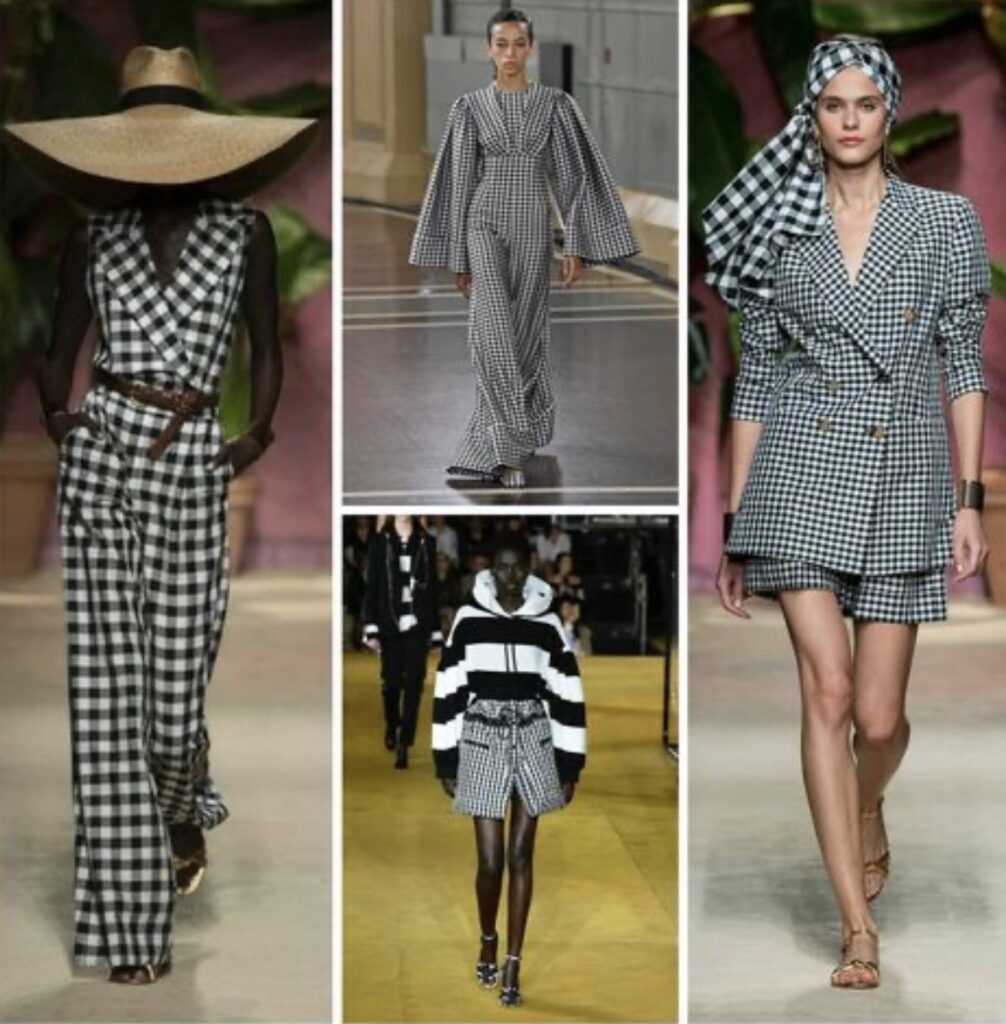
As discussed in my “What to sew for Spring” article, the main inspiration for this dress came from Bittersweet Colour. I wanted to reproduce this beautiful dress, with a bias-cut perfectly fitted bodice and a midi circle dress.
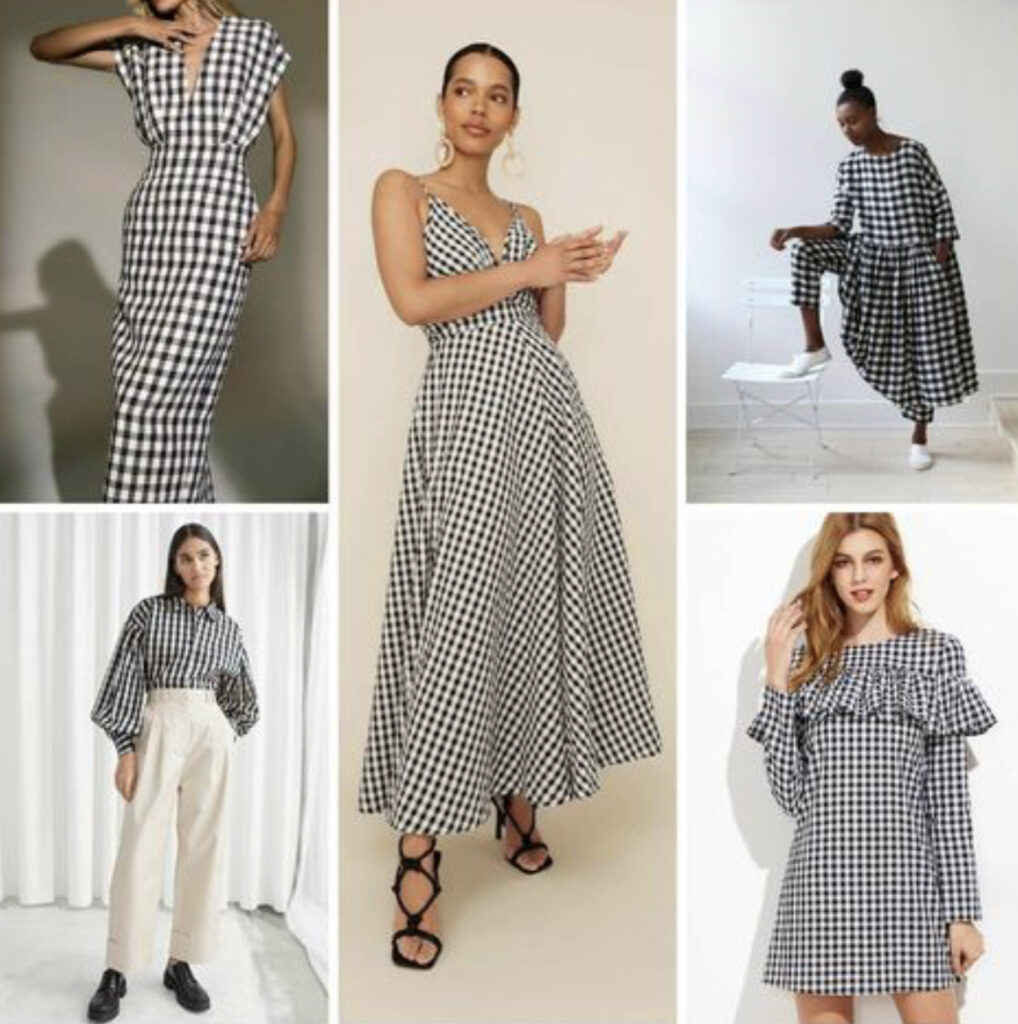
Funnily enough, I also stumbled across a number of black and white gingham dresses on Instagram – here are a few (moodboards from The Sweet Mercerie, middle dress from Cha’s Hands):
I also found the perfect black-and-white gingham fabric from Fabrics Galore: 100% cotton (I really don’t recommend a poly mix for the summer); with just the right size of gingham – 1cm (1/3in); and very affordable (about £8/m). The black-and-white in not available anymore at Fabrics Galore but they have other colours of similar quality here; and Sew Me Sunshine has a good selection too here.
Pattern selection and review
As for pattern choice, I wish I had been brave enough the tackle a shirt bodice similar to my inspiration dress. However I worried (a lot) about pattern matching on the bias so I just went for the most straightforward and best fitting bodice I could think of: that of V8630.
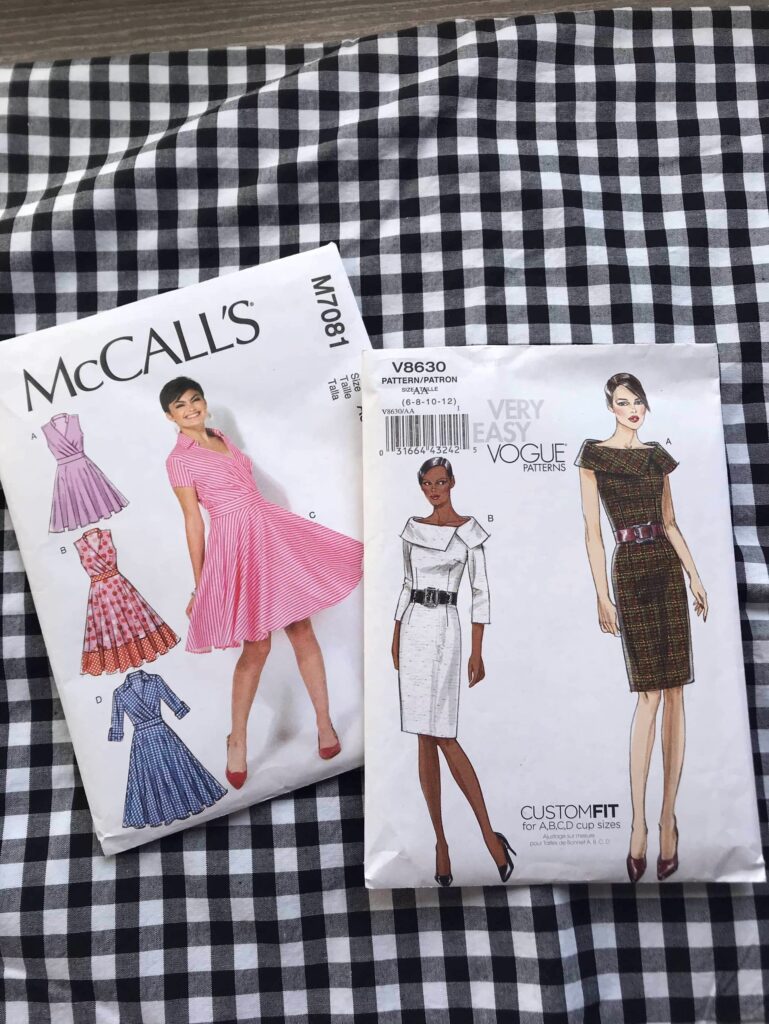
I have been singing the praises of this pattern before (here and here). I have also reused the bodice with other skirts numerous times (here, here among many others) because it just fits so well. It has bust-cup options and both bust and waist darts, which with my E-cup and my small waist is the best recipe for a good fit. To make the bodice work without the collar, I had to raise the neckline using another pattern as a guide – nothing very complicated. And here I cut my fabric in the bias for purely aesthetic reasons, I just think it works much better this way with a circle skirt.
As for the skirt, I used my tried and tested M7081 circle skirt pattern piece (like I recently did for this skirt). It is the perfect length for summer (just on the knee) and it fits exactly in a 150cm wide fabric. Not the case of this specific fabric but cutting it non grain wise wasn’t an issue, especially as my bodice was on the bias.
I had initially omitted a sash but did not like the way the bodice connected to the dress. So I used the sash of V9253, another of my beloved pattern. Problem sorted, hurrah!
Conclusion
This is a very easy dress to make, with only four pattern pieces: circle skirt, front bodice, back bodice and sleeves. I finished the neckline with piping (not sure it was hugely necessary) and for once I did not line anything, as this one is solely aimed at warm days.
Despite this simplicity, the shape is perfectly to my taste: a nicely fitted top with a spinning skirt, everything I like! I am very tempted to make a sleeveless version now.
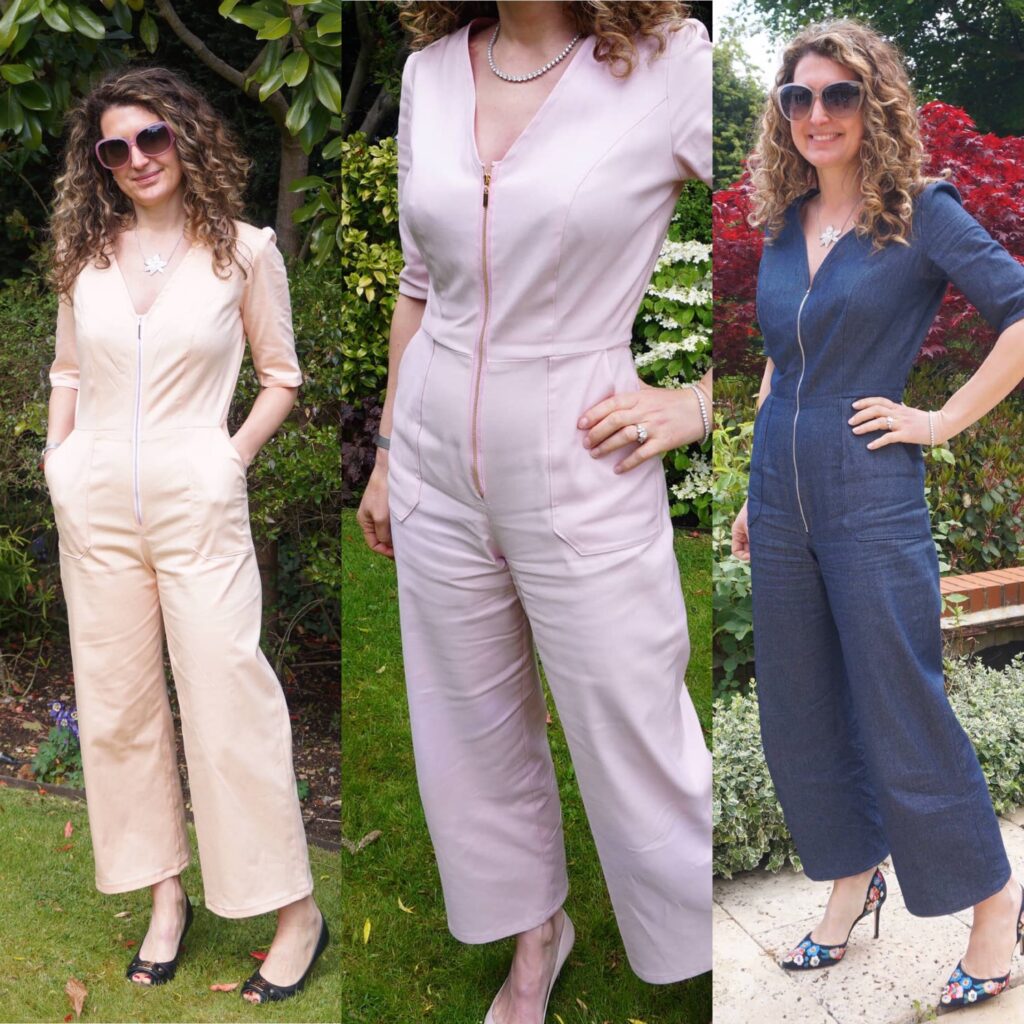
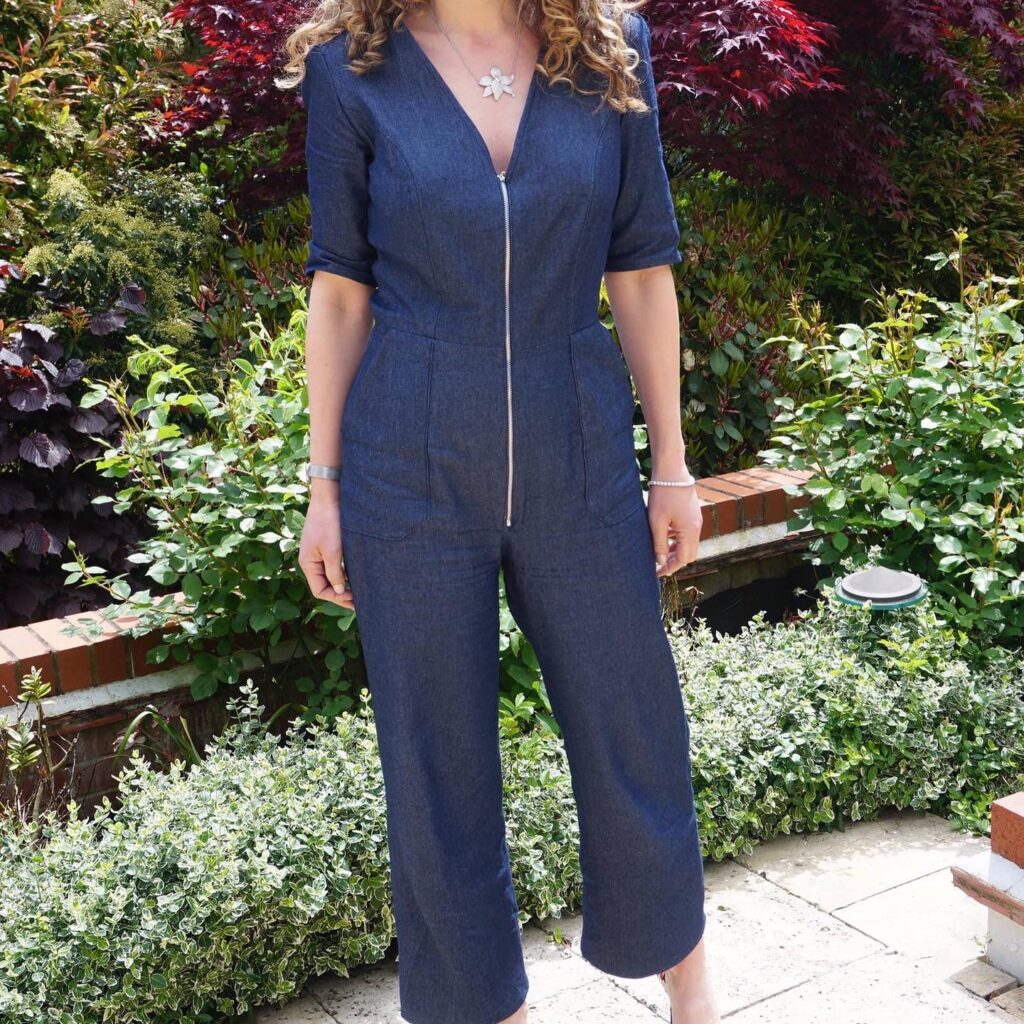
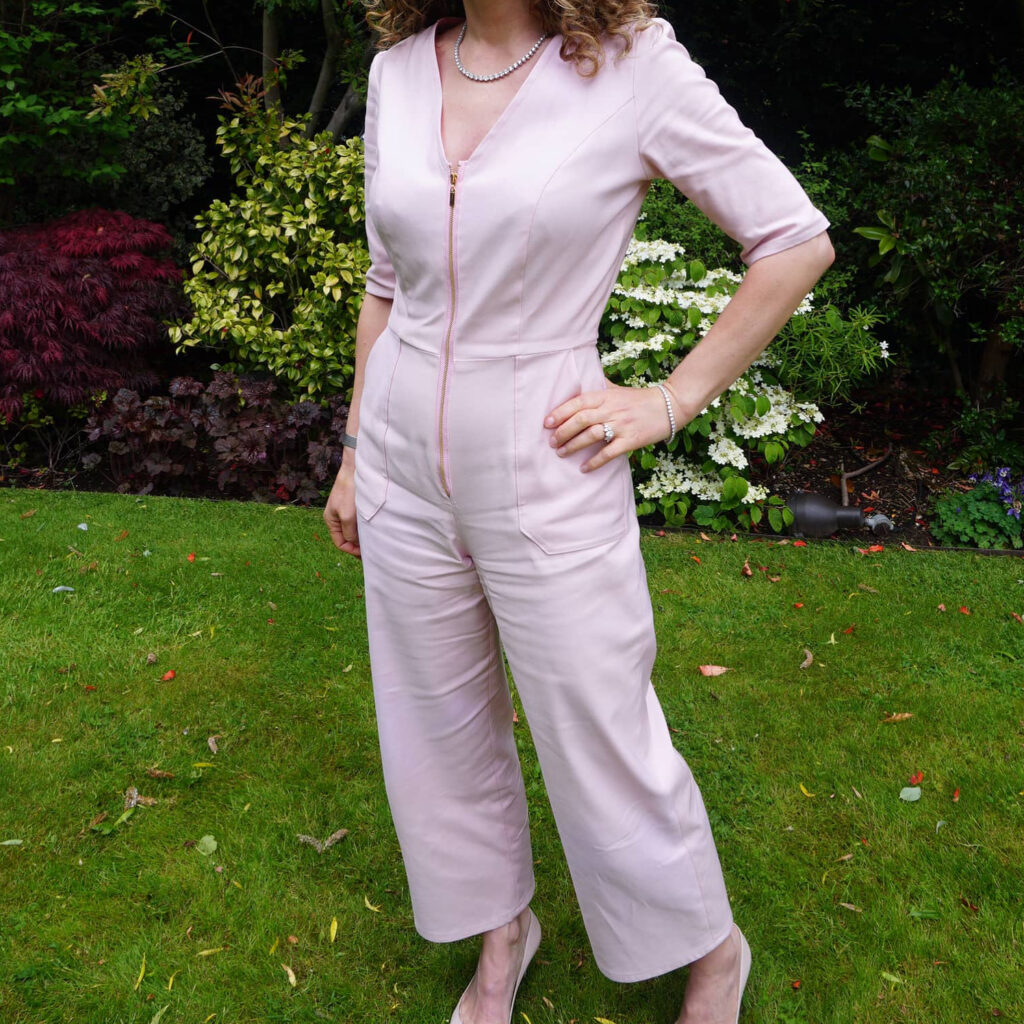
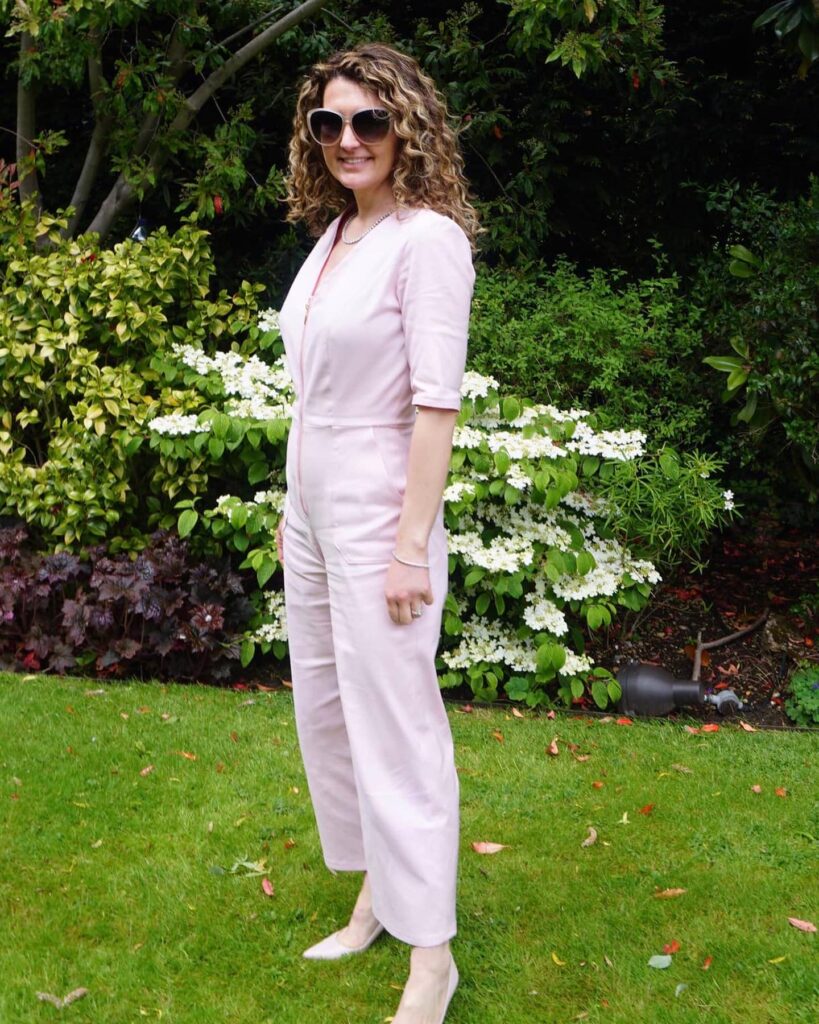
Which jumpsuit to sew? M7908 of course… three times!
As you know, I am a bit of a matchy-matchy girl and rarely sew separates for this reason. Dresses are therefore my go-to garment. Jumpsuits are also a good option and I think I have found a really attractive pattern: let me introduce you to my three versions of M7908.
Which criteria for the right jumpsuit?
I fully embrace the idea of jumpsuits – a dress with legs, genius! – and jumpsuit patterns have proliferated over the past few years. However, when it comes to choosing which pattern to sew, I must admit I am super fussy. Here are my non-negotiable criteria:
- It must be easy-peasy to take off for loo-breaks. Sorry to be so basic but I am not making clothes to have practical problems with them several times in the day.
- The top and waist must be perfectly fitted, because for me this is definitely the area I want to draw attention to. No potatoes sack (as my husband calls them) for me I’m afraid!
- The legs must be super flattering – because saying that I am not a fan of my legs is an understatement.
- It must fit my long torso – I wish the length was in my legs but it sadly isn’t…
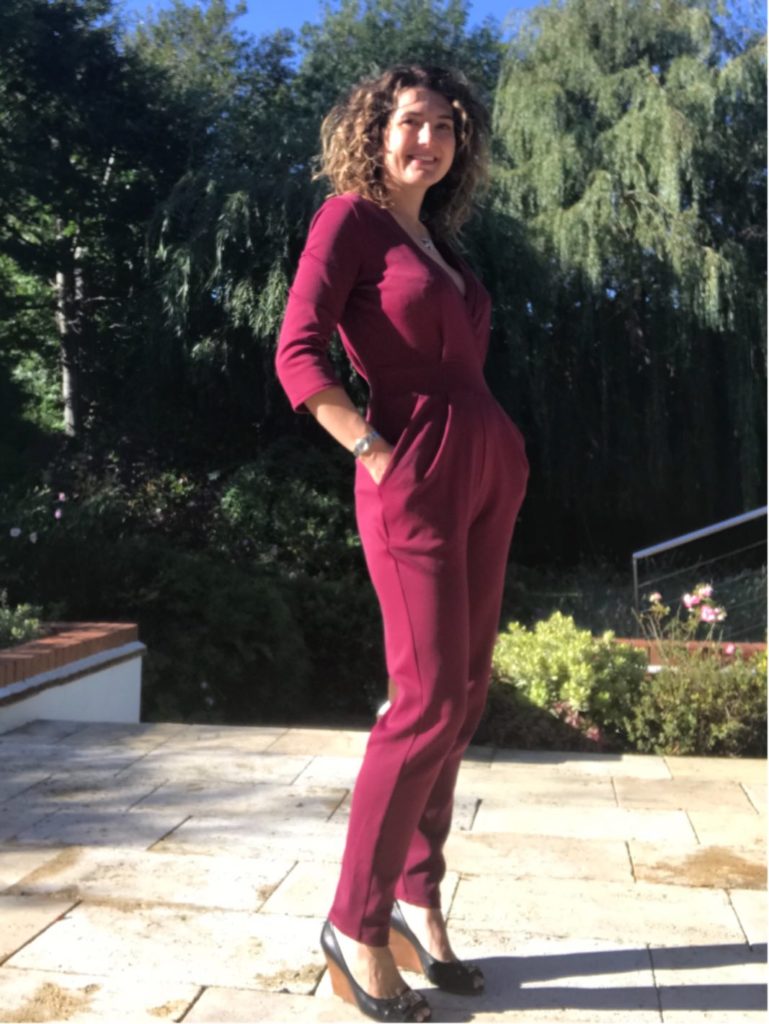
Up to now, I have been tempted by many jumpsuit patterns but the only one that fitted all my criteria was Sirroco by Deer&Doe – see articles here (black versions), here (pink) and here (burgundy).
M7908 turned out to be the woven version of Sirocco (which is designed for jersey fabrics):
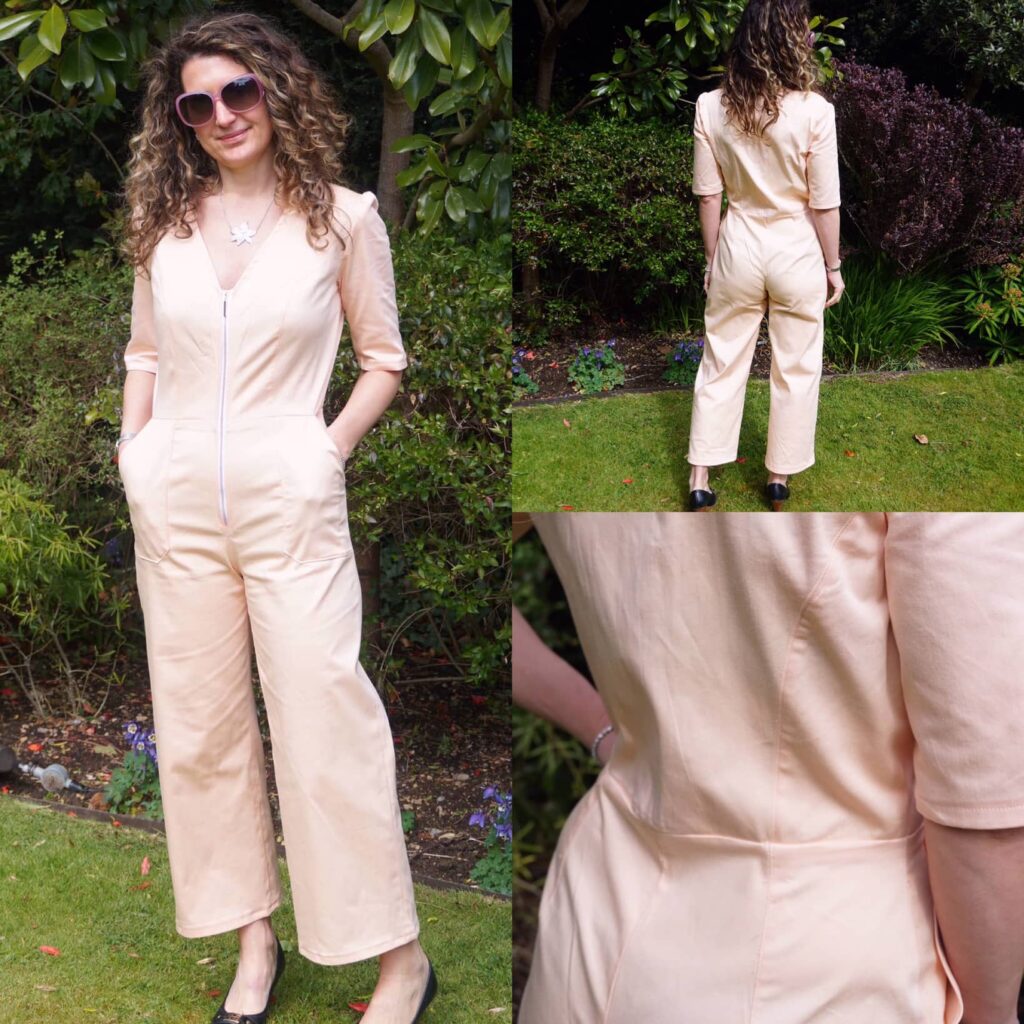
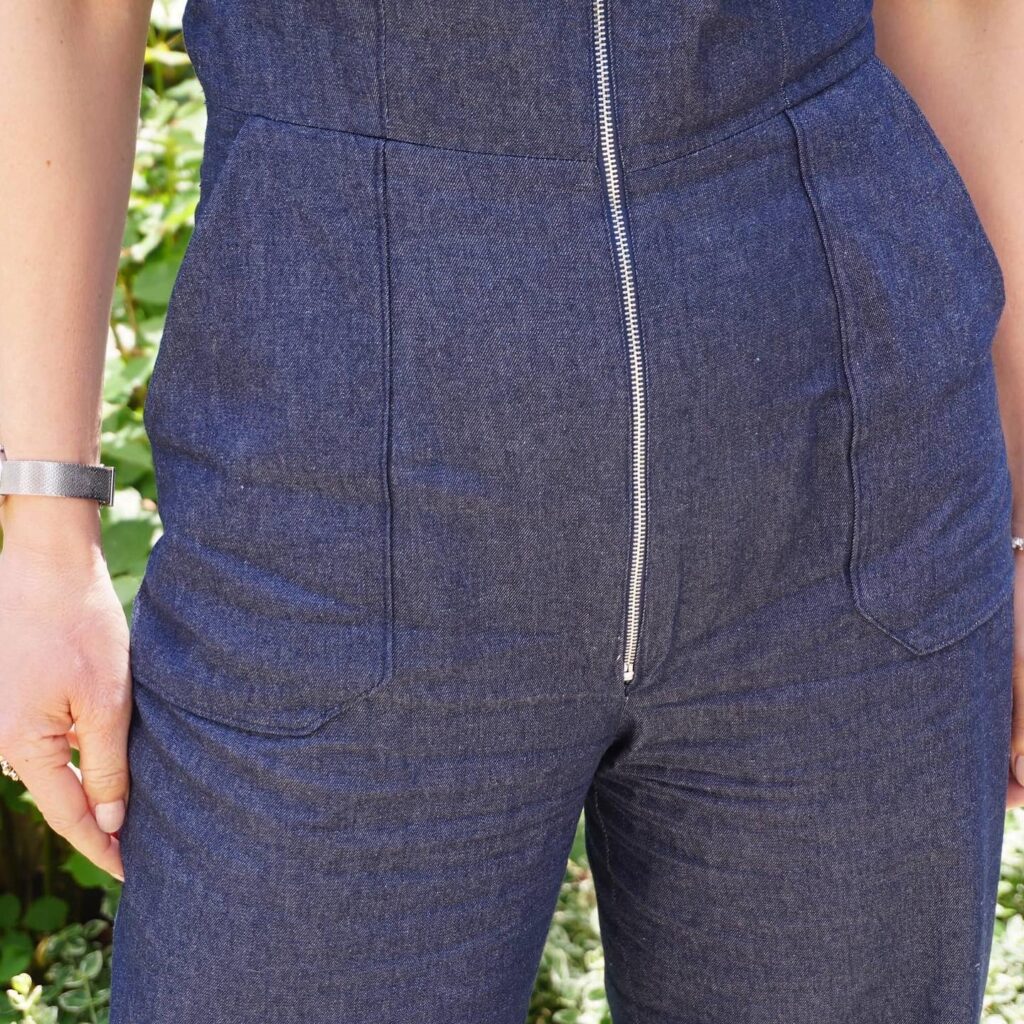
- The front zip makes taking it on and off the easiest thing ever – even easier than with Sirocco. From the picture below you can see how long the zip is (45cm), hence how much rooms it creates to get out when you unzip it.
- The bodice is perfectly fitted, for two reasons: first the pattern offers custom bust cups, so no need of FBA (full bust adjustment) or SBA (small bust adjustment); and second princess seams positioned both at the front and at the back perfectly huge shapes.
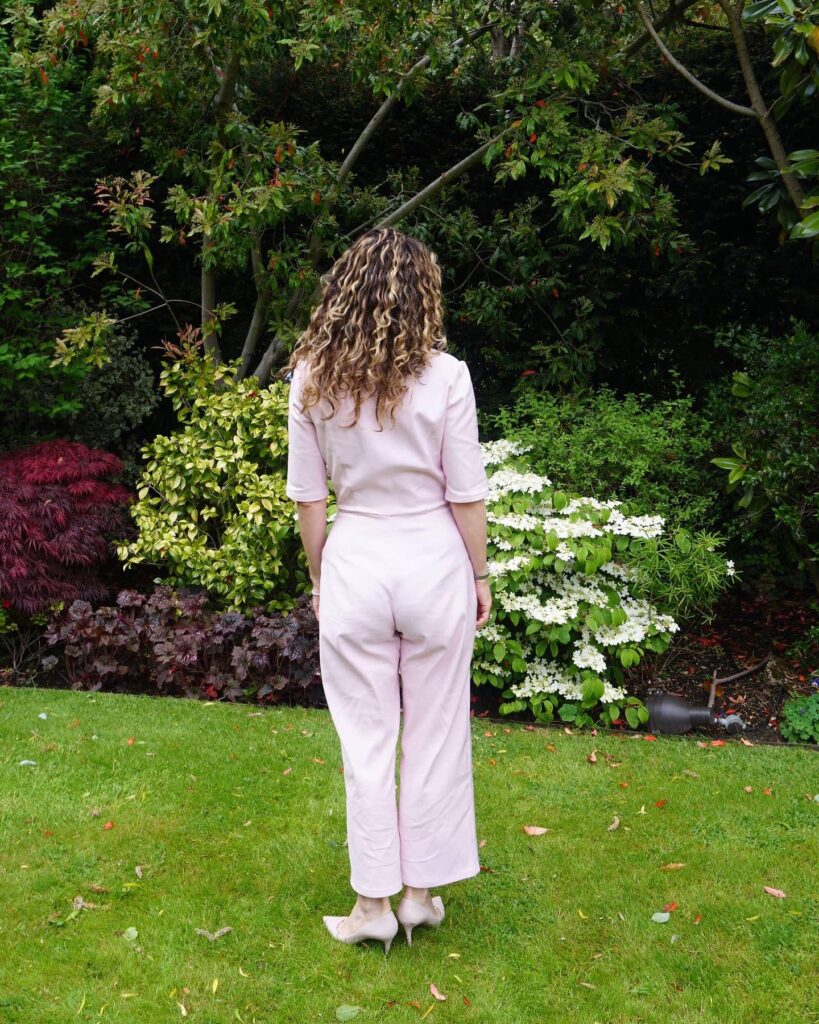
- The large, 7/8th legs work very well for my personal shape (thin waist, large hips, muscly legs). This is particularly visible from the back, where trousers rarely falls smoothly for me (well, never actually).

As for the long torso bit, this definitely was not the pattern to go for – let’s talk about fitting now.
A fitting battle I finally won – ha ha!
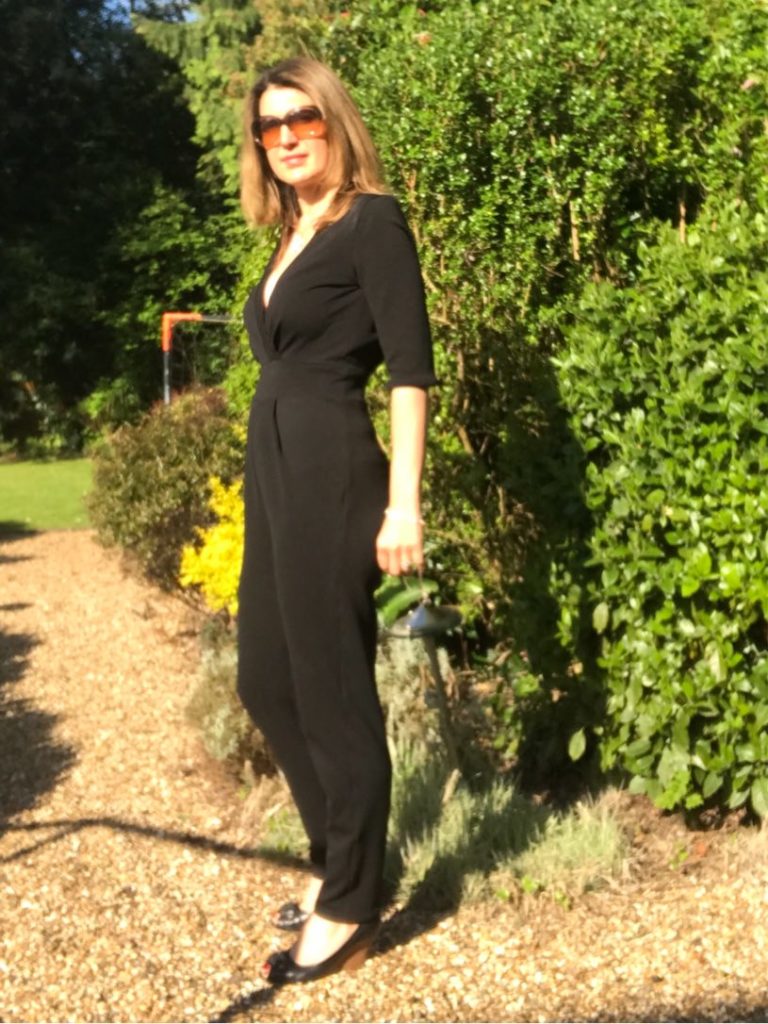
If you are planning to sew a fitted jumpsuit, BEWARE: you are likely to spend a lot of time on fitting. Adding a fitted top to fitted trousers just increases massively the likelihood or something, somewhere, not fitting right. And the problem is that your fitting adjustments are not necessarily going to be similar to mine. After reading several reviews, for the M7908 jumpsuit I think there is however an agreed fitting flaw: it is way too short at the torso!
The first jumpsuit I made is the pale orange one. I was planning to make it a wearable muslin, using the generous seam allowance (1.5cm or 5/8in ) to make my adjustments. And it worked indeed for most fitting aspects, except for the torso length – see how it all pulls at the crotch and consequently does not sit well at the waist. So muslin indeed but not wearable. Whether you go through the muslin path or not, I would strongly advise not to topstitch before you are 100% sure of your fit.
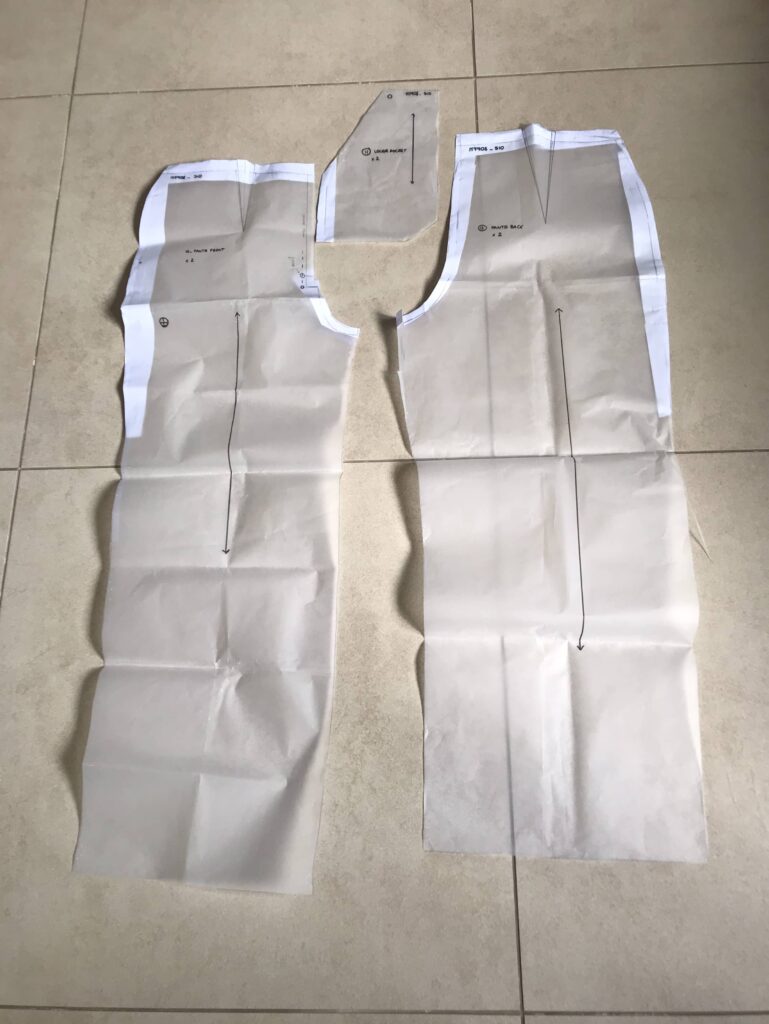
After this muslin, I adjusted my pattern pieces to reflect the changes needed. Below is a picture of the adjusted pattern pieces – the white bits are where I had to make changes (very often quite iterative). I worked mostly on the bottom pieces, because the top had fitted bust cups which work wonders on my E cup; and McCall’s patterns usually fit me like a glove (I am a McCall’s/Vogue/ Butterick pattern size 10 for a UK 8/ FR 36/ US 2).
In summary my adjustments were the following:
- lengthen the torso by 3cm;
- add 1cm width at the hips;
- slightly reduce the crotch length;
- take a bit of width off the back both at the trousers and the bodice (swayback adjustment, not visible because I just cut some of my pattern paper out).
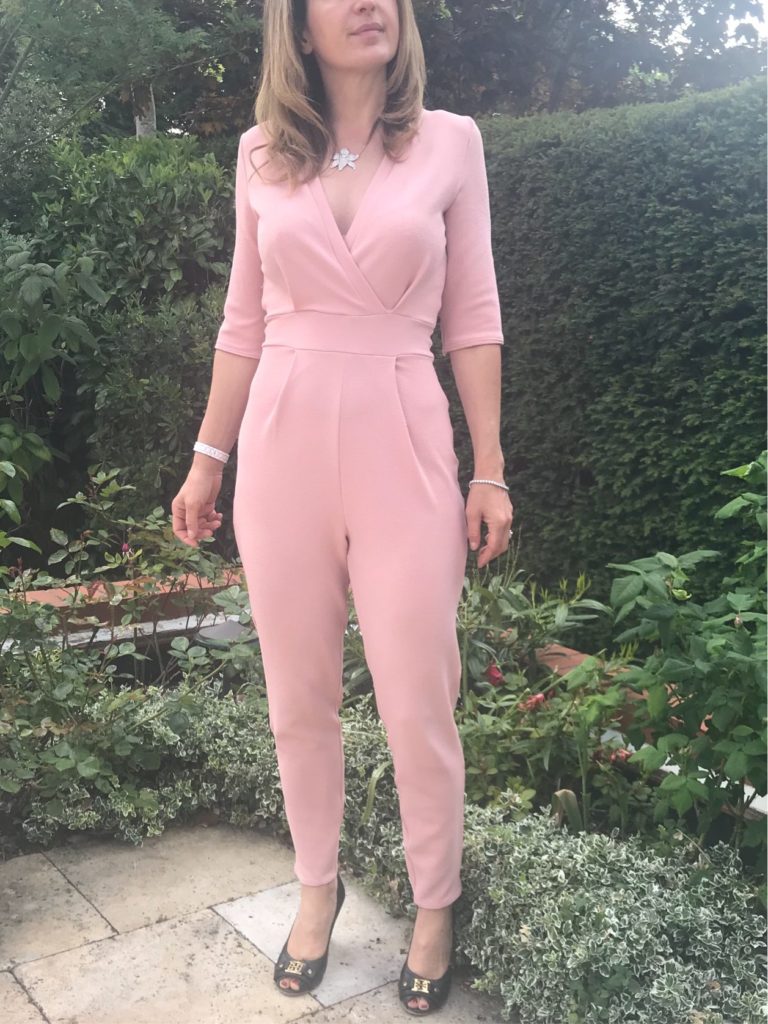
My subsequent pink and denim versions are based on these adjustments and are a perfect fit. I voluntarily left a bit of extra fabric in the back bodice because … this girls needs to breath!
V7908 pattern review: pro and cons
I very much like this pattern, for reasons I have already stated and even more:
- I really like the shape, with its fitted bodice and waist and its 7/8th wide leg trouser;
- It is super easy to put on and off, thanks to its long front zip;
- Once you have worked out all the adjustments you need to make, it is a very quick and easy make. The only technical difficulty is the zip.
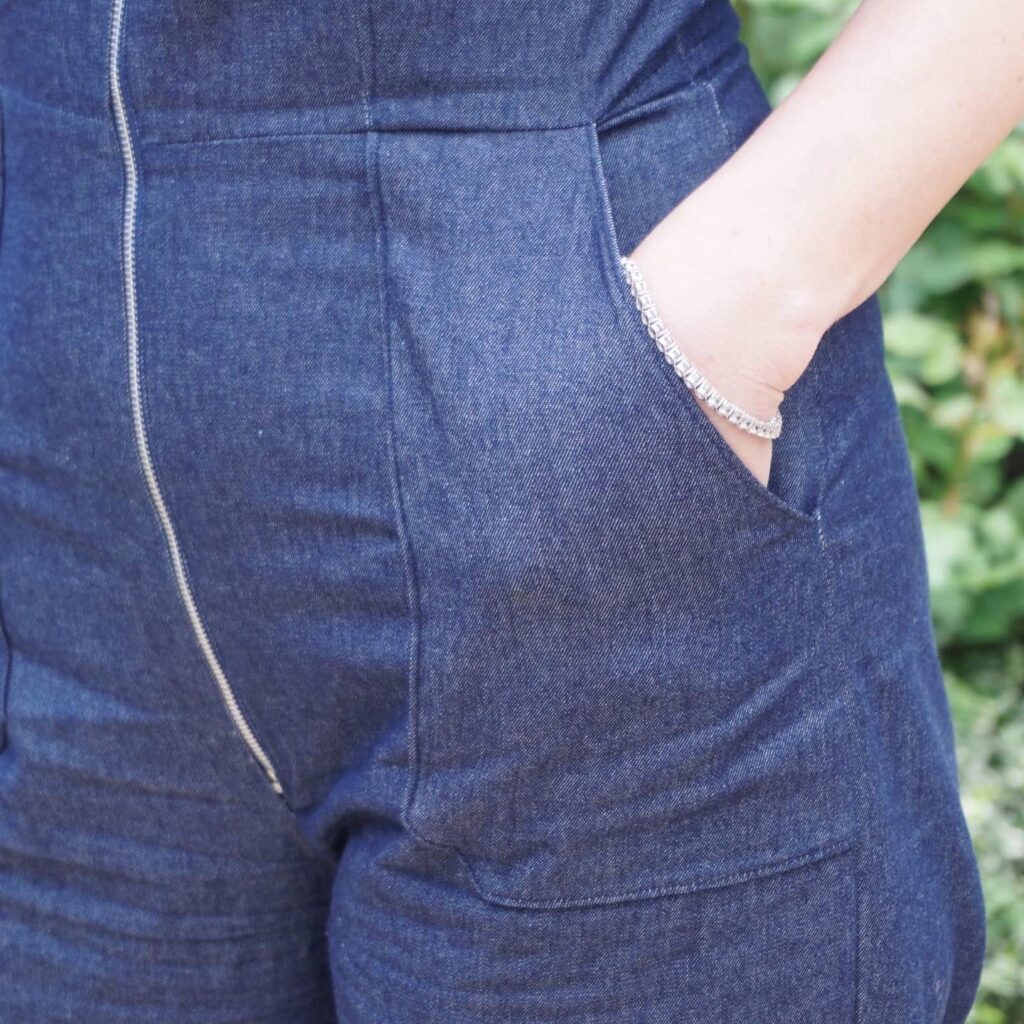
- This pattern has really nice details, such as the visible front zip and the pockets .
- It offers bust cup options, which I am always a huge fan of as it prevents me from having to make a FBA.
That said, there are quite a few things I disliked:
- The fitting effort needed is a terrible hassle and the fact that the torso is so short is just really annoying.
- The instructions are completely hopeless for the insertion of the zip. If you follow them you should cut into your fabric right at the beginning of the process, risking the fabric to tear when you try on the fit before installing the zip. For the pink jumpsuit I did not cut and you can see a bulge at the bottom of the zip; for the denim one I did cut but only at the end (and then misaligned my front seams and have to redo that again but can’t be bothered, oh well…).
- The pockets do not align to the bodice seams in all sizes. For my size 10 it just about worked (and I think the envelope picture much be in a similar size). However if you look at the illustrative drawings and if you read bigger size reviews, the alignment does not work – huge pity! I would definitely advise to redraw the pockets to reach alignment.
- The order of assembly in the instructions is not very helpful for a garment which requires so much fitting. You are supposed to first put the top together, then the bottom, then join them together; and you topstitch as you go. I assembled my denim jumpsuit in a completely different way : 1/ join back top and bottom – check the darts alignment; 2/ join front top and bottom – check the darts alignment; 3/ join back and front together – check fit and then topstitch; 4/ install zip.
Fabric and notions advice for V7908
The pattern calls for woven fabric, but I would strongly advised that you use something that has a tiny bit of stretch (but not too much). It makes the fitting a bit more forgiving and the garment more comfortable.
For both my pink and denim versions, I picked fabrics I had recently used with great pleasure. The pink is a stretch cotton (between chino and twill) from Croftmill, which I used for my Ultimate Trousers. It does have quite good structure, which works really well for this pattern in my view. It does crease a bit but such is life!
The denim fabric is from Fabrics Galore (still available at the time of writing!) and was used for my recent Spring denim shirt dress. It is 6oz in weight and I think I could have gone to 8oz for this jumpsuit, but it is super soft and comfy to wear. The colour is “stonewash indigo blue” and it is truly stunning (I am probably as fussy for denim choice as I am for fitting issues).
As for the zips, I got them from E-Bay, my go-to place with Etsy for sewing notions. The pattern calls for a 45cm zip but I used 40cm for my first two versions and I actually think 45cm is a bit too long.
Conclusion
Despite its fault, M7908 is a lovey pattern. And after my long fitting battle, I am definitely keen to reuse this pattern as much as possible.
After three versions, I am taking a little break and will go back to it in Autumn – I already have a gorgeous burgundy twill fabric just waiting to be cut! This is definitely the perfect garment for the transitional weather we have been having in England… well, since March!
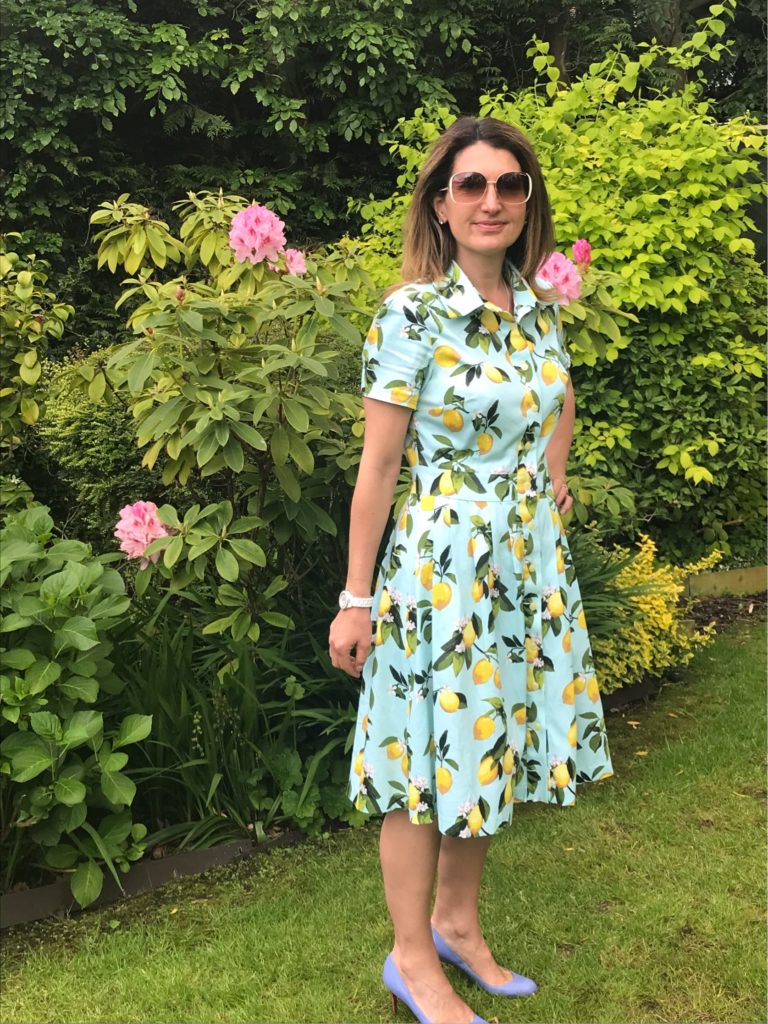
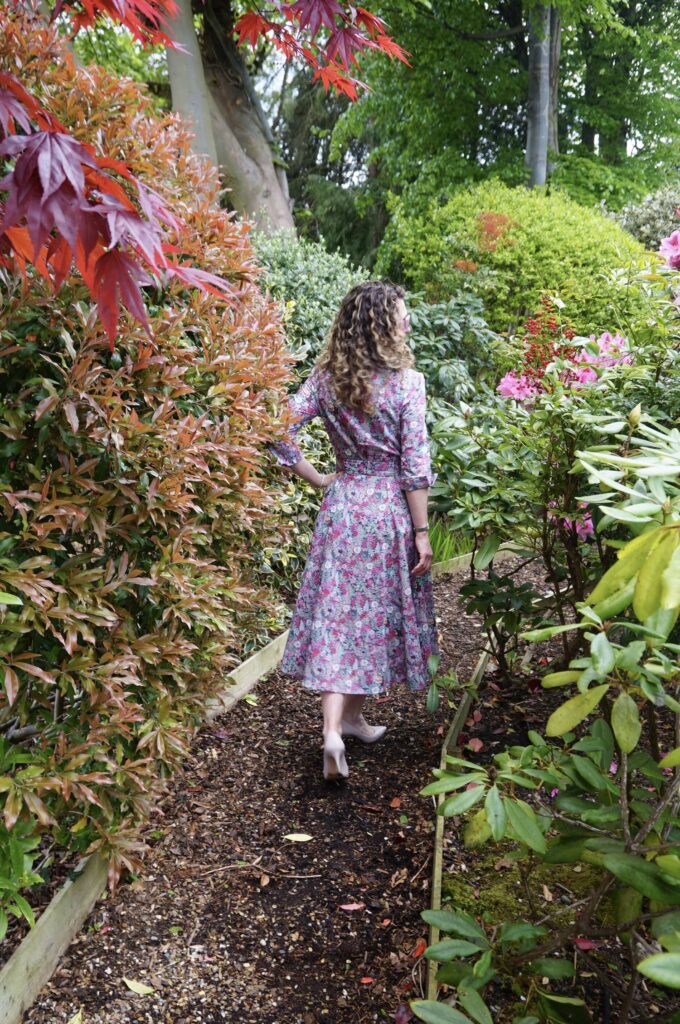
A second shirt dress for Spring
Despite the complete absence of Spring weather, I have been making tremendous progress on my handmade Spring wardrobe and have nearly completed all the projects I had planned earlier in the season – I am so proud of myself! Here is my latest make, a midi shirt dress in Liberty fabric.
Mixing patterns: B6702 and M6696
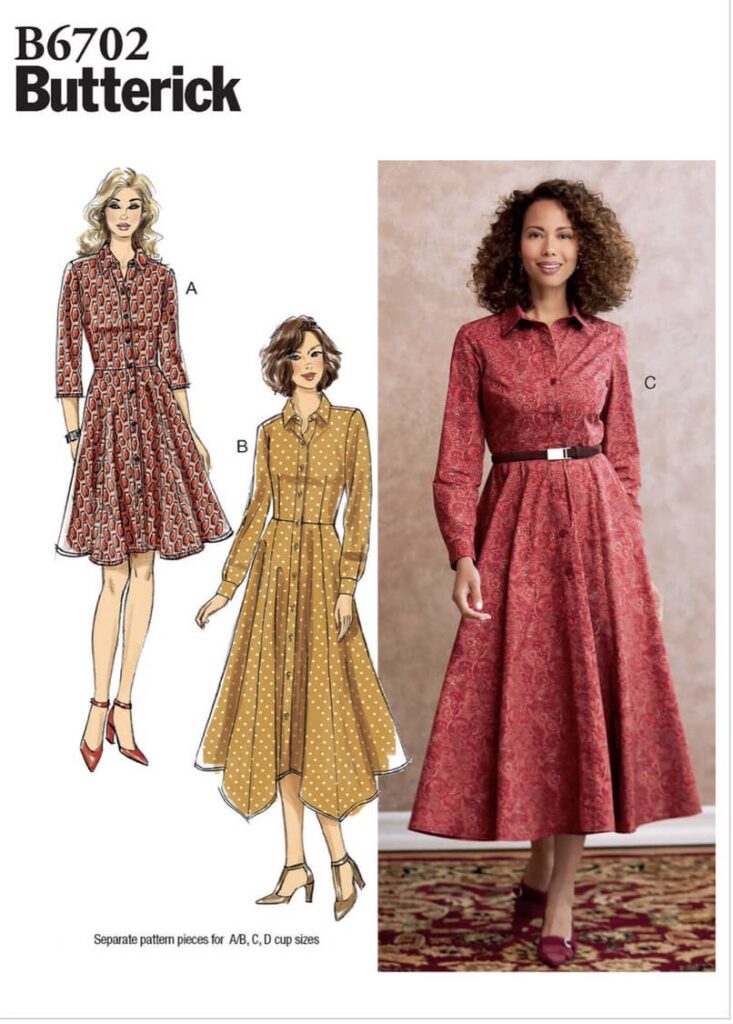
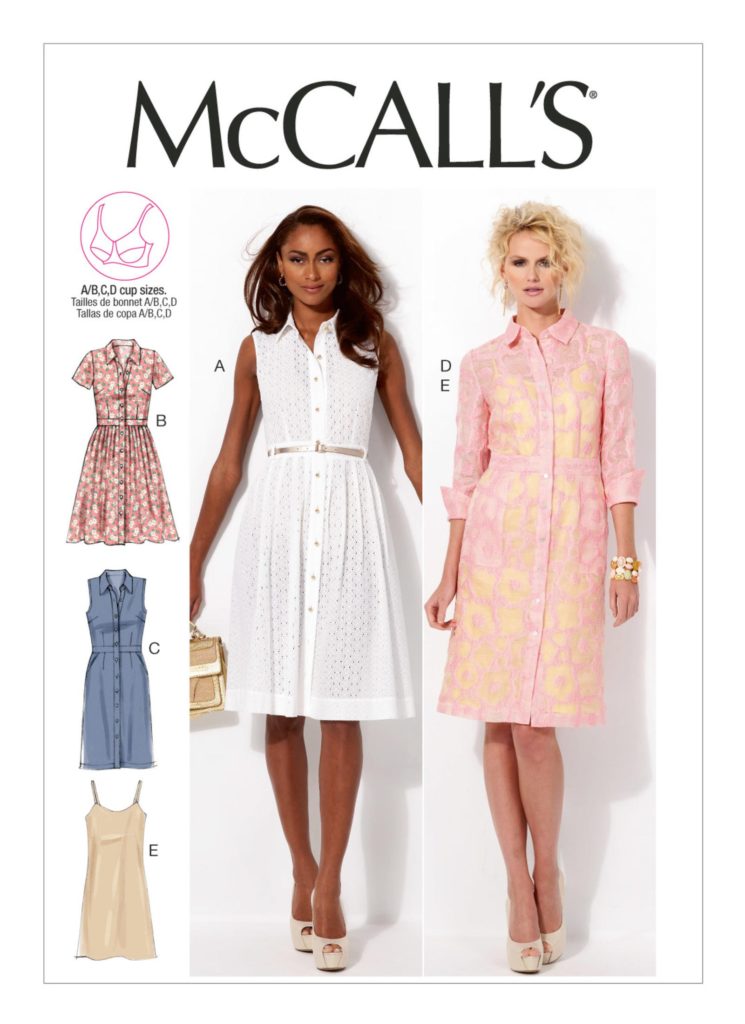
I had originally planned to make this dress using a Butterick pattern, B6702. I have already sewn three shirt dresses using the knee-lenght, pleated skirt of M6696 (here, here and here) and I absolutely adore them. However I was keen for a change, especially to go for a longer and wider skirt.
However I pondered for ages about the absence of belt in B6702 – would it mean a less fitted waist? and the weight of the skirt bodice pulling on the bodice? I don’t have answers to these questions because I eventually decided to combine the top of M6696 (bodice + belt) with the midi skirt of B6702. And it worked wonders!
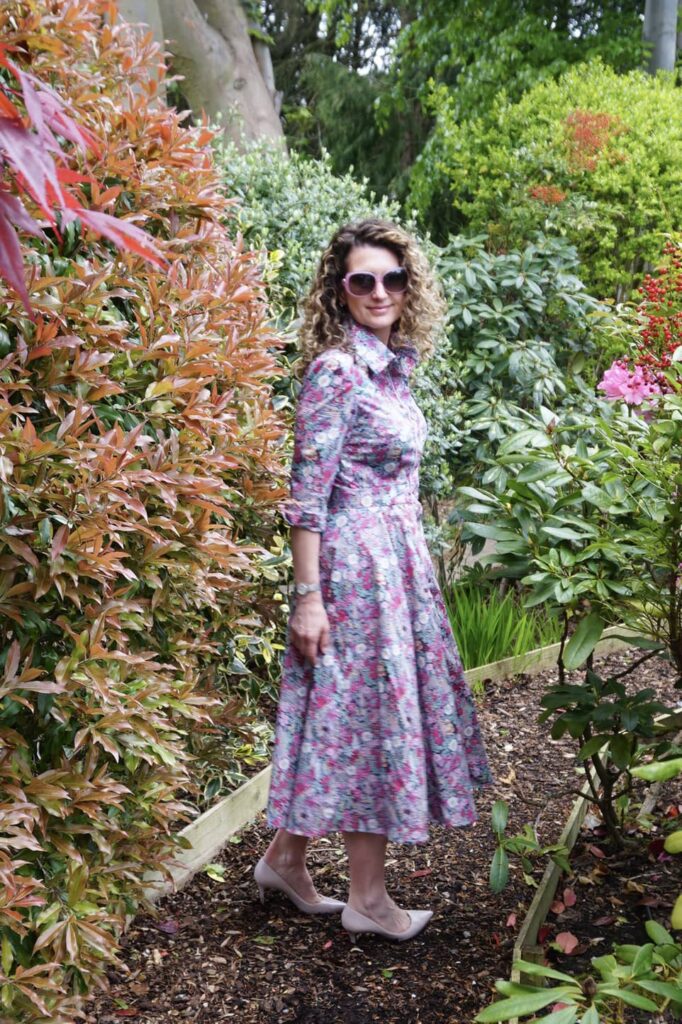
McCall’s and Butterick (along with Vogue) belong to the same pattern company so combining their patterns is actually a piece of cake! I very roughly measured the skirt and bodice waist circumference to check they matched in my usual size 10 (FYI I am a UK 8/ FR 36 / US 2) – and they perfectly did! These two shirt dresses are also constructed exactly in the same way: the button placket is added to the dress once the bodice and skirt have been assembled, so I did not have to fiddle with different button placket constructions.
M6696 and B6702 pattern reviews
As far as the patterns are concerned, I recently reviewed M6696 extensively (here) so not much more to add: this is an absolutely impeccable pattern, with a gorgeous shape, a beautiful finish and perfect sizing (it has bust cup options, which help massively the bust fitting). The instructions are extremely clear and will immensely help you if you’re sewing your first shirt dress – I still follow them religiously.
As for B6702, I did not sew the bodice but it has custom bust cups too, a huge positive in my view. The skirt is very pretty but I am a bit disappointed that it does not have more volume, especially for a skirt with six pieces! (you can tell I am a fan of two-pieces circle skirt) That said, I really should have realised this from the enveloppe illustration. And the big advantage of this skirt is that it does not consume a huge amount of fabric.
Word of warning: when making this dress (either following one of the patterns or mixing the two), you need to be careful about your button placket: make sure it is way longer than what you need! The M6696 button placket pattern piece is scarily short, so after a stressful experience of not having more fabric to cut into, I am overly generous when I cut it!
Modifications to the original patterns
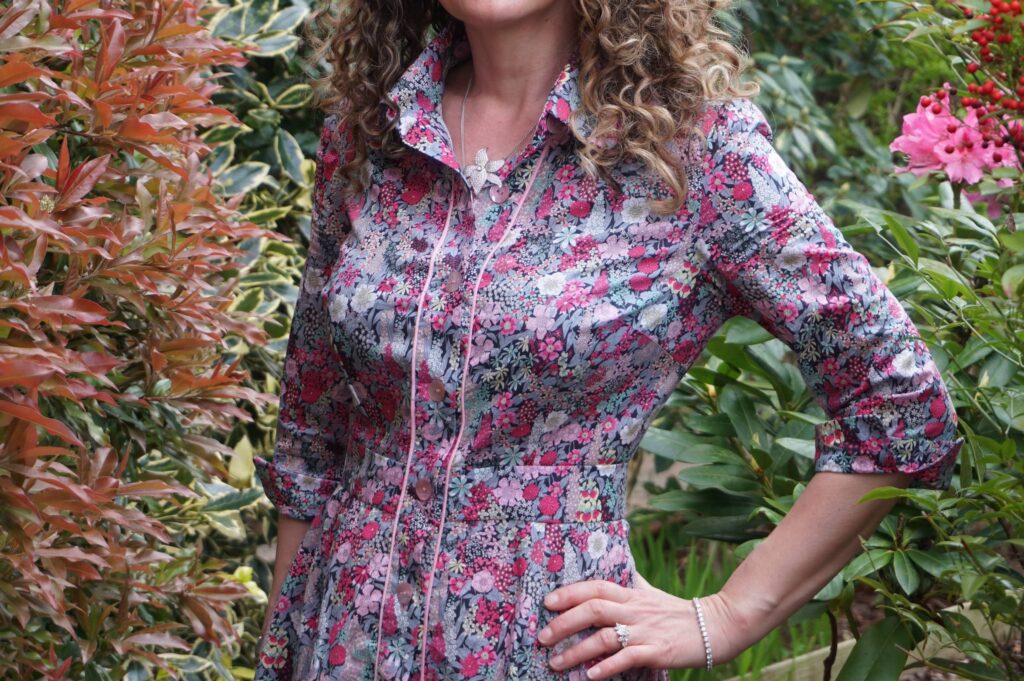
The only two modifications I made to the patterns (on top of mixing them of course) is that first I added piping on each side of the button placket – I adore this detail and have used it in my previous dresses too. I hesitated for a long while between a vivid or pale pink – I am so pleased I chose the pale with the busy fabric. The buttons are also pale pink, in mother-of-pearl and found on E-Bay (which, with Etsy, is my main source of buttons).
And second I added sleeve cuffs to my 3/4 sleeves, because I also adore this finish and put everywhere.
Fabric used: Liberty lawn lover forever
The fabric is a Liberty lawn bought from Croftmill. If you’ve already sewn Liberty lawn, you know it is the nicest fabric that exists on Hearth: soft as silk to wear, easy as cotton to sew, it is just an absolute dream. Sadly the price keep increasing and since the production was relocated to Italy a few years ago, it is impossible to find cheaper end of rolls, so this purchase was a real treat to be honest!
Why did I chose this specific Liberty – well, guess! Obviously I will never wear these together though.
Conclusion: how many more shirt dresses do I really need?
I am extremely pleased with this dress, which I have been wearing a lot recently given the freezing cold of the past few week. Whenever the weather improves, I will however need a sleeveless version. There is no such thing as too many shirt dresses in a girl’s wardrobe, right?
Spring separates: trousers, top and skirt
As you know, I am a dress-addict and would wear (and sew) dresses every single day. But for the sake of diversifying my sewing, I have recently tried to introduce different pieces in my wardrobe. Last winter was all about skirts (here and here) to match my (far too) numerous knitted cardigans. For Spring, I already showed you a cape, a trench coat and a trousers and blouse set. Here are my latest additions: another pair of trousers, a wrap top and a circle skirt.
Trousers: a hacked versions of The Ultimate Trousers
So my first pair of Spring trousers were The Ultimate Trousers by Sew Over It.
I was so thrilled with their impeccable fit around the waist and bum (not so sure about the legs) that I immediately wanted to make another pair. But I was quite tempted to try wider legs. So I used an ancient pair of store-bought wide-legs trousers I adore, measured the leg width and applied that to my Ultimate Trousers pattern and here we are!
I think I added about 13cm of width to the legs; and I also lengthened to full rather than 7/8 length. I am very pleased with the resulting fit – not a huge achievement to fit wide legs you will tell my but I am happy still!
The fabric is the off-white twin of the pink one I used for my first Ultimate Trousers. This is a mid-weight, slightly stretchy cotton chino, perfect for purpose. It comes from Croftmill but is unfortunately out of stock now. I would strongly recommend you use fabric with a tiny bit of stretch if you are sewing you first trousers like me, it makes fitting (and walking and breathing) all the easier! I ran out of matching zippers I’m afraid – not too bad…
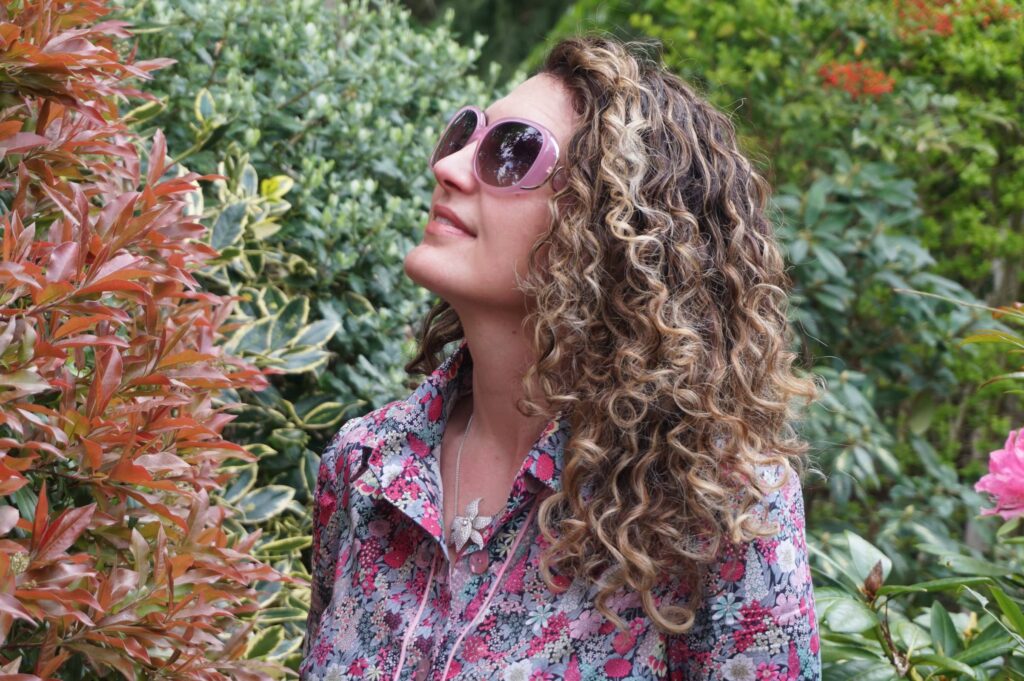
A wrap-top to match the trousers: V9315
Being me, I really need a new top to go with these trousers so I gave the V9315 wrap top a go.
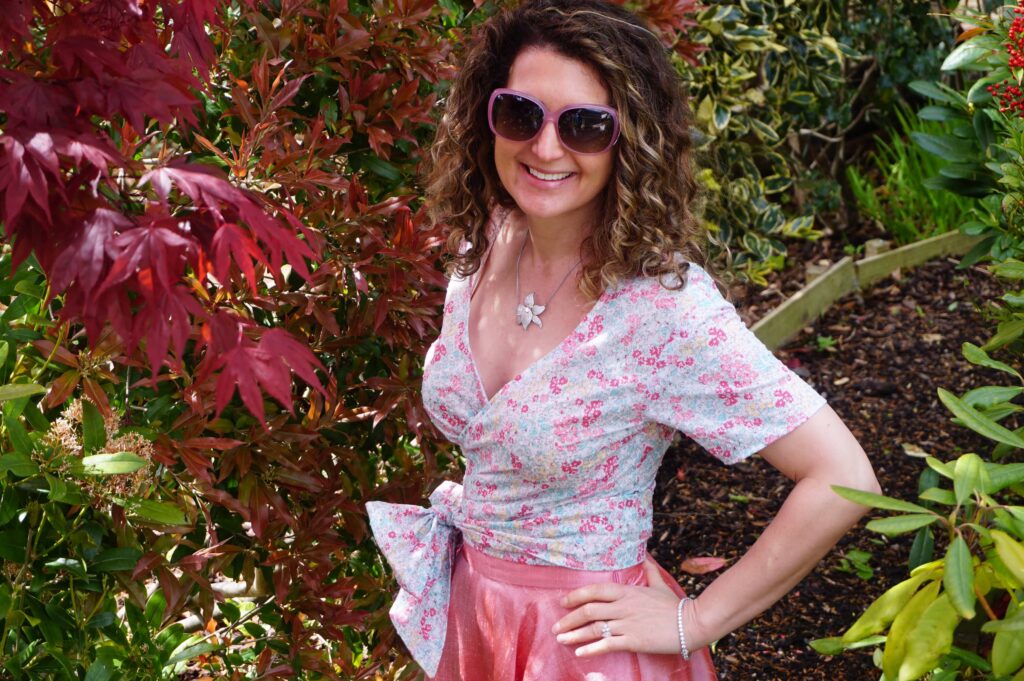
It is rated as “Very Easy” by Vogue and truly is, I think I made it in about three hours. The shape is very pretty, with a reasonably deep cleavage and a very large sash resulting in an enormous bow, what more to ask for? I chose to keep the sleeves short, not an option shown on the envelope but very easily achieved by omitting the sleeve ruffle. I also omitted to make an FBA, which would have helped the neckline sit a bit better but I really could not be bothered!
I used a lightweight cotton dobby from Fabrics Galore, a pleasure to work with and super comfy. Lightweight fabric is definitely perfect for this pattern, as you want a lot of fluidity for the bow.
I only have one criticism for this pattern: it is very short!!! It works very well with a high waisted shirt but not a slightly-below-the-navel pair of trousers…. Especially when your cropped-top days are behind you… Bouhouhou…
The circle skirt saviour
“In doubt, reach for a circle skirt” should really be my motto! Well, this is exactly what I did when I realised that my pretty warp top was running the risk of very little wear. And I am so pleased I did because the match is perfect!
I used my tried and trusted skirt piece from the M7081 dress pattern, in the same way as for my maxi circle skirt (you can also use the By Hand London’s circle skirt calculator). I made no change to length and cut into my precious pink silk dupion from Amothreads. I also lined the skirt, to be able to wear it with tights with no problem. Here as well an extremely quick make – about 2-3 hours (plus an extra hour of hem hand sewing).
And here we are, another set I will be able to wear without wondering how much midriff is on show! But now I need to find an appropriate top for my trousers. This is an everlasting process, that’s why I find dresses so much easier!