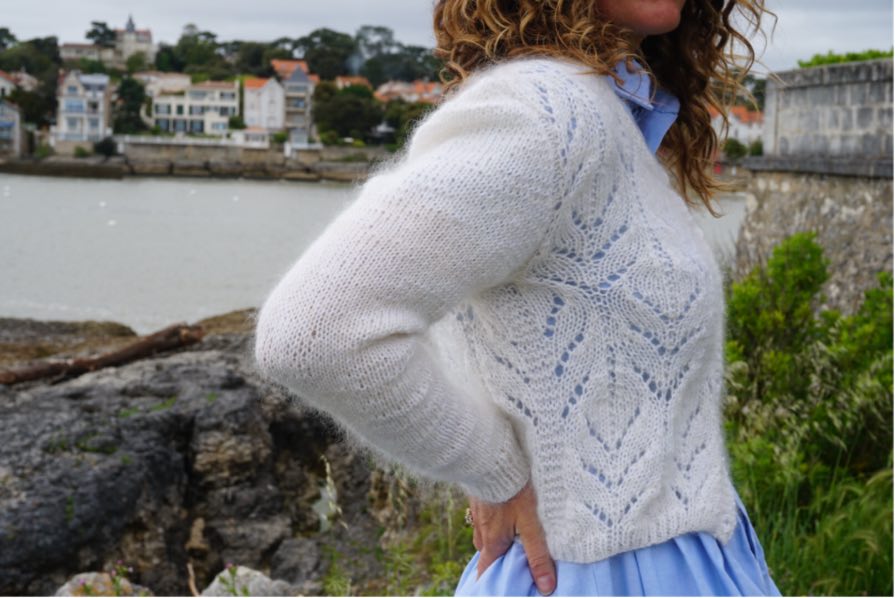
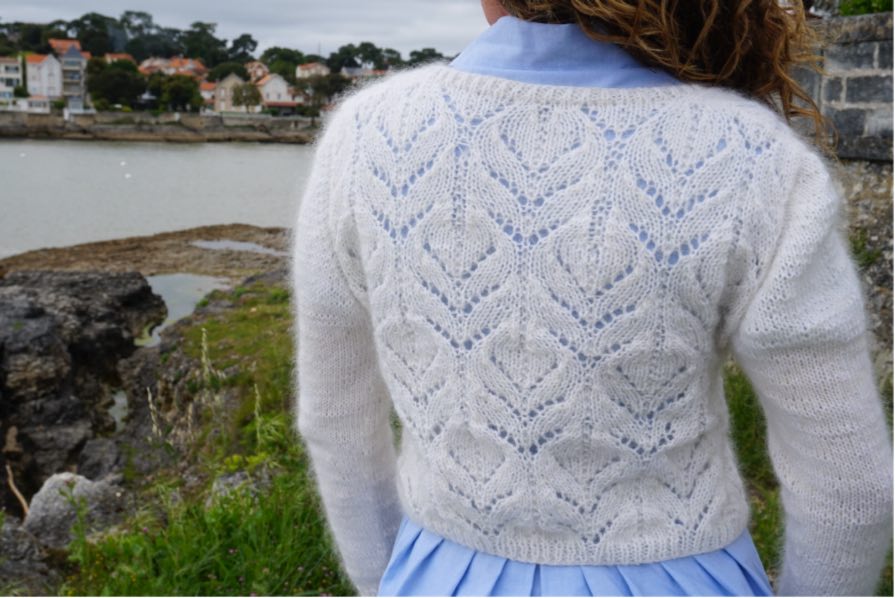
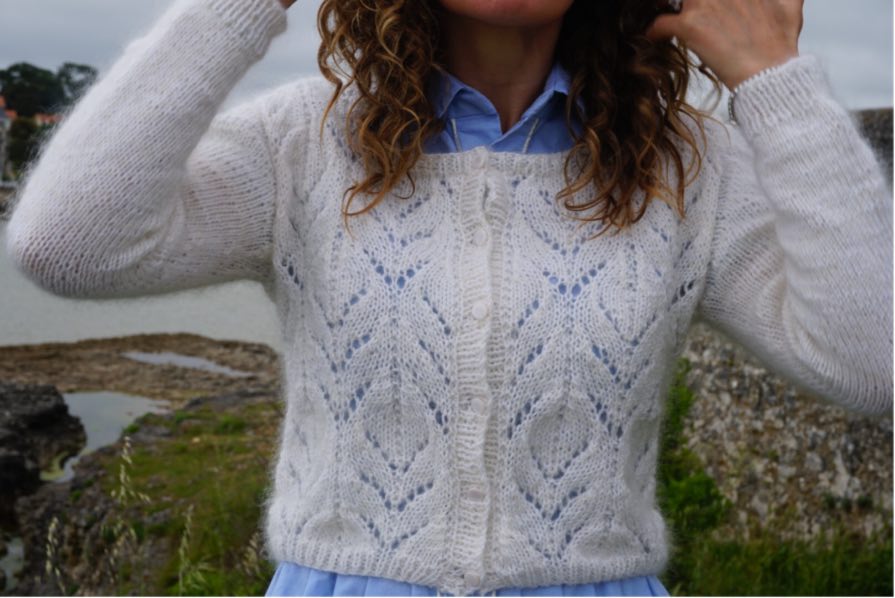
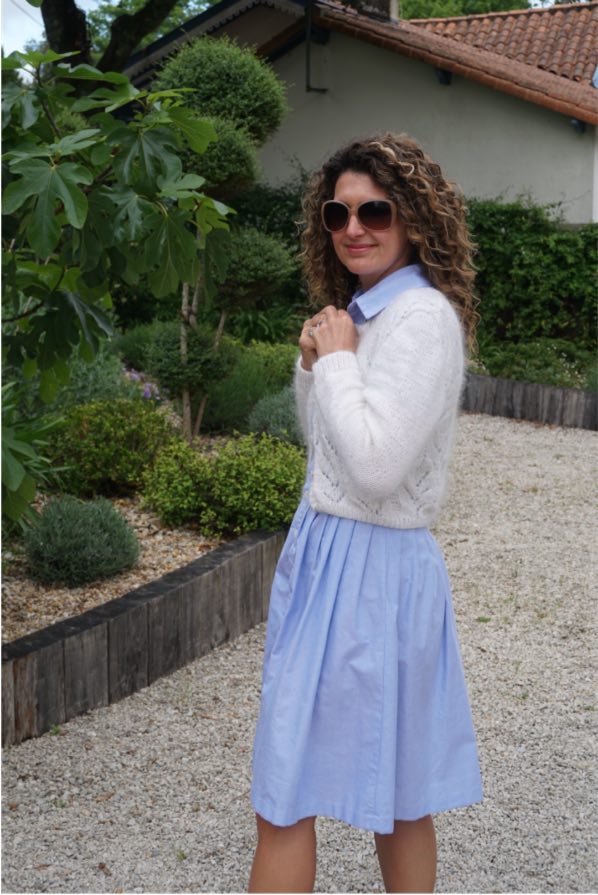
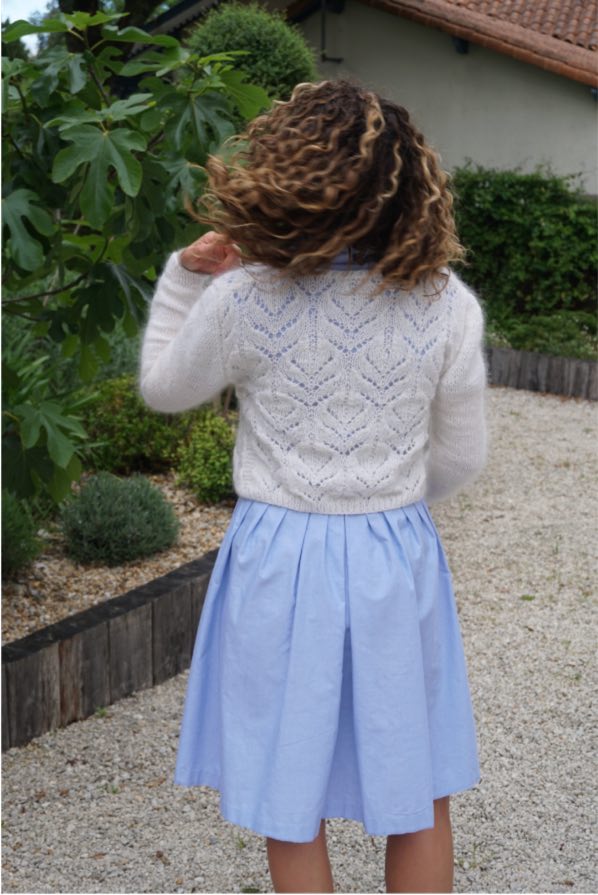
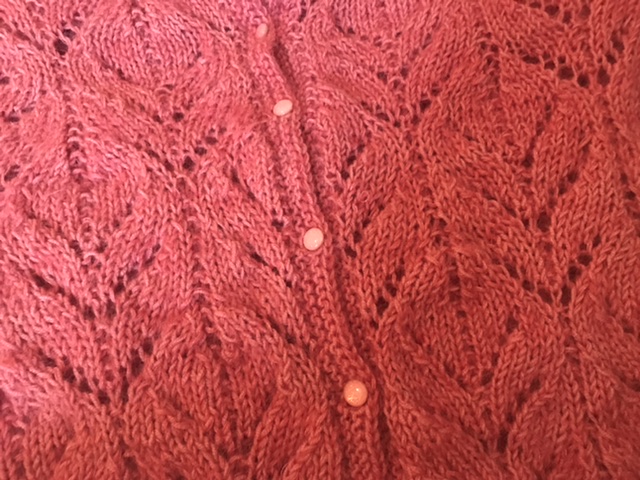
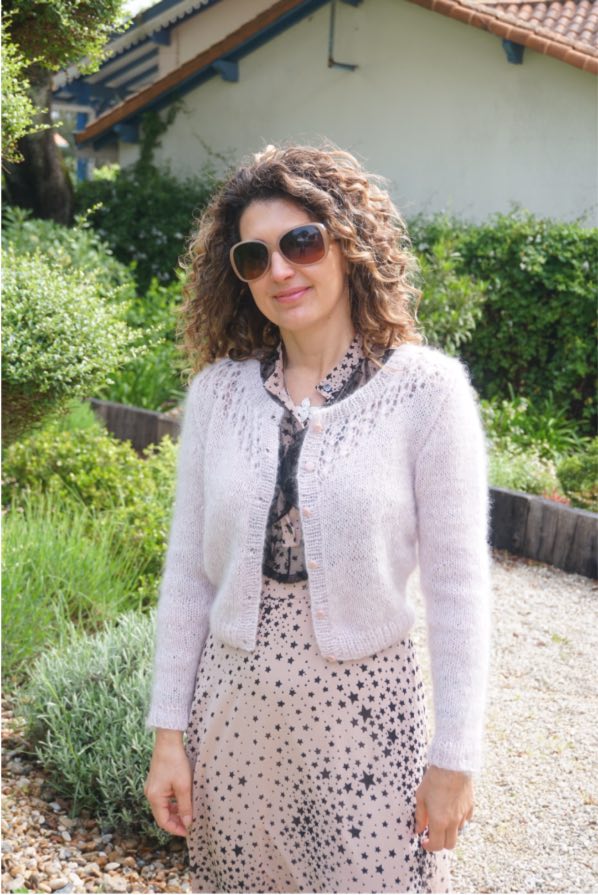
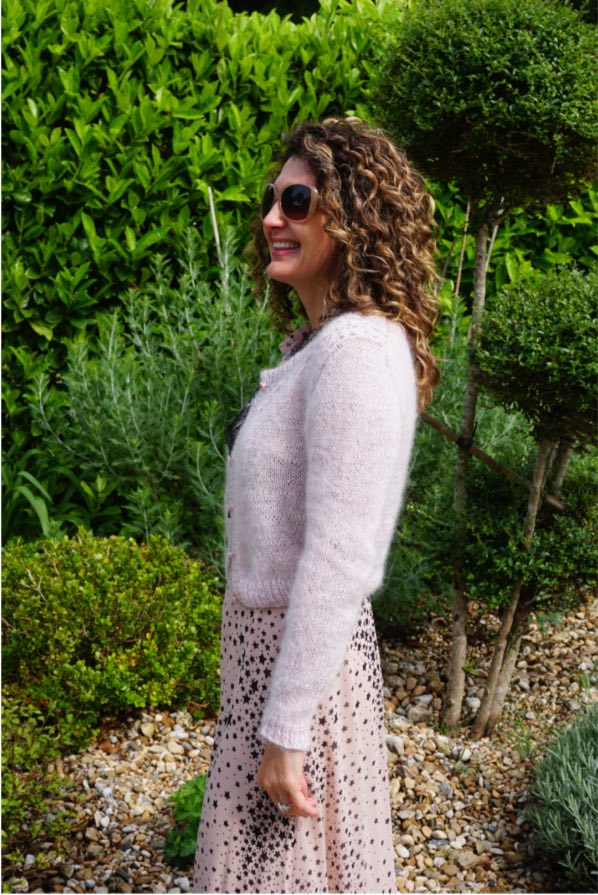
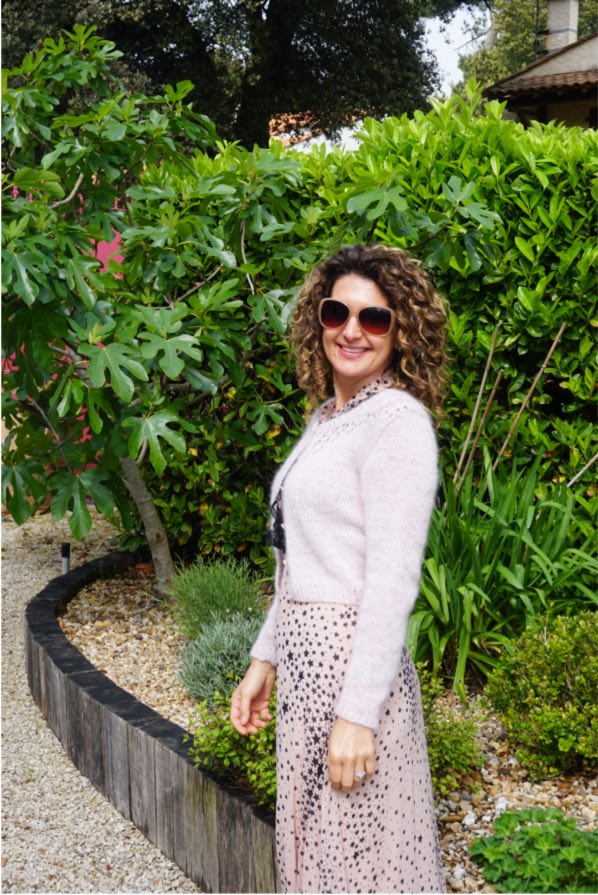
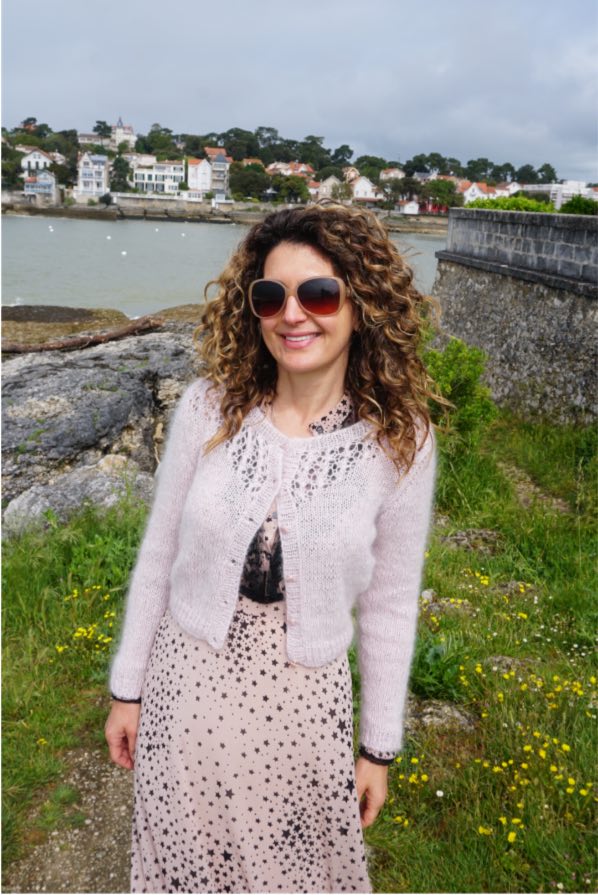
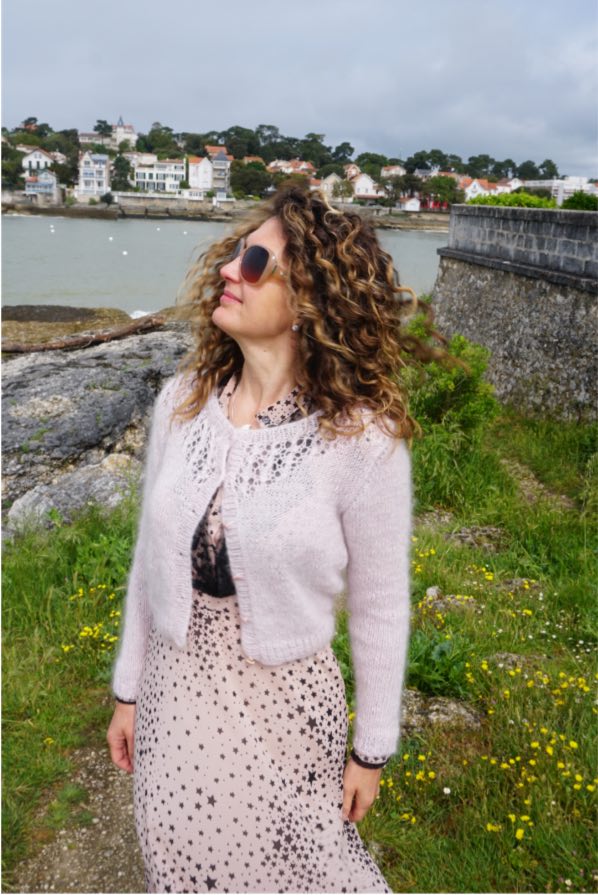
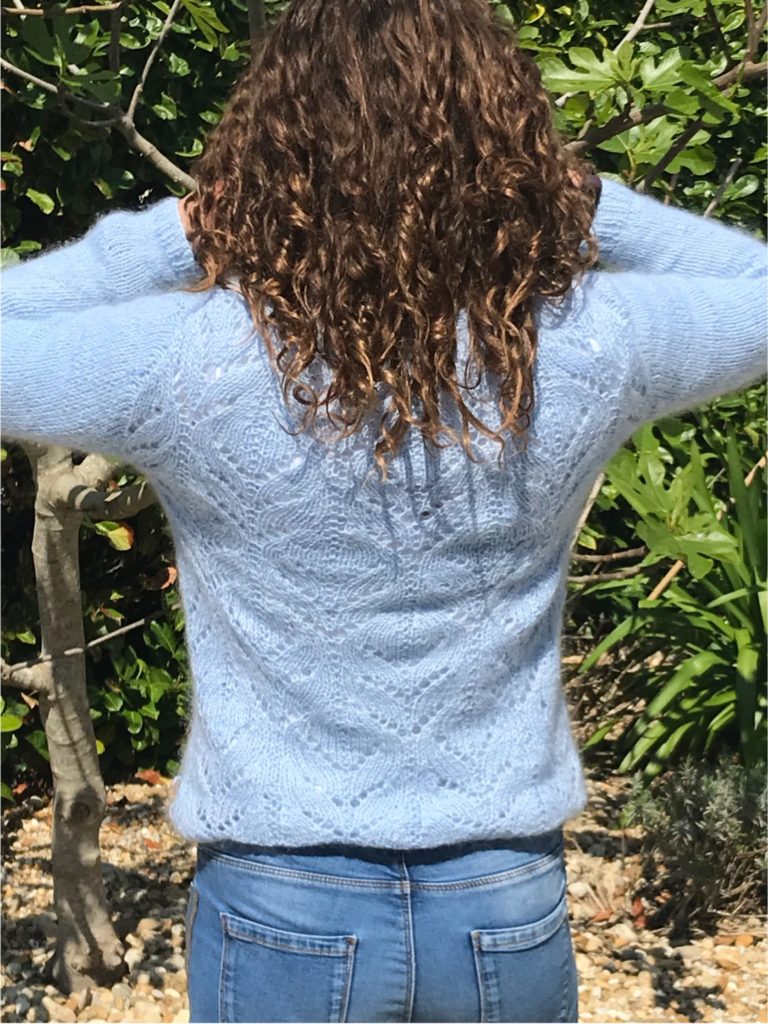
Blossom Cardi in Lily White
Another lock-down knit, another cardigan: here is my Blossom cardigan in Lily White.
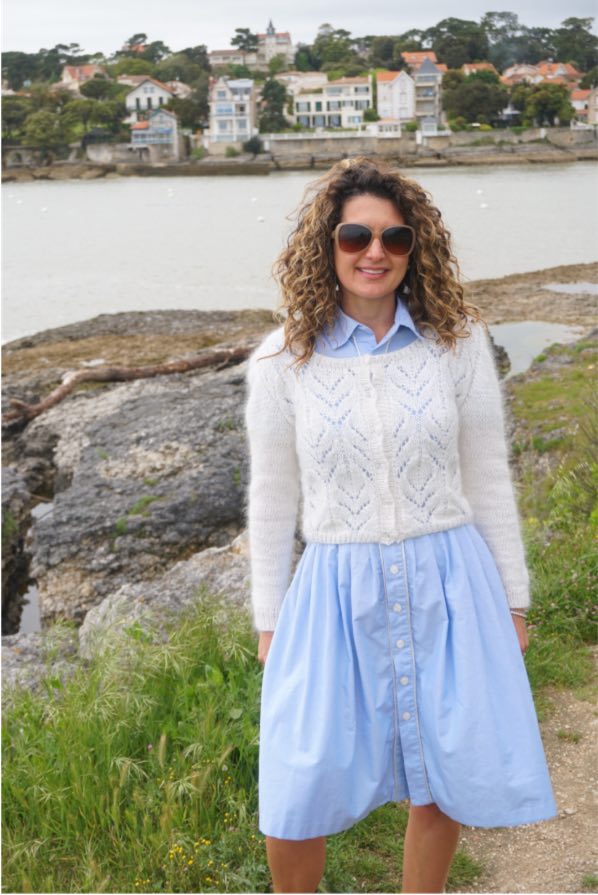
Blossom was designed by talented designer Anna Dervout and I am an absolute fan – under my needles first came the shawl, then two jumpers, the only thing missing was a cardigan!
But the one designed by Anna did not suit me, as the lace motif only appears at the back – what a shame! So ever since knitting my first Blossom jumper, I dreamt of a white cardi with full-on lace – here it is.
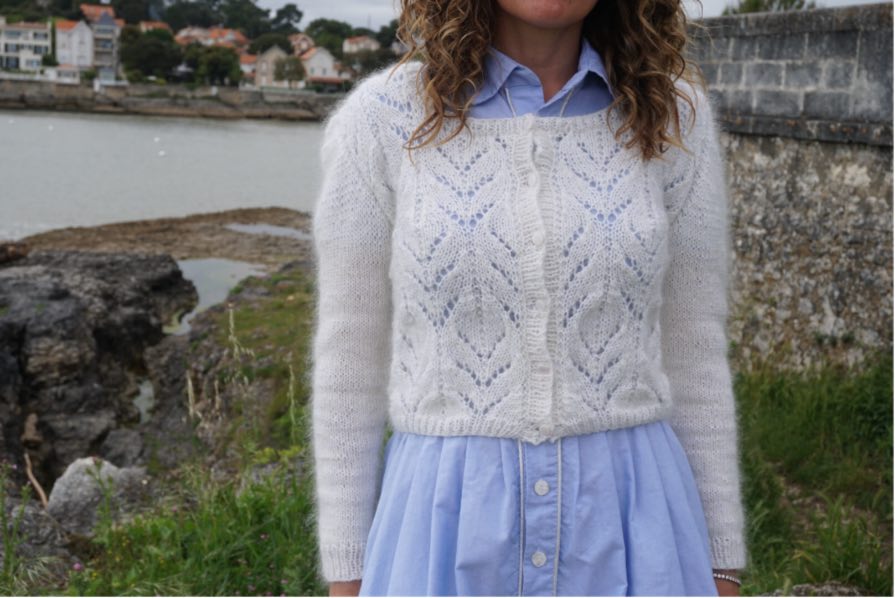
I did not use any specific pattern for this cardigan but obviously used the Blossom motif; and I also got quite a lot on inspiration from the Salal cardigan pattern for proportions. Here are a few details that could help if you’re planning to knit a similar cardigan:
- As I wanted a snug fit I casted on 8 motifs (16 stitches each), plus two additional stitches at the beginning and at the end (to attach the button placket); and three stitches in the middle for interruptions – these were for too much, miss!
- I knitted 27cm from bottom to under-arm to achieve a cropped lenght and 19cm from under-arm to top, to get more ease at the sleeve opening than the (tiny) 15cm recommended by tyhe pattern.
- I started my front neckline decreases 10cm above the under-arm, initially binding-off 10 stitches (2 beginning stitches + half a motif), then 2 stitches 4x on front rows.
- For the button placket and the neckline, I knitted 6 rows of stockinette.
- I used 4mm stitches for the body and 3.5mm stitches for the ribbing – but my knitting is very loose.
- I knitted in a combination of Drops Baby Merino (5 skeins) and Drops Kid Silk (4 skeins), which is a combination I absolutely adore for it softness and it fluffy effect; and which I’ve used A LOT In my recent project
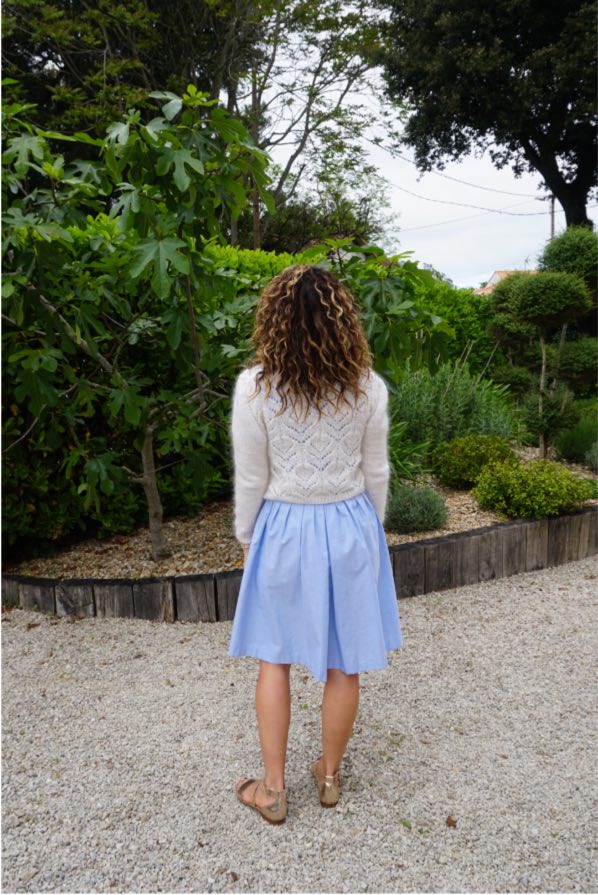
As for any self-drafted project, there are a few things I would (and did!) change for the next one. I am not a fan of the sides; and the sleeve opening is actually a bit too big. But these small details aside, I am very happy with this cardi – and quite proud I could achieve my vision and end-up with something more than decent!
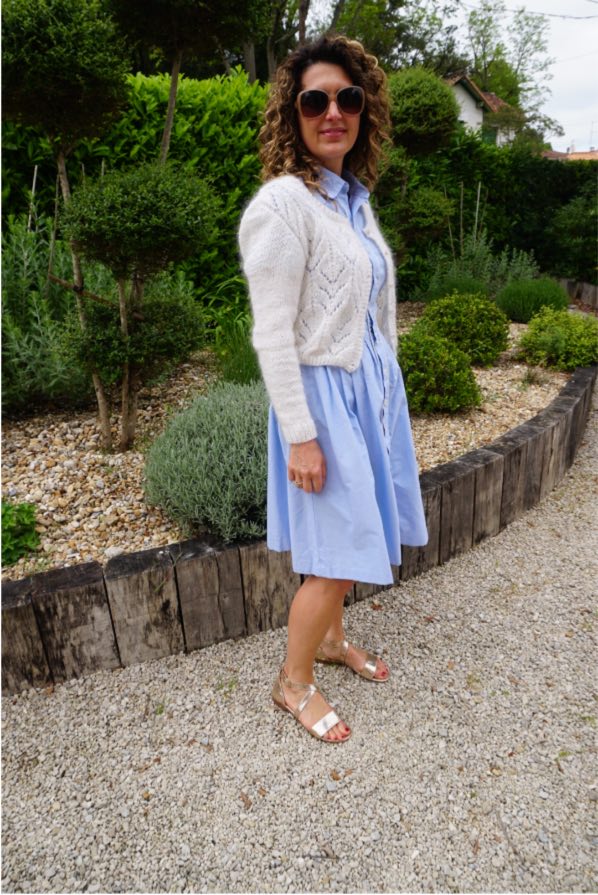
You’ve obviously guessed – another Blossom cardi was knitted and you will see it soon. Being slightly out of my usual colour palette, it just needed a matching skirt which I finished… today!
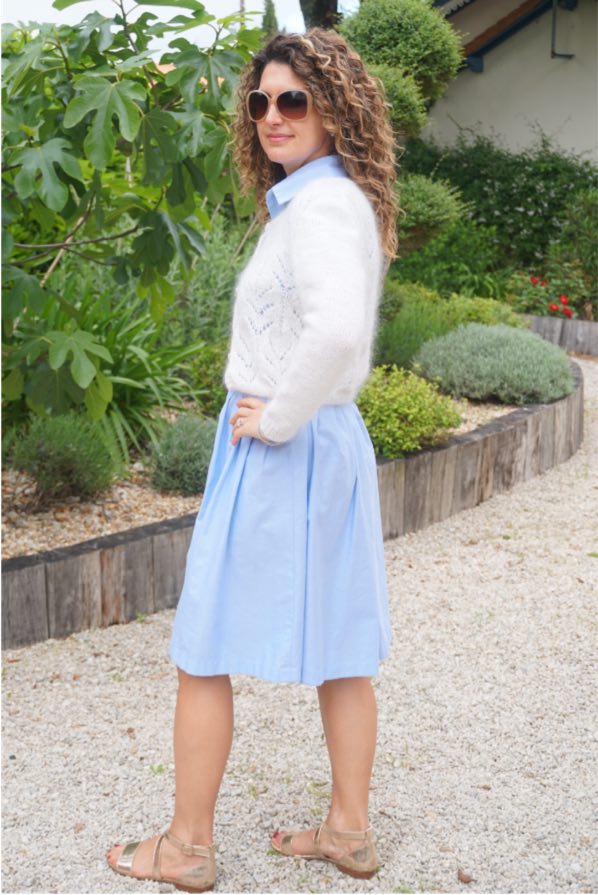
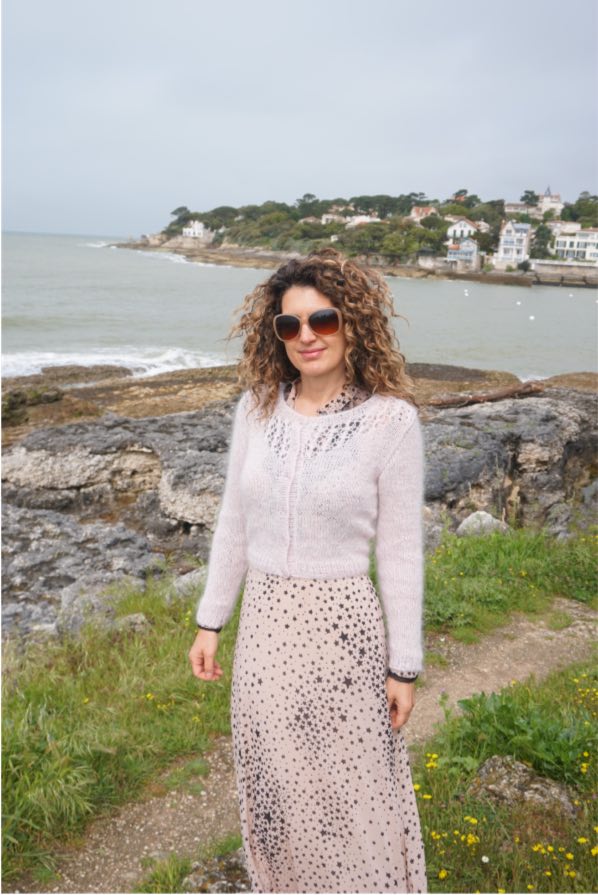
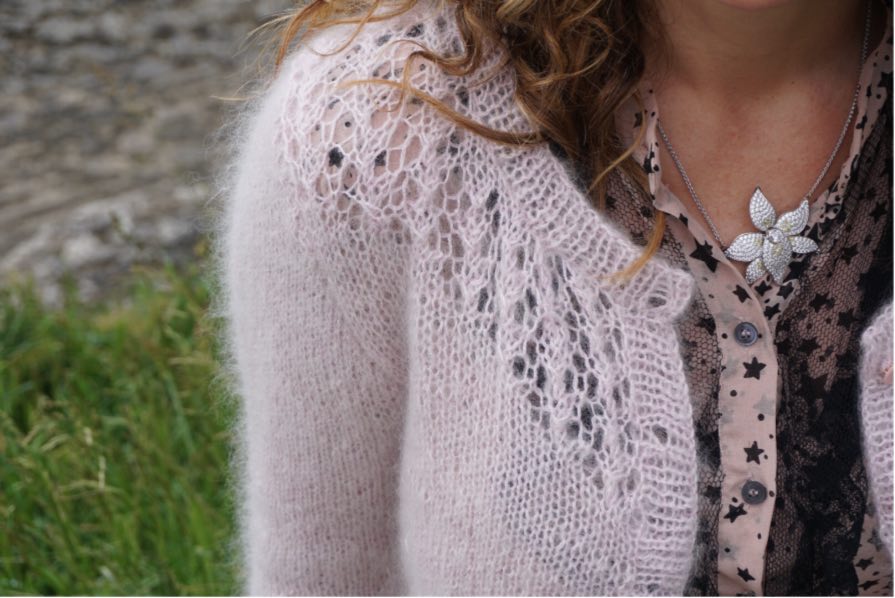
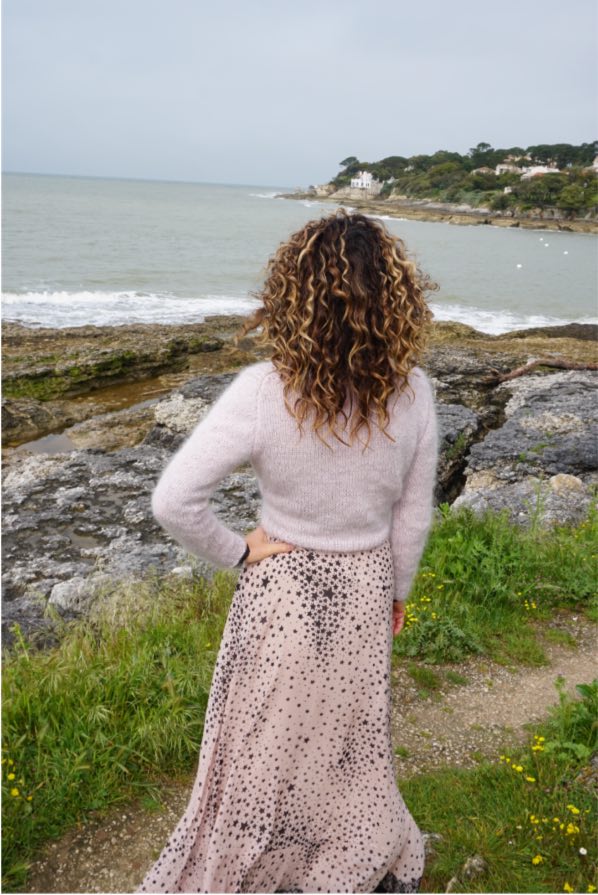
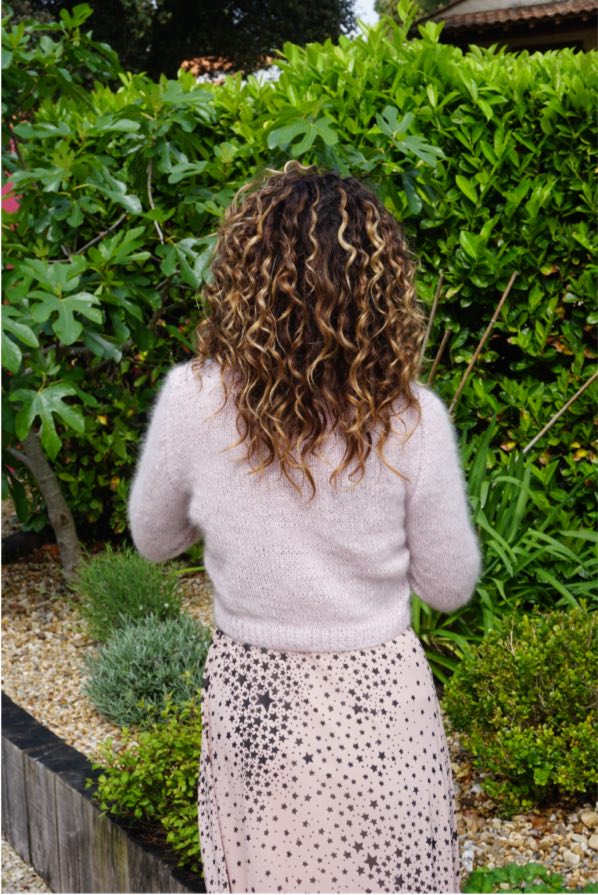
My powder pink Salal cardi
Let me introduce you to my first lock-down knit: the Salal cardigan by Untangling Knots … and brace yourself for (many…) more to come, as knitting has been my main creative outlet in the past few weeks and buttons have just arrived so now I can take pictures!!!
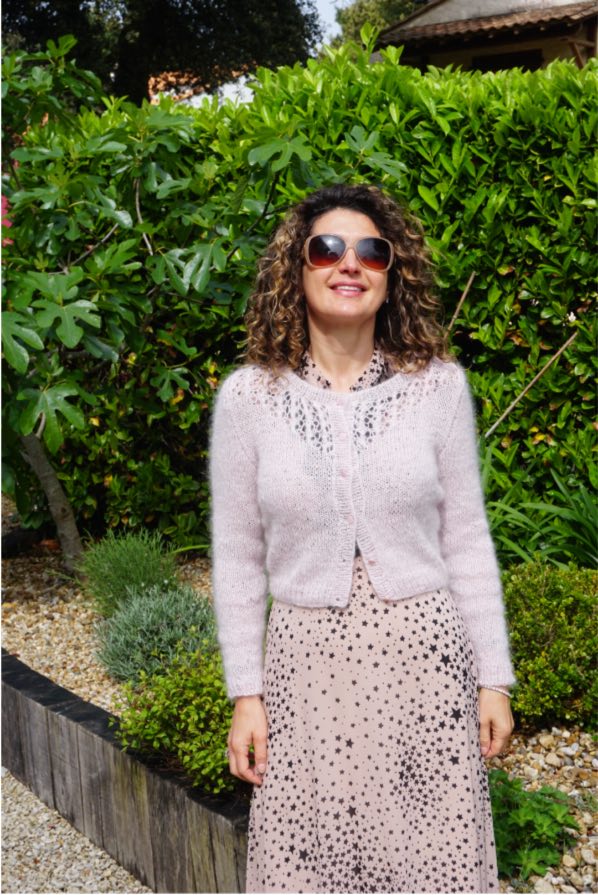
My first Untangling Knots project, the Chuck jumper, had been such a success that I was very keen to knit many more of Andi Sutterlund’s patterns– I had warned you… I am so pleased I did keep my word! As for the Chuck jumper, I adore this Salal cardigan. The fitted shape, the cropped length, the delicate lace detail, everything is absolutely perfect. I am a huge fan!

This should have been a very quick knit but it was my first time knitting a cardigan so I messed up my lace and ended-up with two asymmetrical sides… twice… Argggh! I think I wasn’t properly concentrating because frankly, the lace chart is not complicated at all. I nearly gave up… and I’m very pleased I didn’t, because this cardi is a beauty, in the perfect colour to go with my spring wardrobe. So my advice to you: try and have maximum peace and quiet while you are knitting each side of the lace!!!

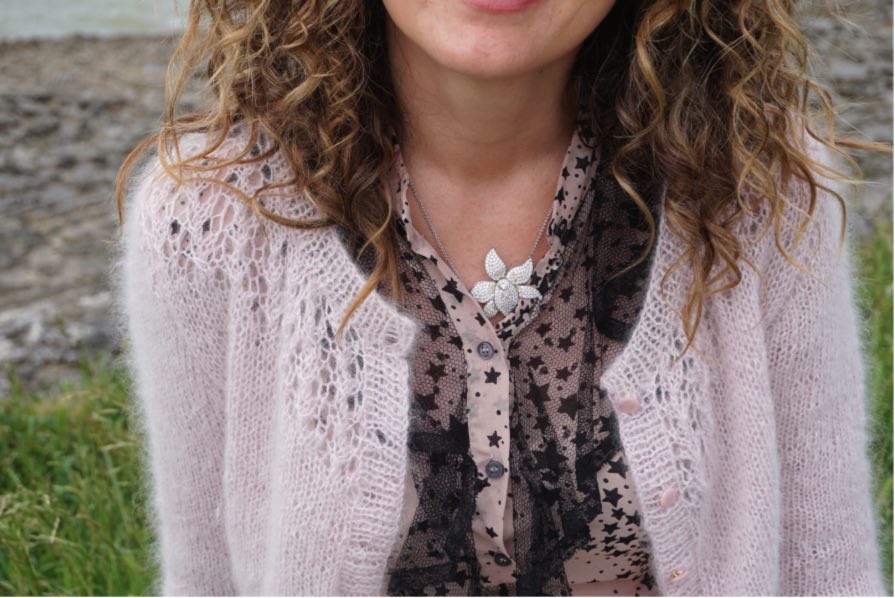
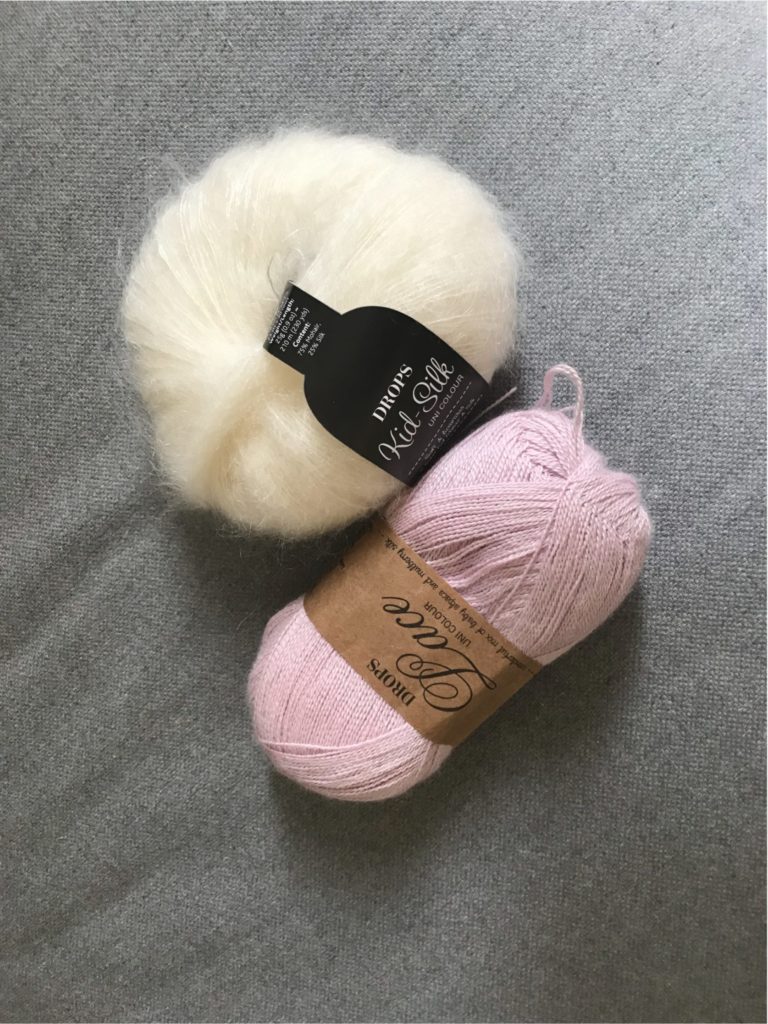
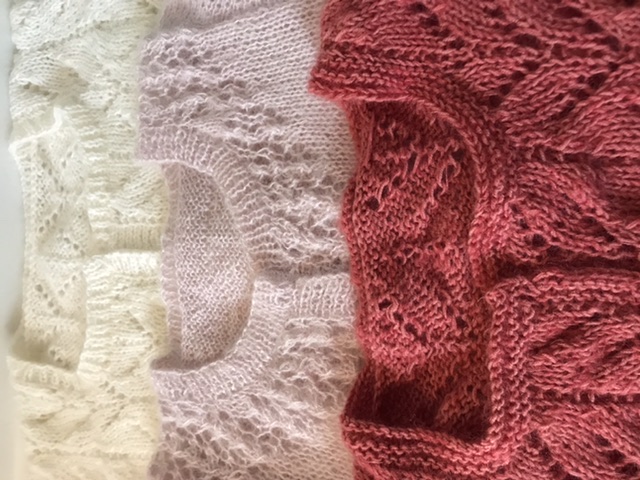
As for the yarn, I did not follow the pattern recommendations at all but was guided by my current obsession with fluffy knits. So I knitted a combination of two yarns: Drops Lace in Dusty Pink and Drops Kid Silk in Ecru. This may sound like a strange colour combination but I found the pink lace far two bright for my linking; matching it with ecru kid silk got me exactly the colour shade I was after.
I will definitely reiterate this colour mix, as adding the ecru creates a perfect pastel. I really enjoyed working with these two wools, they make a lighter combination than my usual kid silk – baby mohair one (see my two Blossom jumpers, my Chuck jumper and my Blossom shawl for a comparison). Pity the lace is available in so few colours! – and I think it is getting discontinued as well, nooooooo!!!
As for technicalities:
- I used 4 and 3.5mm needles (instead of 4.5 recommended by pattern). 3.5 was supposed to be only for ribbing but ny mistake I used them for the sleeves, not too visible so I did not bother redoing both sleeves (!!!).
- I lengthened the sleeves to 44cm (under arm measurement) to get long sleeves.
- I knitted the smallest size available (my knitting is very loose so I am always worried about messing-up fitted knits) and it fits to perfection, even at the back despite my narrow shoulders. This had been a worry for Chuck, which I knitted in the second size available, but definitely not here.
Not much to add, the more I look at the pictures the more I want to make another Salal in a different colour – better stock of that lace while I can find it!!

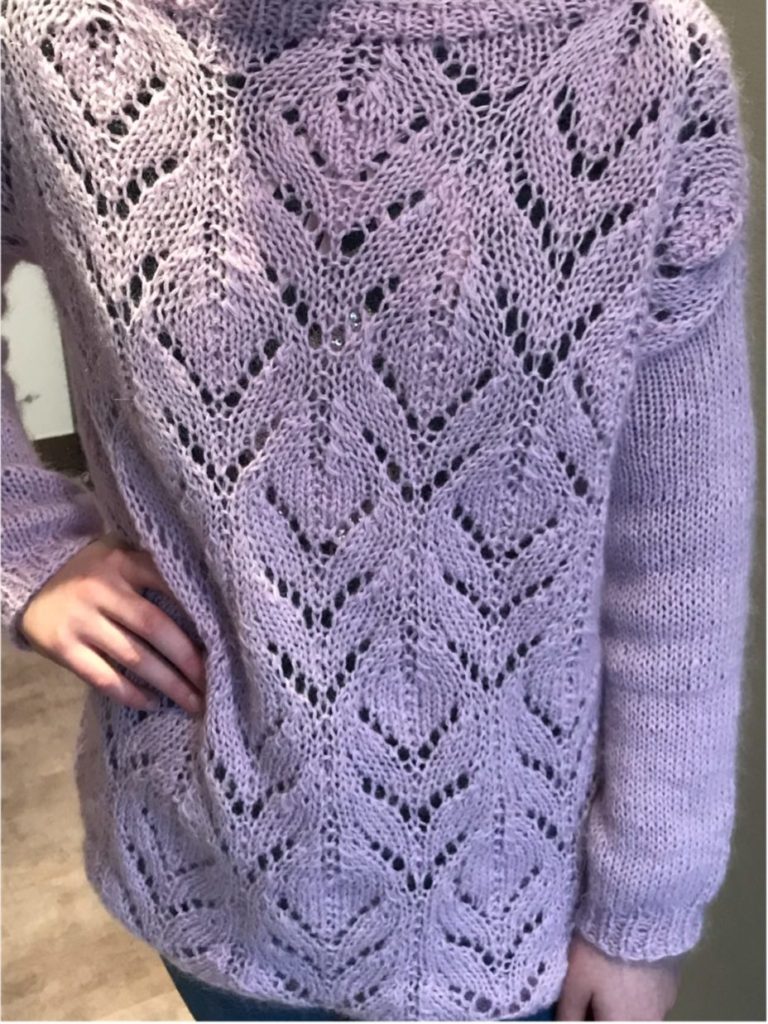
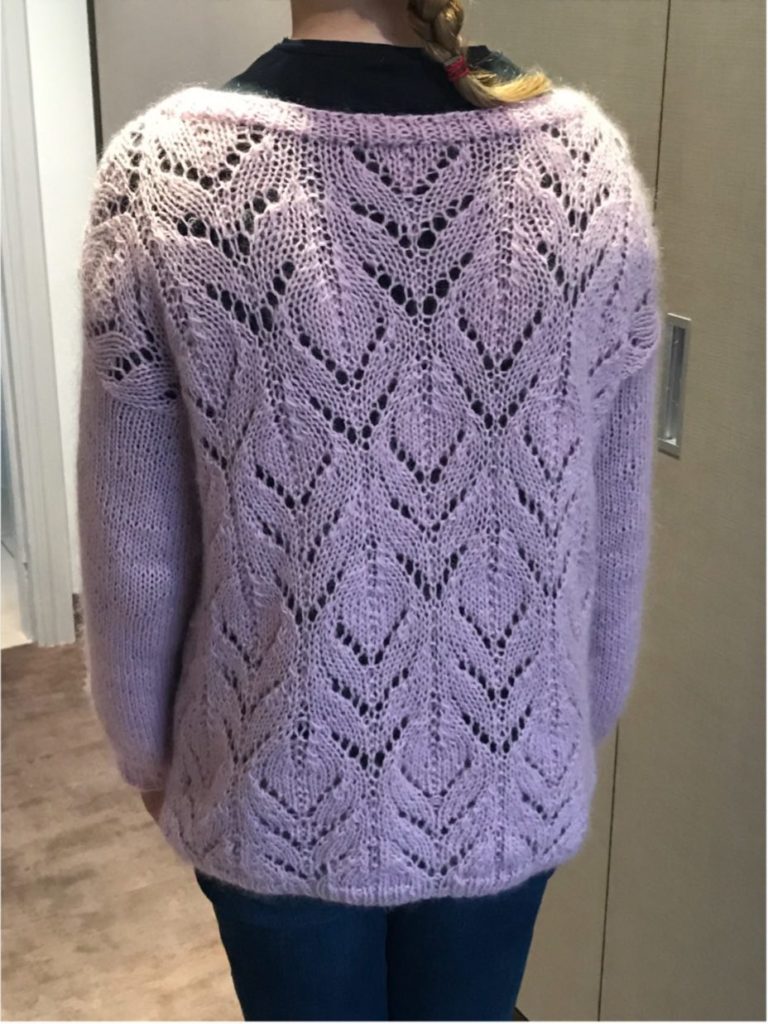
My girls’ Blossom jumpers
Once they saw my amazing lace Blossom shawl knitted earlier this year, both my girls were over-excited to discover I could make such pretty things – they had been used to my rather randomly-sized, irregularly knitted self-drafted horrors (they are SO good to wear them). I therefore had the perfect excuse to use this beautiful motif and knit them two Blossom jumpers one after the other- here they are:

Blossom was designed by talented designer Anna Dervout and there are three knitting options available: a shawl, a jumper and a cardigan. The motif is beautiful but actually quite easy to knit, as on top of knit and purls they are only three stitches you need to know:
- yo = yarn over – see this video for continental method and this one for the English method
- k2tog = knit 2 together (Continental / English)
- SSK = slip slip knit (Continental / English)
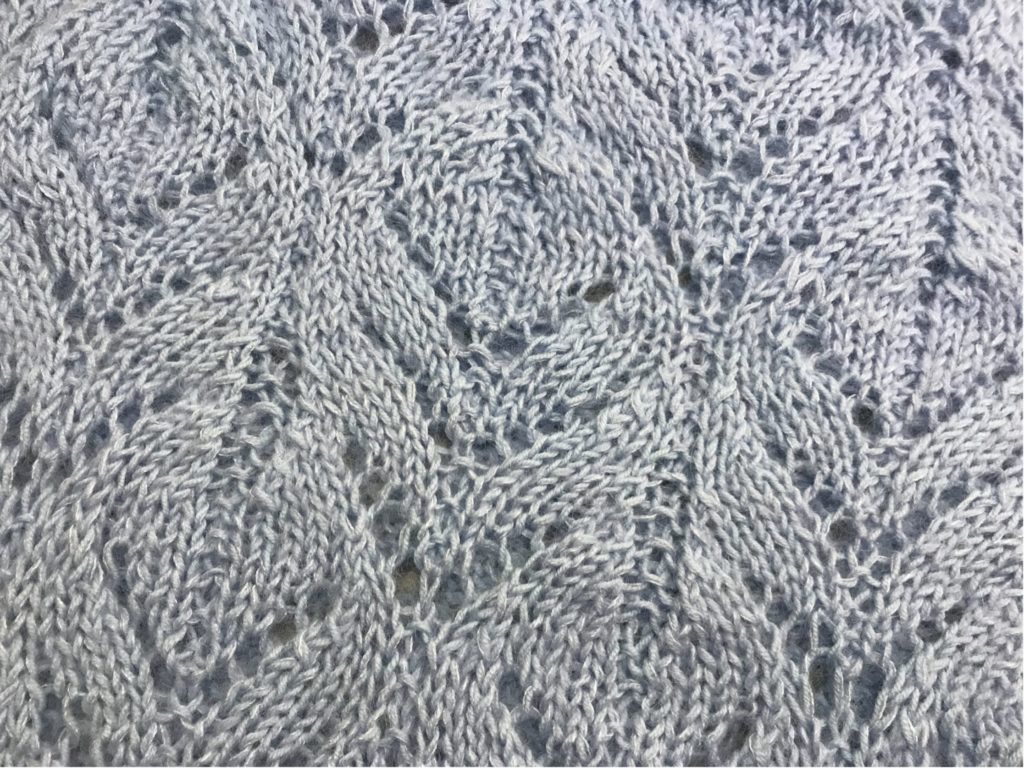
I had found the shawl quite complex, as on top of the lace you needed to manage increases, to create a triangle. So I must admit the jumper was a huge relief! – you just need to repeat the same motif several times, without too much thinking.
To avoid mistakes, I had the genius idea (only for the second jumper though!) to put a knit marker at each motif beginning. It increased my knitting speed considerably, as I was able to identify mistakes immediately rather than go a full round before. I also used markers for my sleeve decreases.
My first version was the pink one. The technicalities are the following:
- Needles used: 3.5mm for ribbing and 4mm for body and sleeves (a size below the one advised by the pattern but my knitting is very loose).
- Yarn used: knitted in double-year, using Drops baby merino light pink 05 (6 skeins) and Drops kid silk light pink 03 (5 skeins). This is a yarn combination similar to the one I used for my shawl and I love how soft it is to the skin.
- I used the second size of the pattern with no modifications whatsoever.
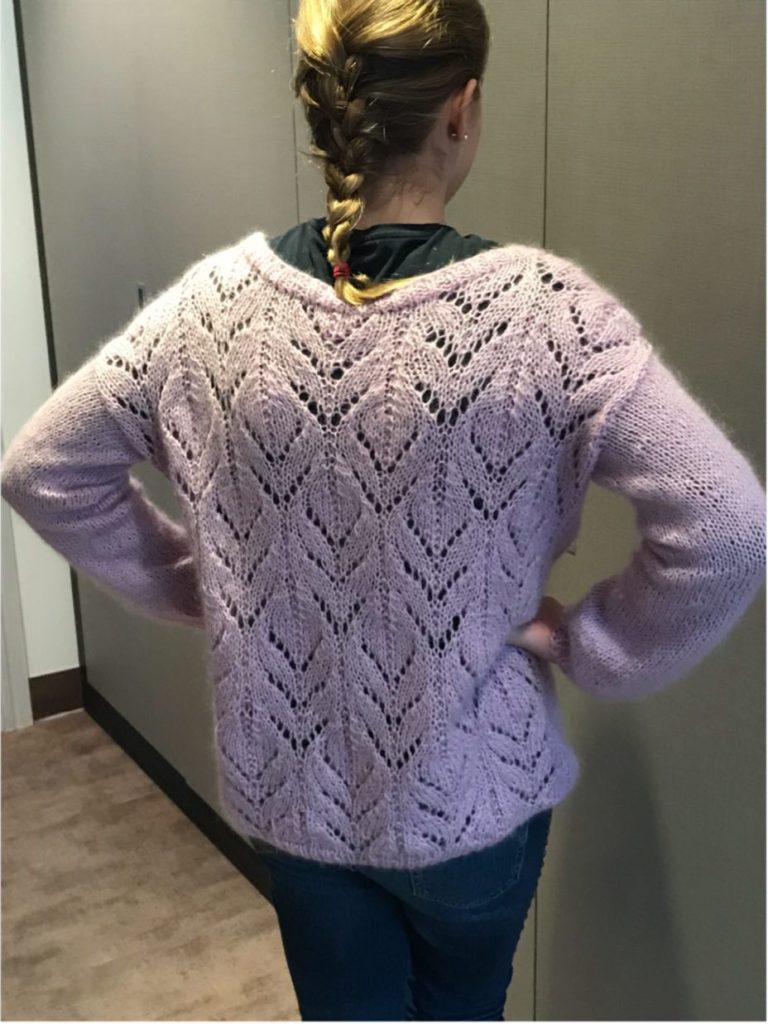

I was actually quite disappointed by this jumper for several reasons:
- First and most obvious, it is far too big!! I think I made the mistake of underestimating the loose aspect of the pattern – and neither I or my girls are into loose tops!
- Second, I dislike the dropped sleeves shape – it was visible on the presentation pictures of the designer but I did not pay enough attention.
- Third, the sleeve opening is far too tight – 15cm, while for my (very fitted) Chuck jumper it is closer to 19. I should definitely have checked before!
But on the other hand I was enamoured by the motif and the yarn combination. And as my older daughter was very keen to get her jumper, I knitted a second one! And this one is just… PERFECT!!!
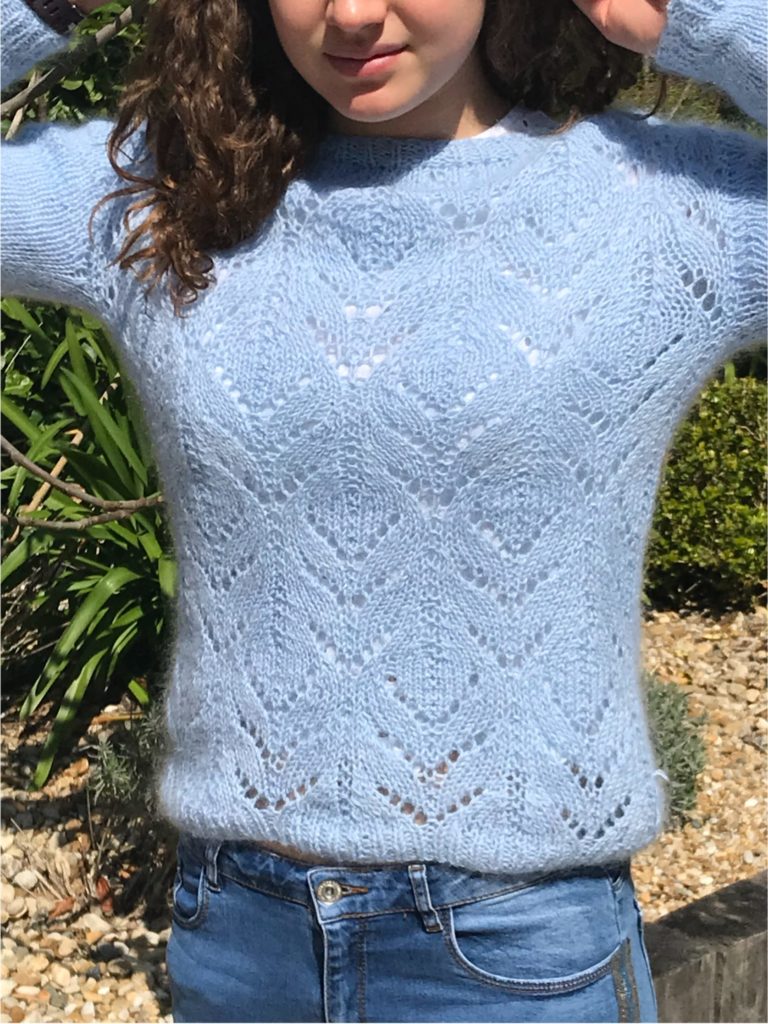
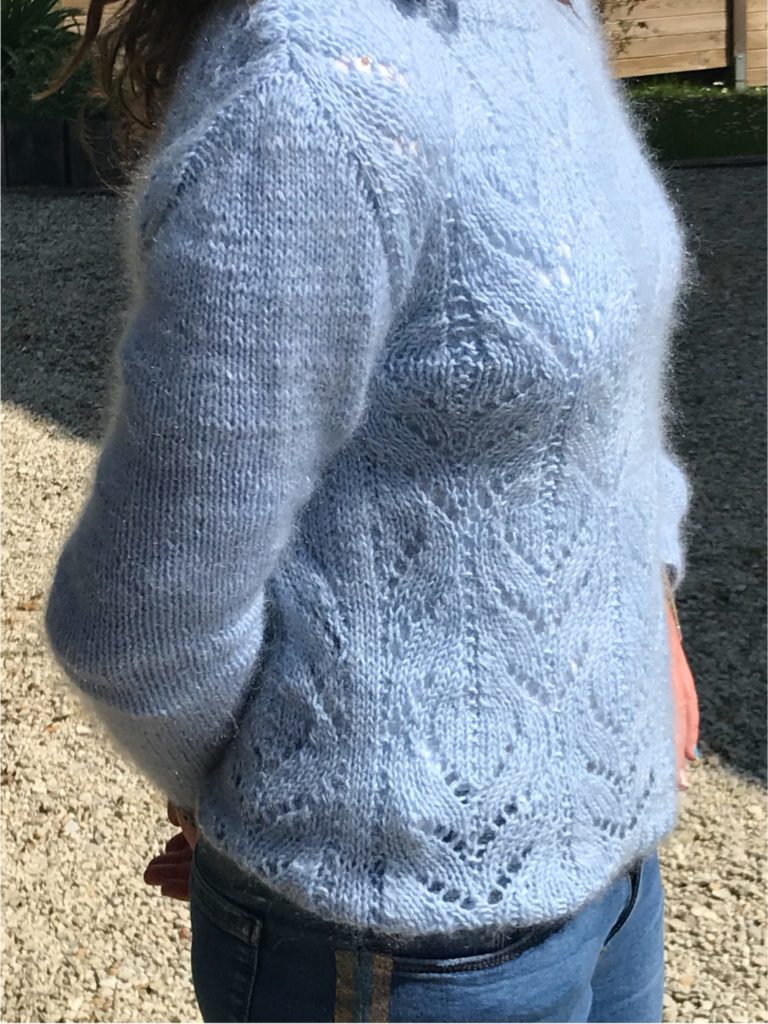
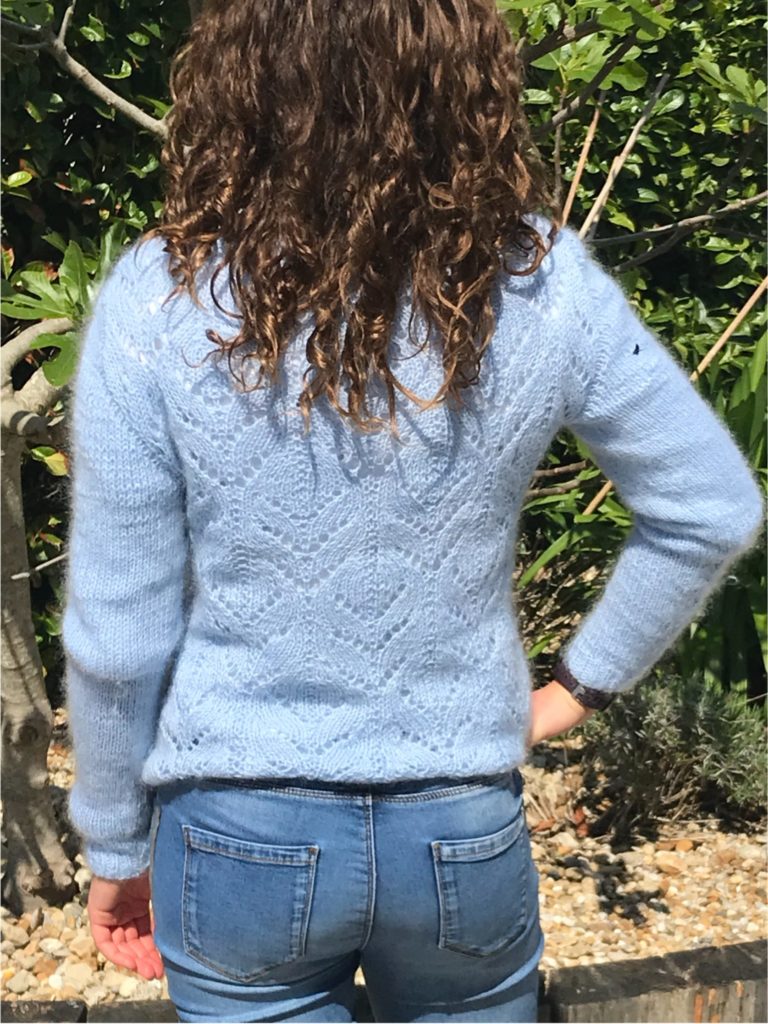
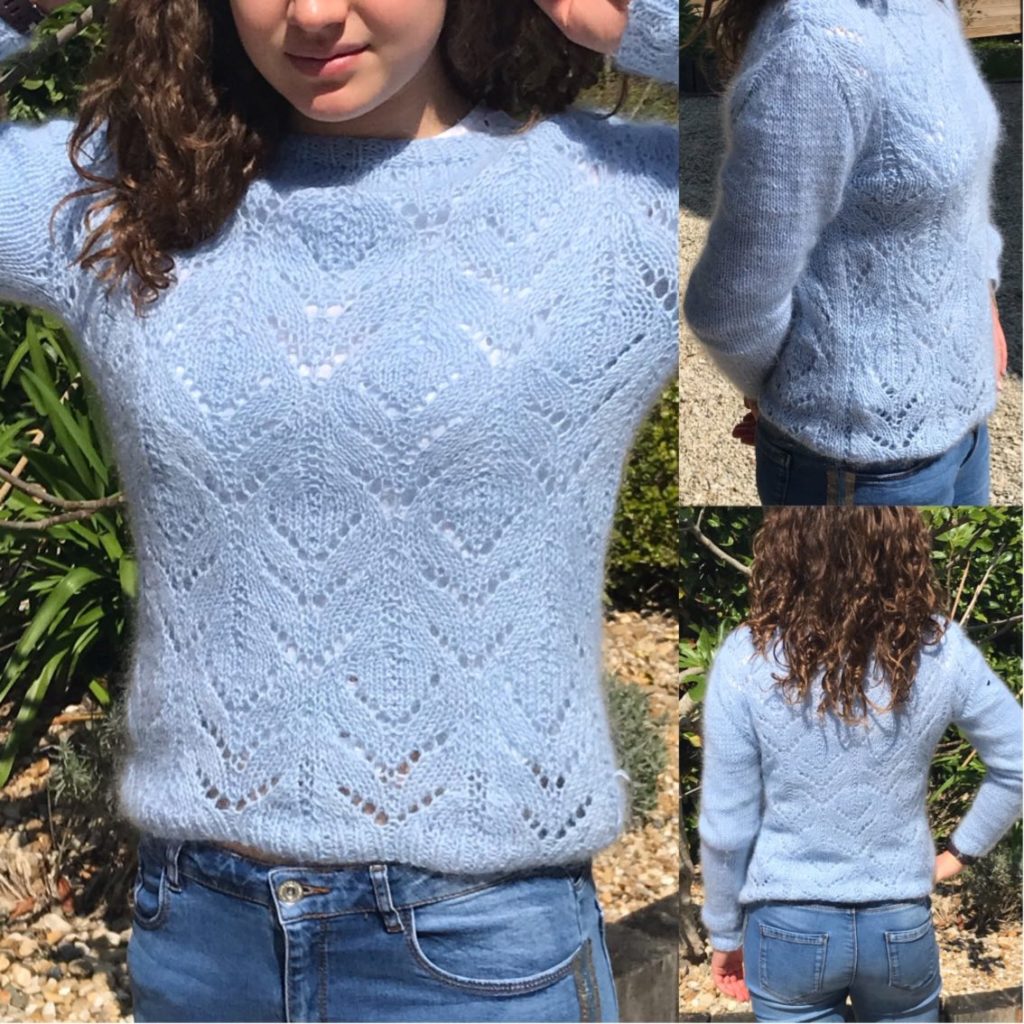
The yarn combination is Drops baby merino ice blue 11 (5 skeins) and Drops kid silk light steel blue 07 (4 skeins) and the needles used are the same. The main changes I made are these:
- I reduced substantially the size – one size below the smallest recommended, with only 4 motifs at the front and 4 at the back (in case you are wondering my daughters, despite being two years appart, are the same size – which also happen to be my size, how convenient is that!).
- I shortened the body length to what my daughter liked (bottom to under-sleeve is 37cm) – was it for me it would be even more cropped.
- I increased the sleeve opening to 19cm.
- I shaped the sleeves using German short rows, using the technique of the Chuck jumper – not more dropping shoulders!
Obviously it took me so long to write this article that I have now another two Blossom cardigans knitted now… but awaiting buttons to be introduced on my blog. Given how long mails takes currently, I may well post them in the middle of the summer… Of well!
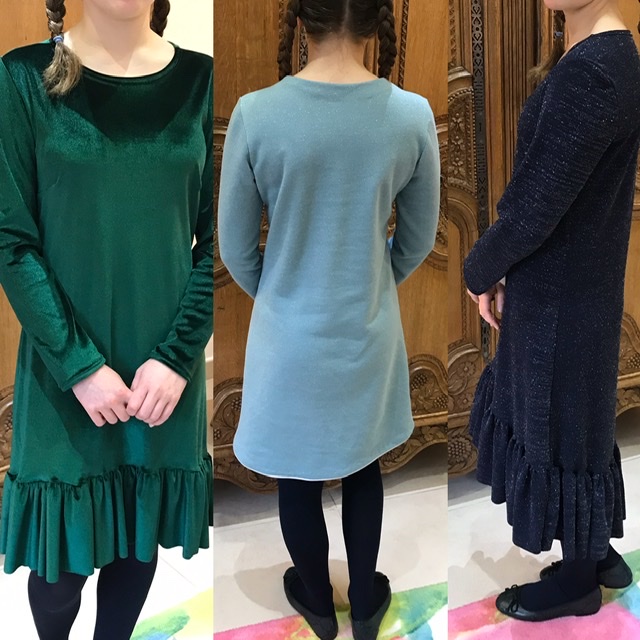
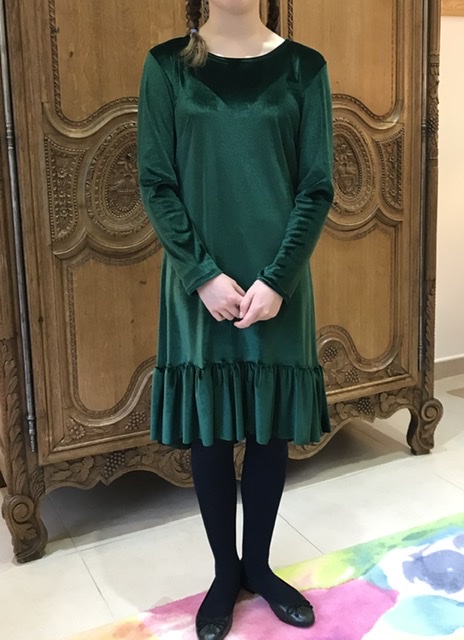
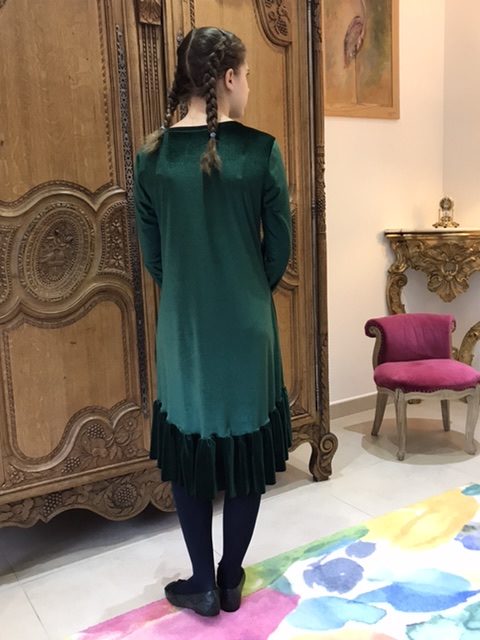
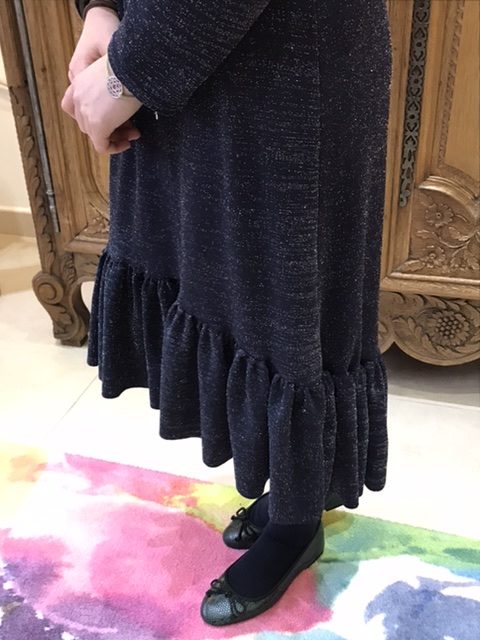
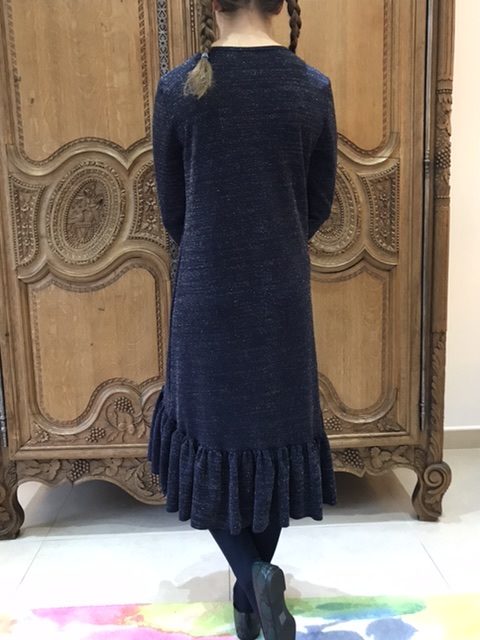
Three Cara dresses for my teenager
Let’s change a bit of color-scheme and style on the blog! Today I’m showing you the dresses I made for my teenage daughter for the winter, using the Cara pattern by La Maison Victor.
Sewing for teenagers is a minefield (and I refuse to make jeans or cropped hoodies!) and I was amazed she was so pleased. So my recommendations are the following:
- let them choose the fabric;
- discuss shape AT LENGTH with them – contrary to me, my daughter hates anything that is too adjusted; and she won’t wear anything above the knee either;
- if one works make several of the same! But with easy variations – pre-approved by your teenager of course!
You may remember I had used the Cara pattern for myself previously, with limited success – for me, the dress was far too wide at the shoulders! Not even to mention the agony of wearing this fabric! (see this article for my moaning about it all).
Thankfully my daughter has more standard shoulders than me; and otherwise is currently exactly my size; so I managed to reuse the same pattern pieces, without re-cutting – that said, having two girls, I never cut into a pattern directly, I copy it on tracing paper so that I can reuse it in a different size if need be.
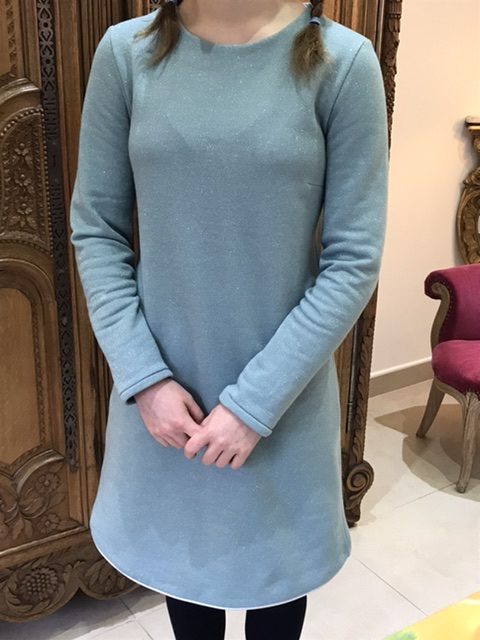
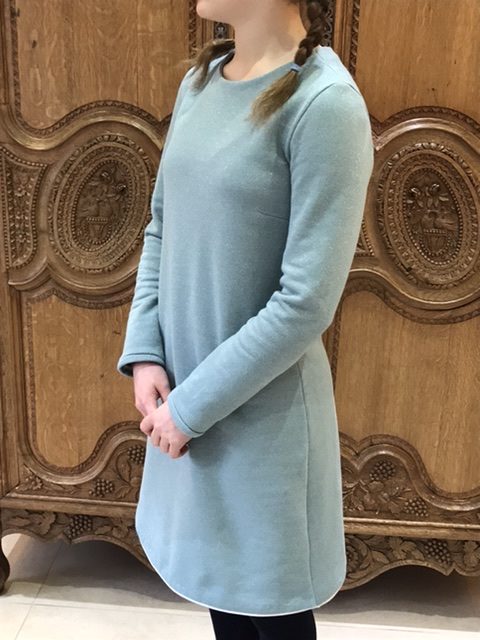
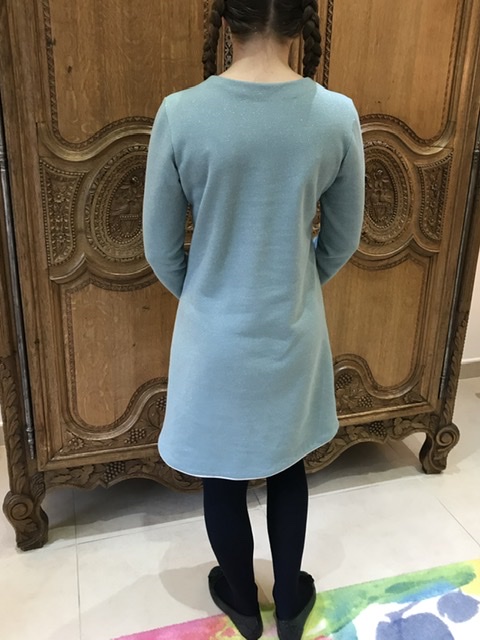
So – version 1: I used a French terry fabric, super soft on the inside, and with silver sparkle on the outside. I added silver piping at the hem – because, well you know, why not!
Version 2: stretchy velvet similar to the one used for my collection of Magnolia dresses. I created a curve at the bottom of the dress (15cm off at the highest point); cut a 20cm x 150cm band of fabric and gathered it on one side; then joined both (this is exactly the same technique I used for this dress). No hemming needed here, hurrah!
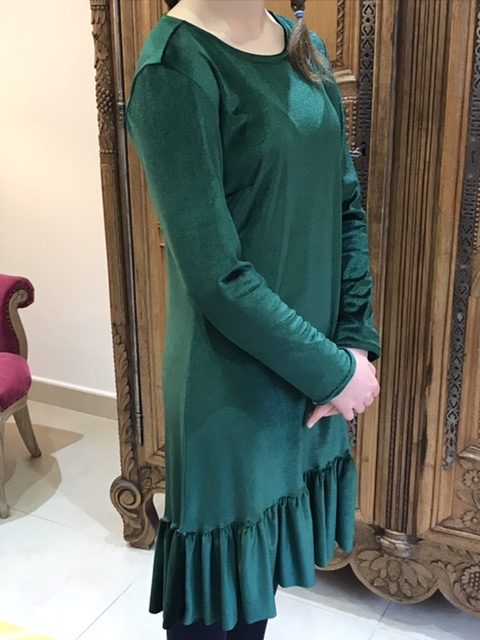
Version 3: another stretchy fabric, here too with silver sparkles. Exactly the same recipe as version 2.

And there we go. Very easy makes and 100% approved by my teenager. Now I need to figure out what the sew her for the summer – maybe a version of this smocked dress, but with shoulder ties? Any recommendation welcome…