Long Desired, Finally Knitted: My First Untangling Knots Jumper
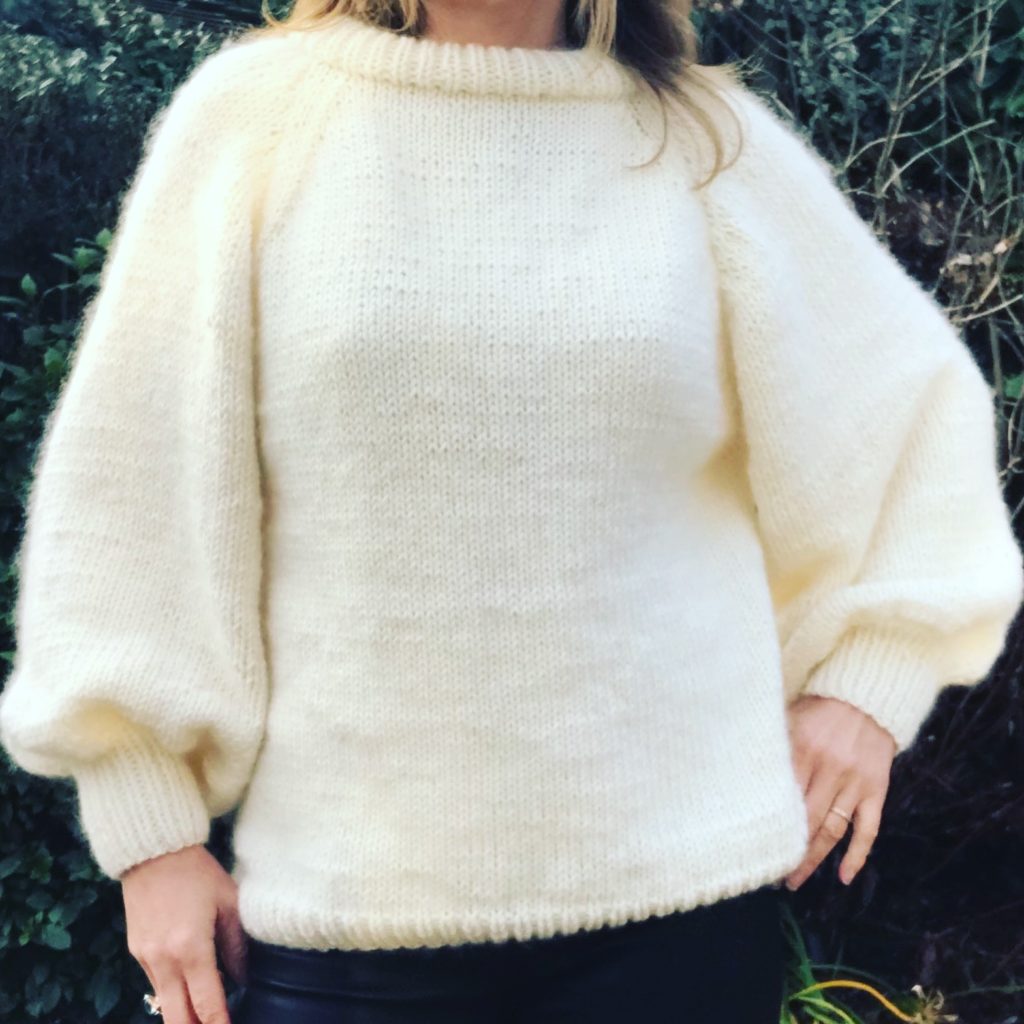
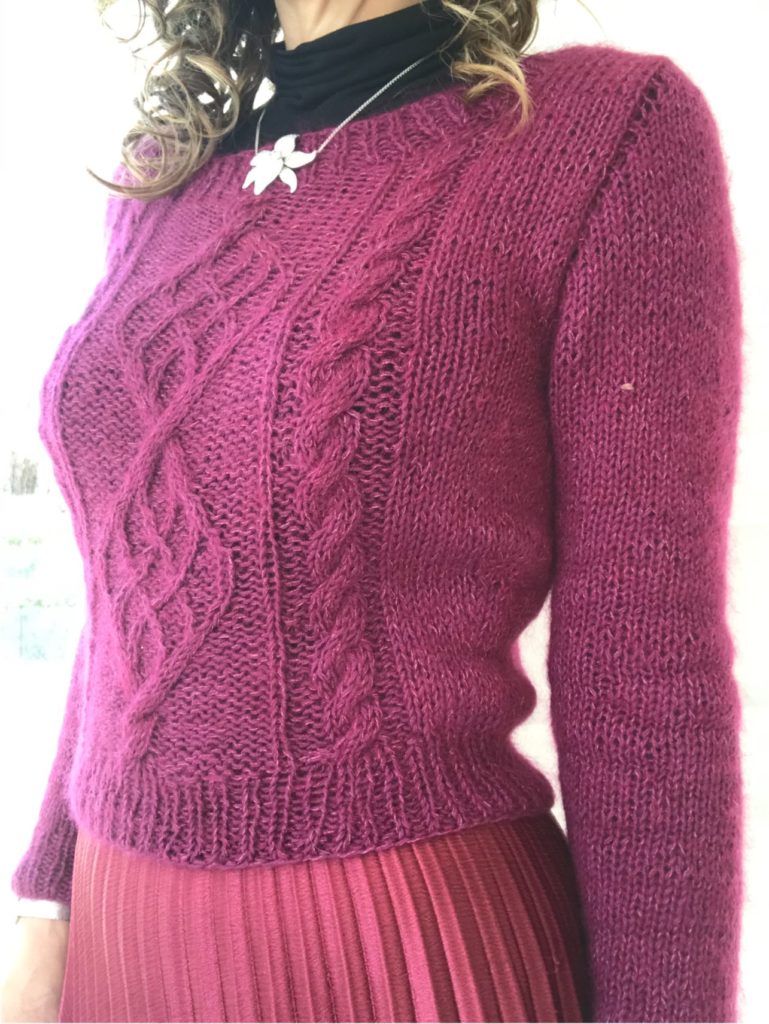
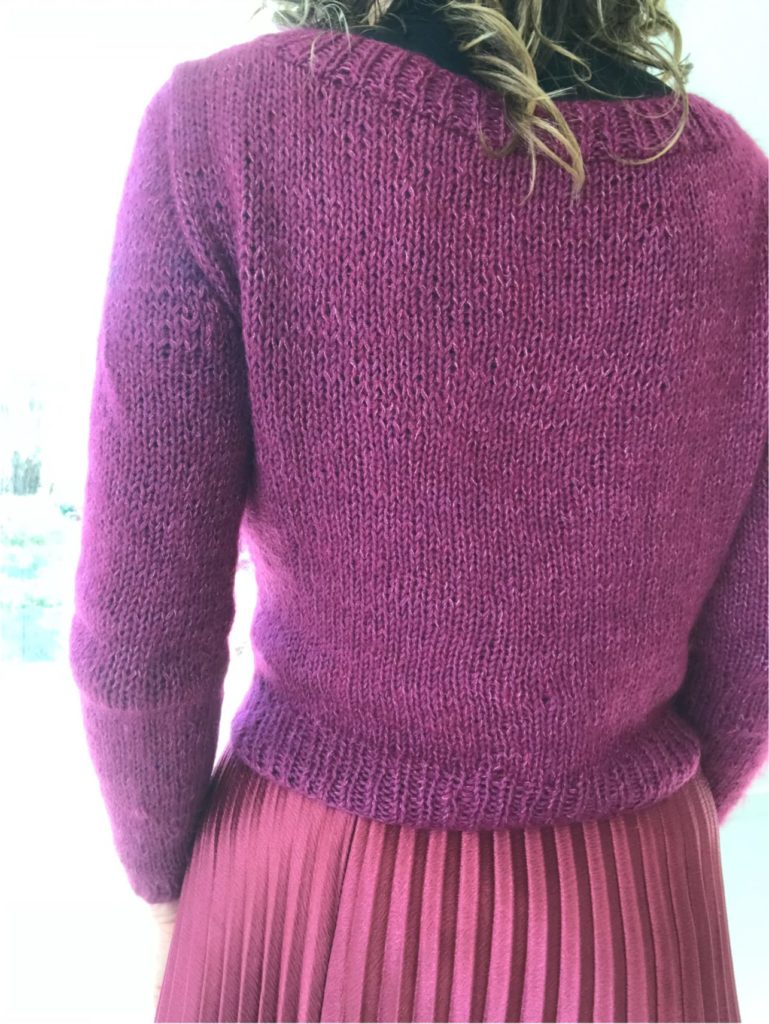
This is definitely a major achievement in my knitting life: I have finally managed to knit an Untangling Knots jumper, specifically Chuck. And I just think he is the most handsome thing I’ve ever knitted!
I had been eying Untangling Knots knitting designs for years, after discovering them on Dolly Clackett’s blog – if you don’t know her yet, Roisin has the most amazing collection of handmade 50’s-inspired dresses, and her Untangling Knots cardigans perfectly compliment them.
I even bought the Chuck pattern two years ago but… I just couldn’t understand anything! I tried but I couldn’t even understand how to cast-on the initial stitches. Being a top-down, French knitter, I did not understand the bottom-up construction method, the logic of the pattern, the abbreviations…
But as I progressed in my knitting over the past few months, here are a few things that helped:
- First, I discovered this amazingly helpful website, which explains all the abbreviations and shows you in photos and videos how to make all possible stitches – this has been like a miracle in my knitter’s life!
- Second, I started knitting from patterns (previously I just knitted pattern-free shawls and randomly self-drafted jumpers) – I found the Along Avec Anna patterns particularly straightforward for pattern beginner. I started with the Blossom shawl and followed-up with two Blossom jumpers (soon to be blogged).
- Third, the logic of the Untangling Knots patterns finally became clear. They seem to follow this logic: start from the back, keep on hold when at the under-sleeve level, attach the front, start knitting in round when the back level is reached, then add the sleeves. This techniques results in a completely seamless knit and a perfect finish.
So here I am, having completed my first Chuck in bit under three weeks. I must say I am utterly pleased with myself!
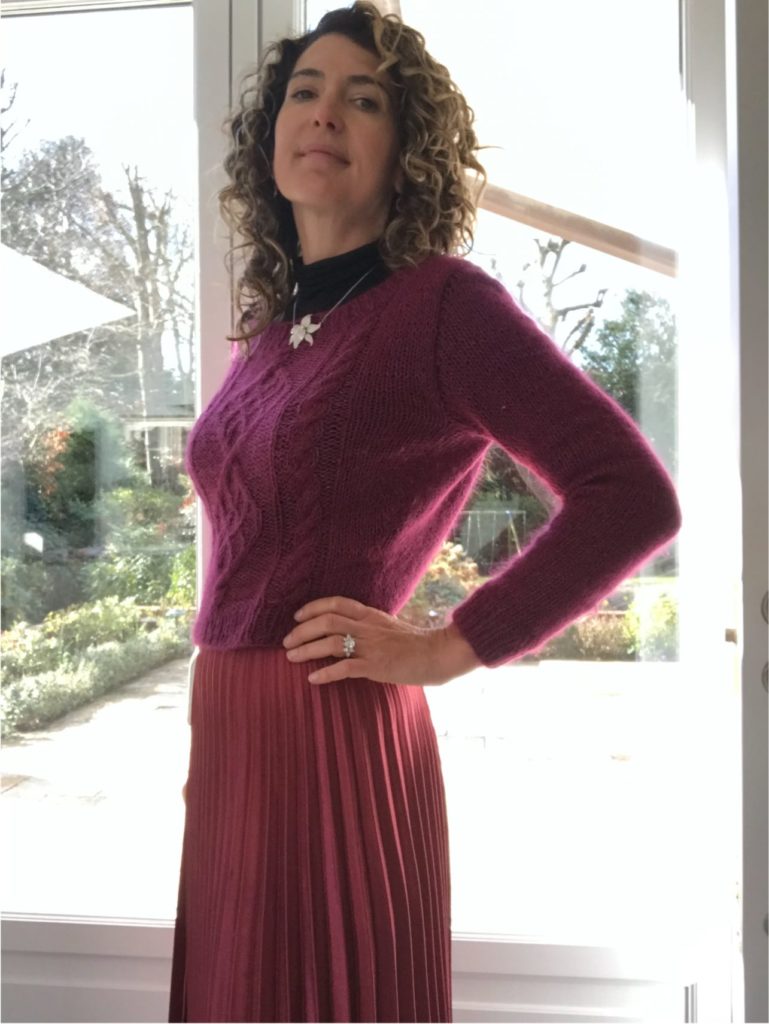

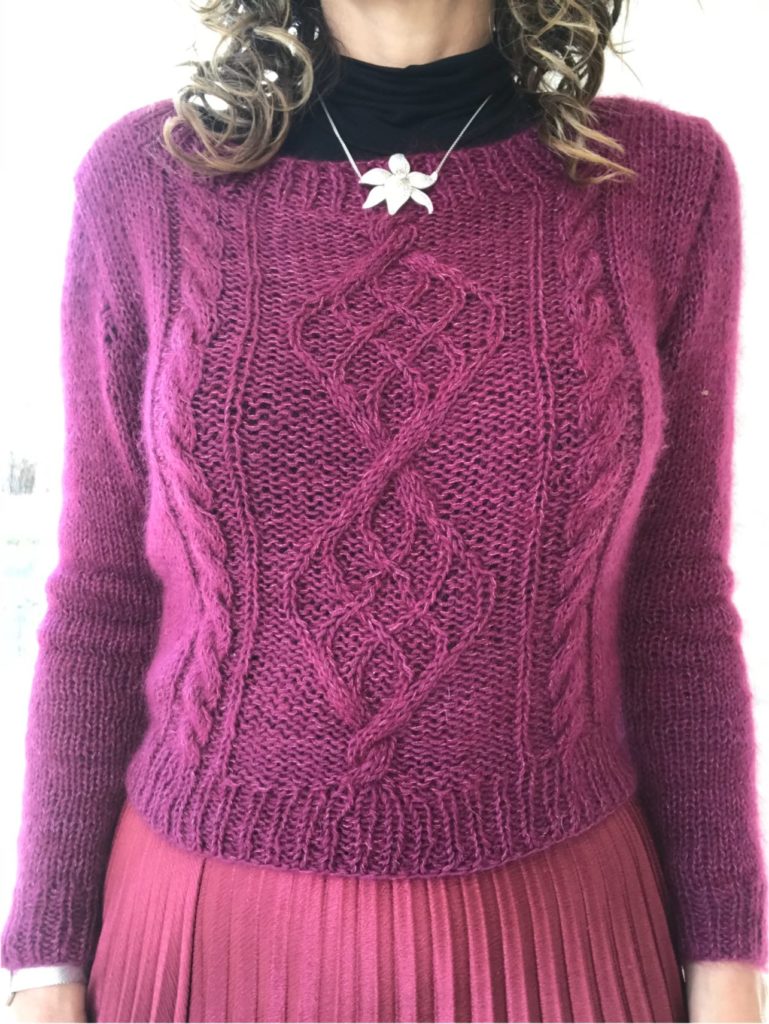
I absolutely love the fit and shaping of this sweater – except at the back, where it does look a bit loose. I think it is related to my unusually narrow shoulders but I don’t really know how to sort this out without making the front too narrow – I think I will contact the designer for advice, as I am very keen to knit the exact same jumper in several other colours!
As for technicalities:
- I am a UK size 8/ FR size 36 and I knitted the smallest size available.
- I am a very loose knitter and achieved the right gauge using #4 needles and a combination of Drops Baby Merino yarn – colour 34 Heather, 4 skeins; and Drops Kid Silk – colour 17 Dark Rose, 3 skeins.
- I used #4 needle for everything except the ribbing, where I used #3.5 (this is my only deviation from the pattern).
Not much else to say except that you’re likely to see a number of Untangling Knots knits on the blog in the coming months… Next on the list is a yellow Salal cardigan, wait and see…
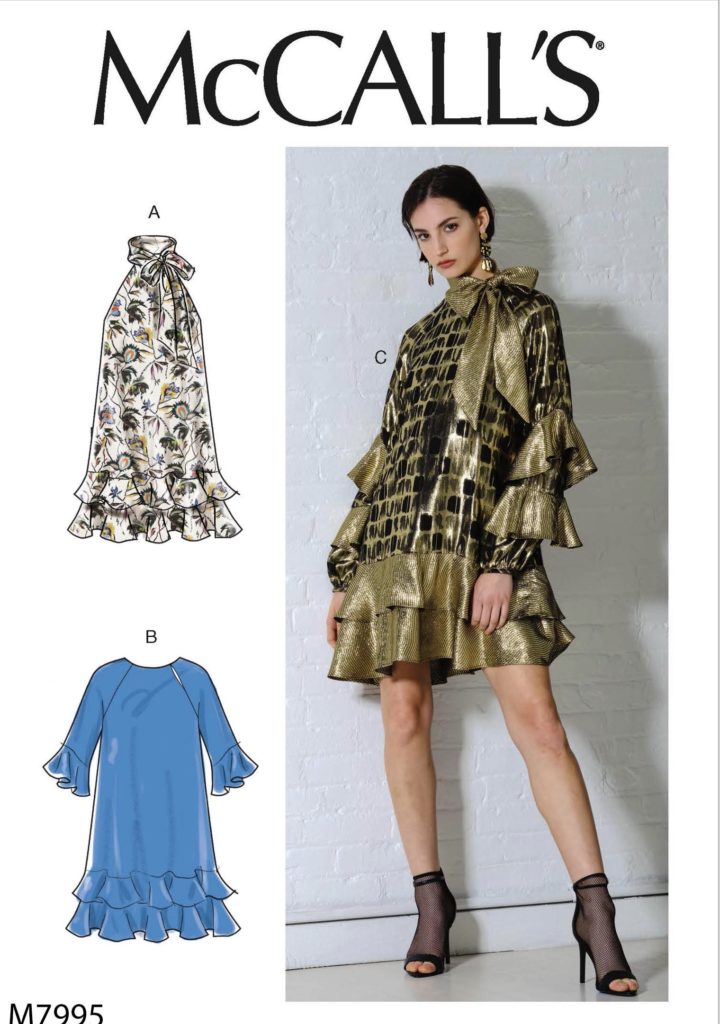
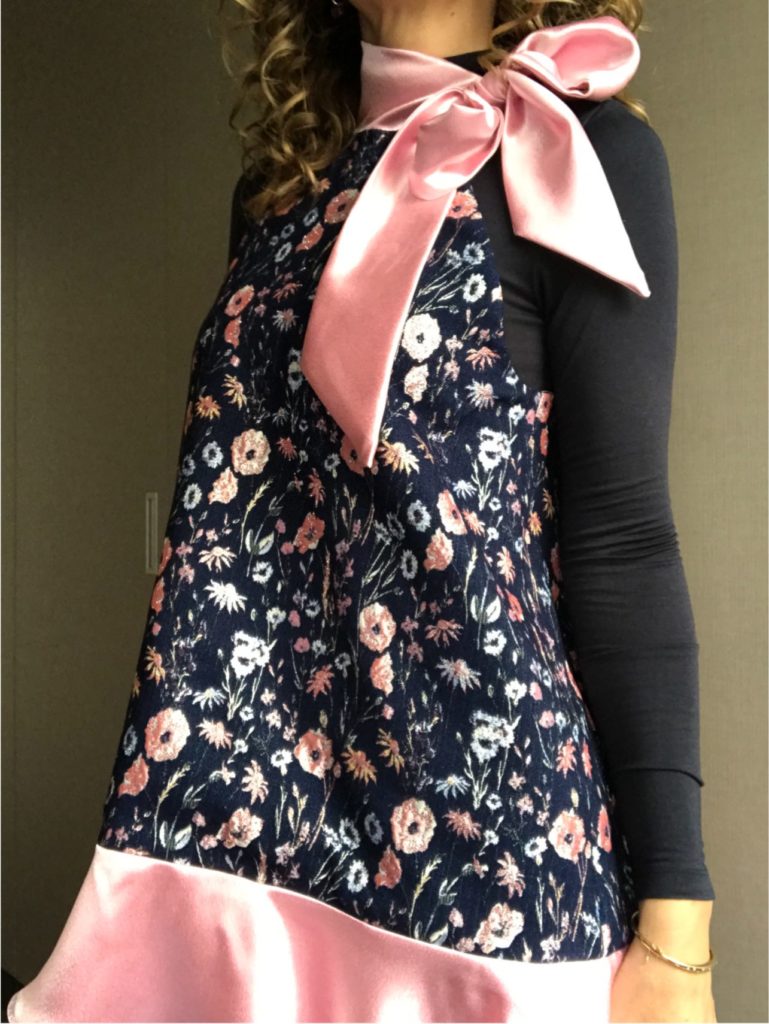
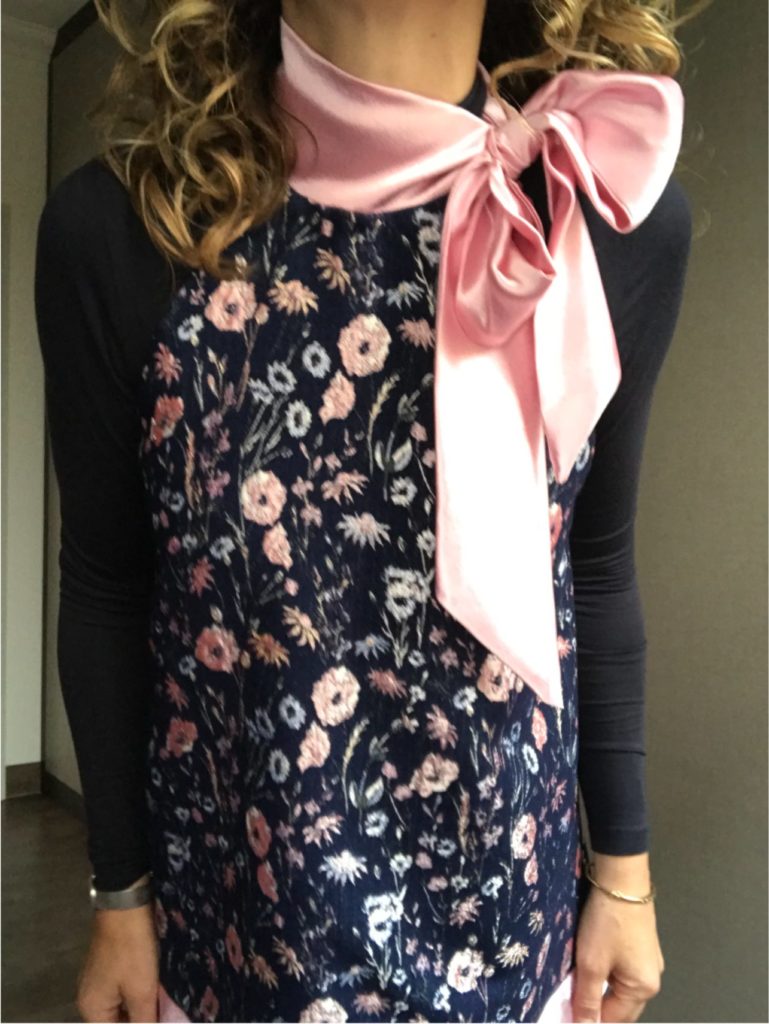
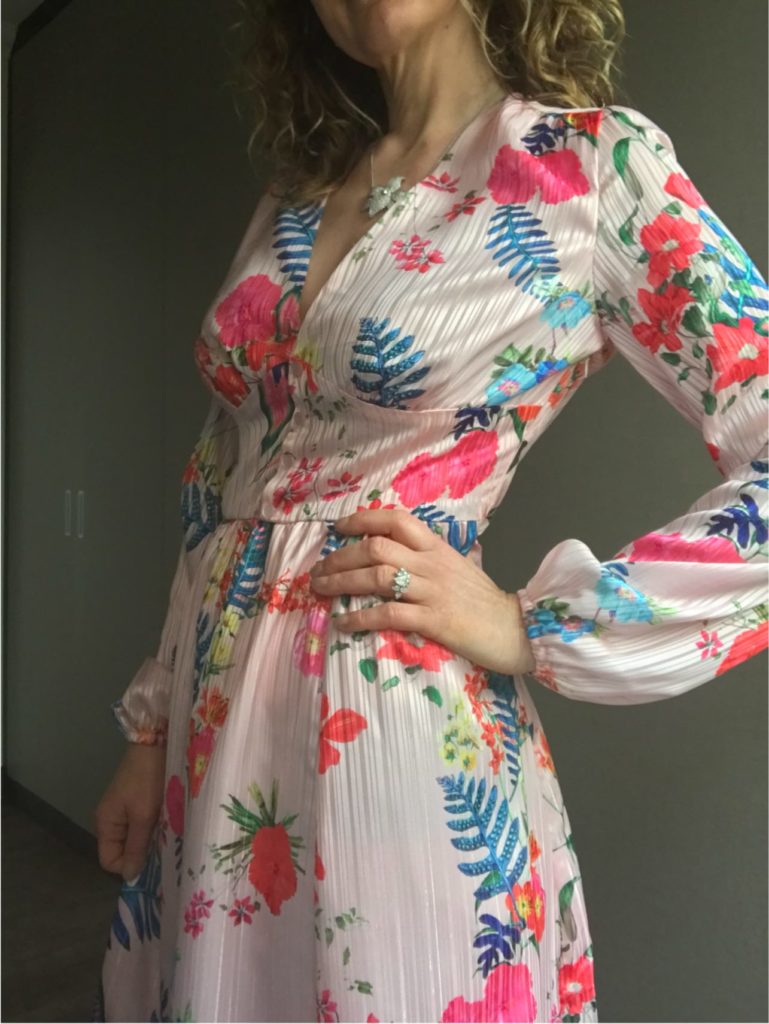
Pink Ruffles – M7995 Dress
Is there anything like a dress pattern crush? – all seamstresses will reply in unison « of course« !!! Anyway that’s exactly what I felt when I first saw McCall’s M7995 dress, released as part of their last A/W collection – too quirky for a long-term relationship, but definitely too attractive not to make one!
My crush was made even worse when I saw Zoubi Zoubisou’s version on Instagram. The fabric contrast was such a genius idea, I had to have the same!!!
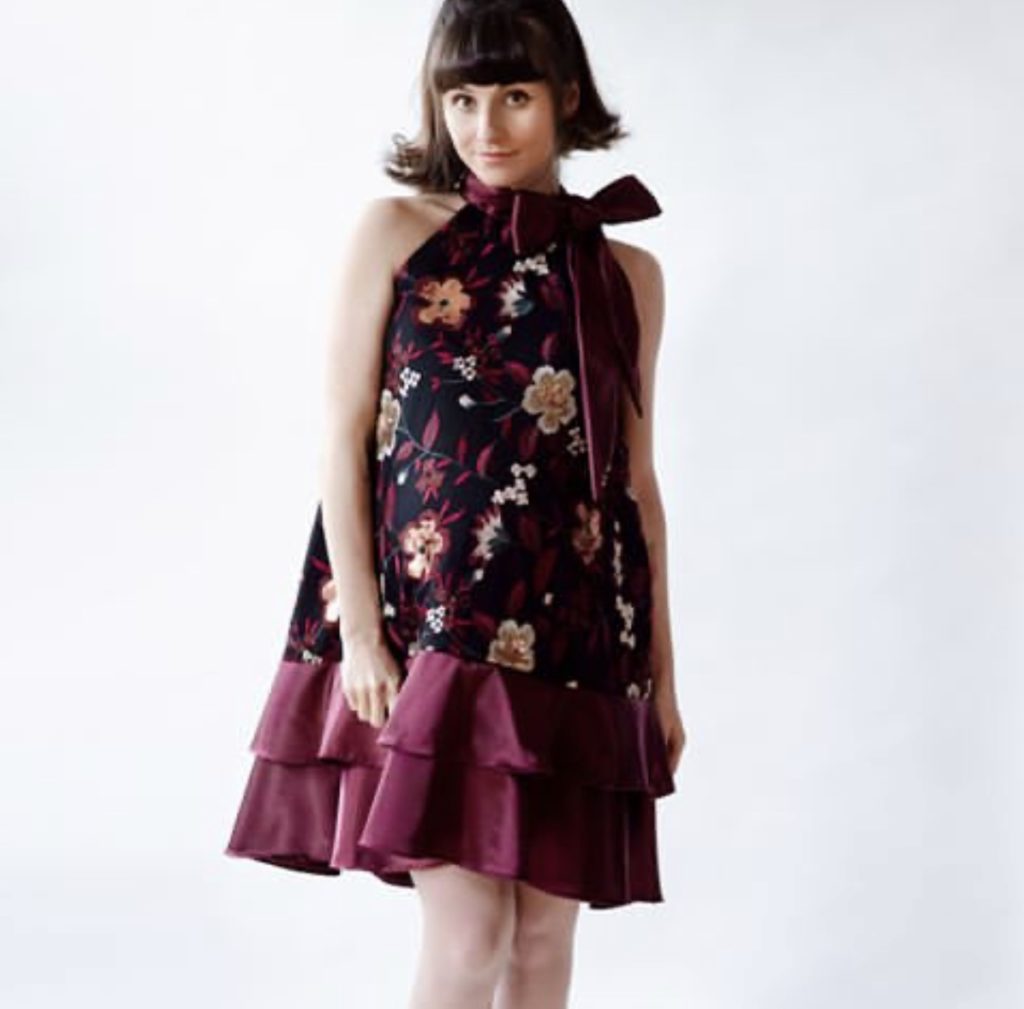
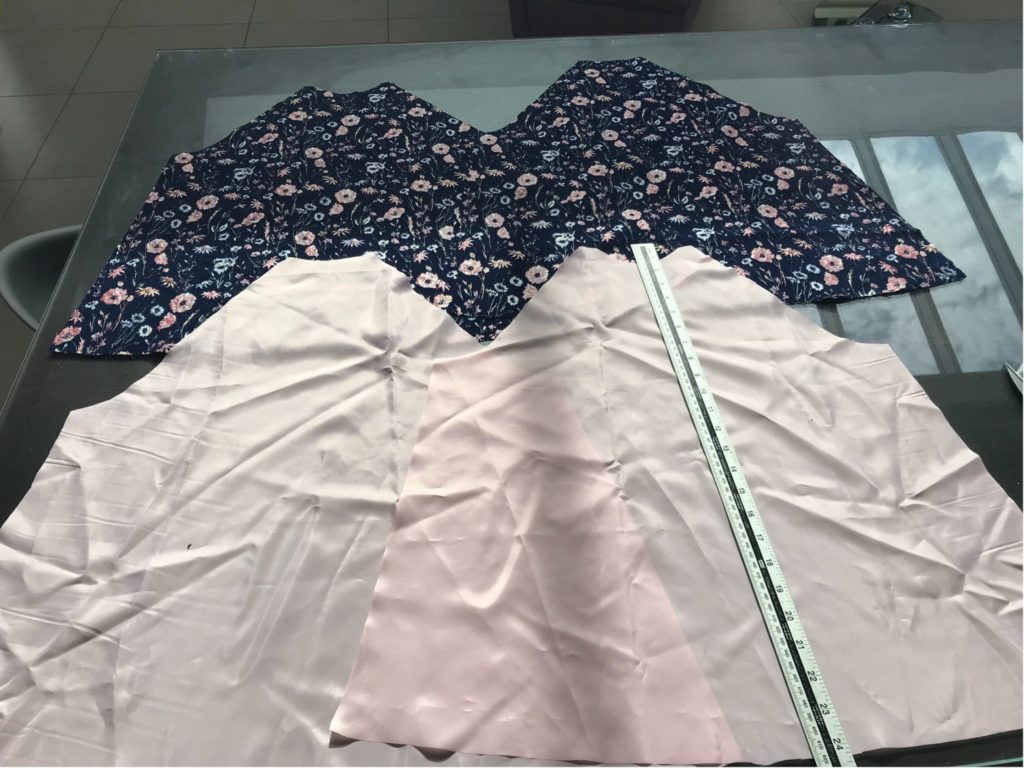
After a couple of months looking for the appropriate fabric, I actually… found it in my stash! Do you remember this dress? – I never posted specifically about it but it was part of my brocart frenzy 18 months ago...
I had a bit left of this beautiful brocart for the body of the dress (you need very little if you’re not adding the sleeves, something like 70cm!); and I miraculously found a matching shiny pink crepe on the Croftmill website, for the bottom ruffle and the bow (I bought 1m) – we had a deal!
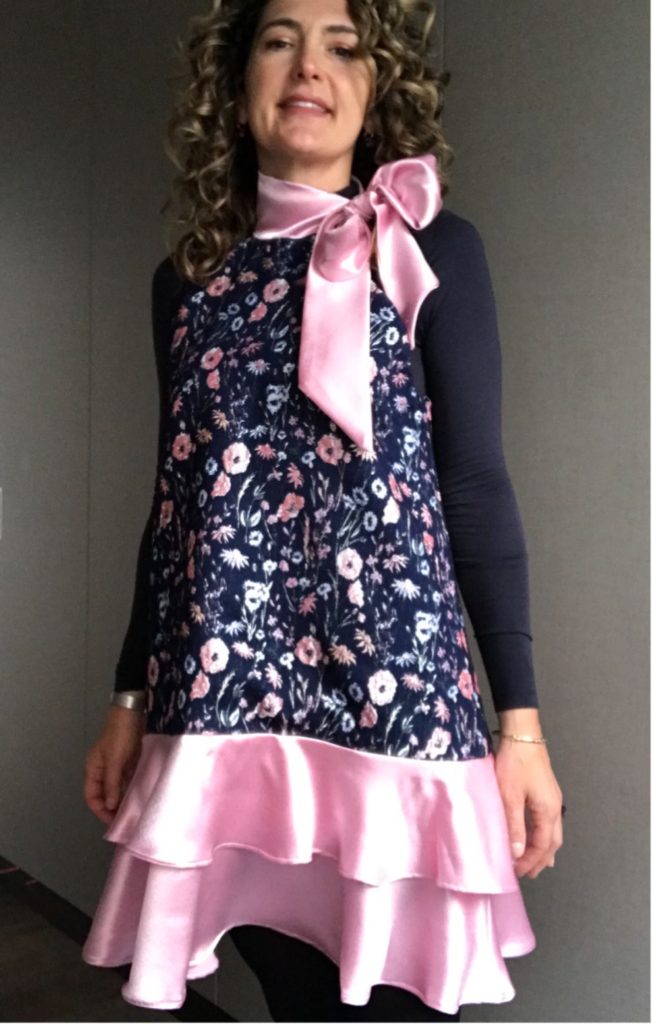
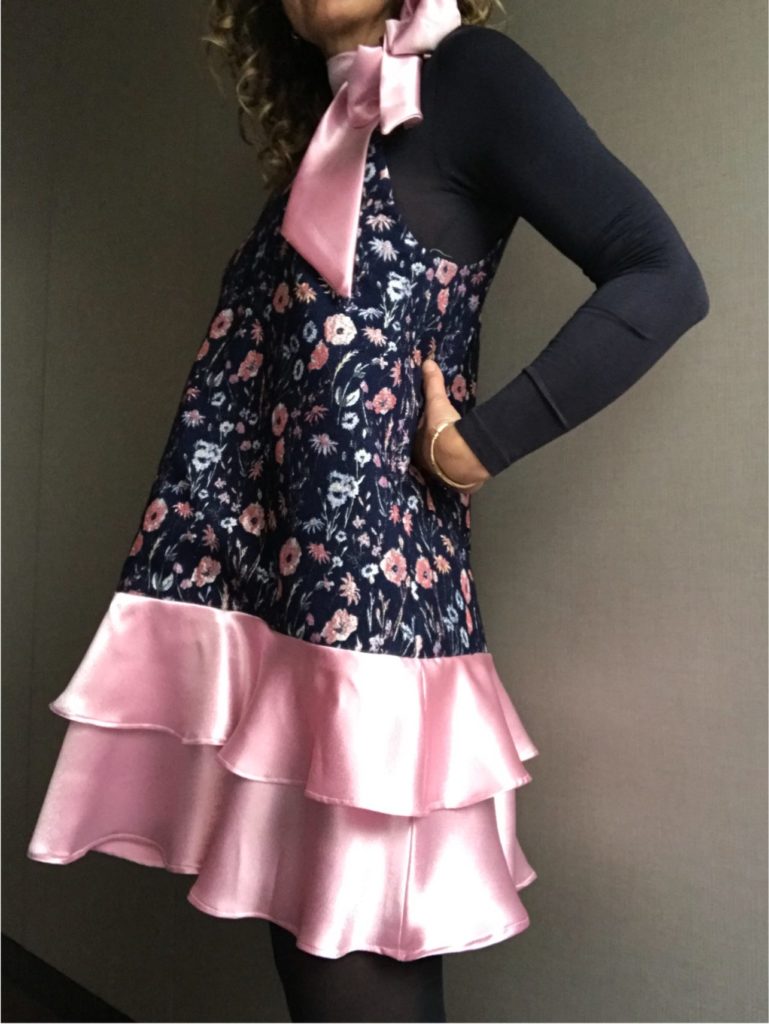
Based on the finished measurements of the bust indicated on the enveloppe, I cut a size S, which seem fine even with my E-cup – but I stupidly lowered the sleeve opening by 1.5cm, which I always do with McCall patterns but shouldn’t have done with this one – oh well.
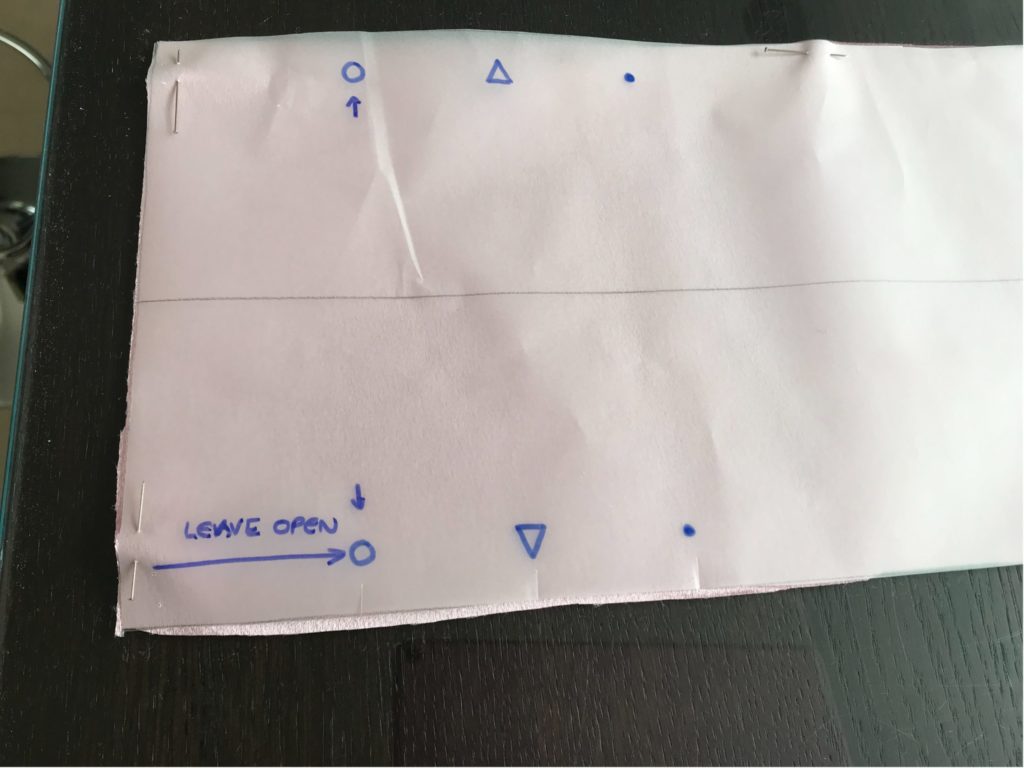
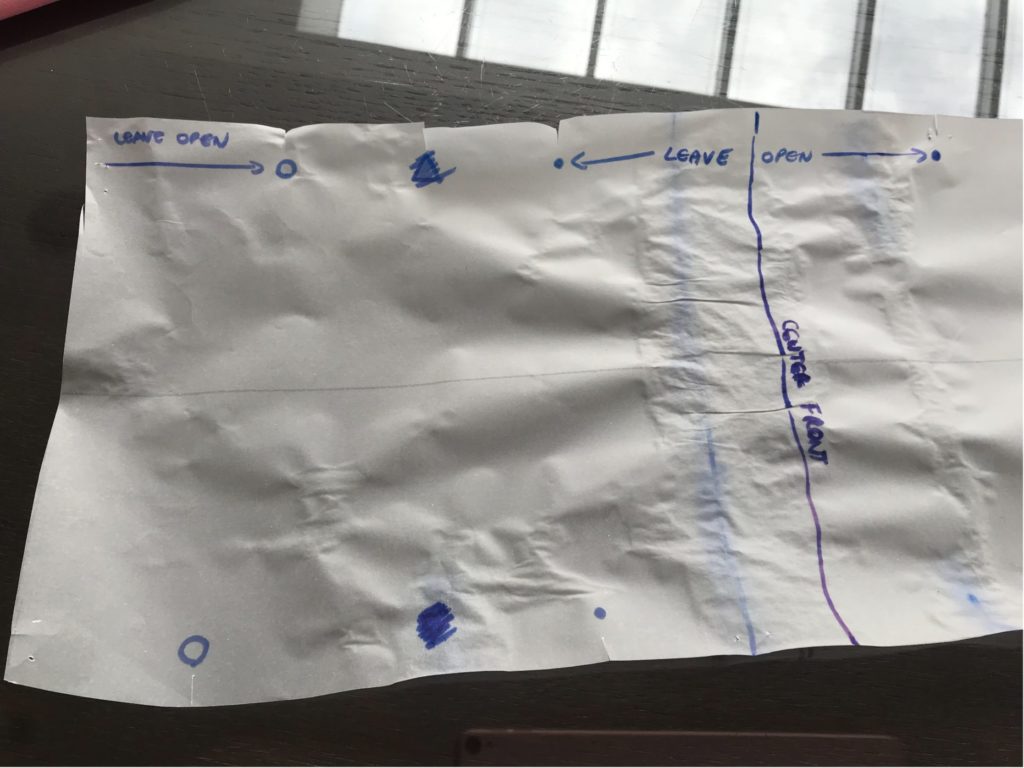
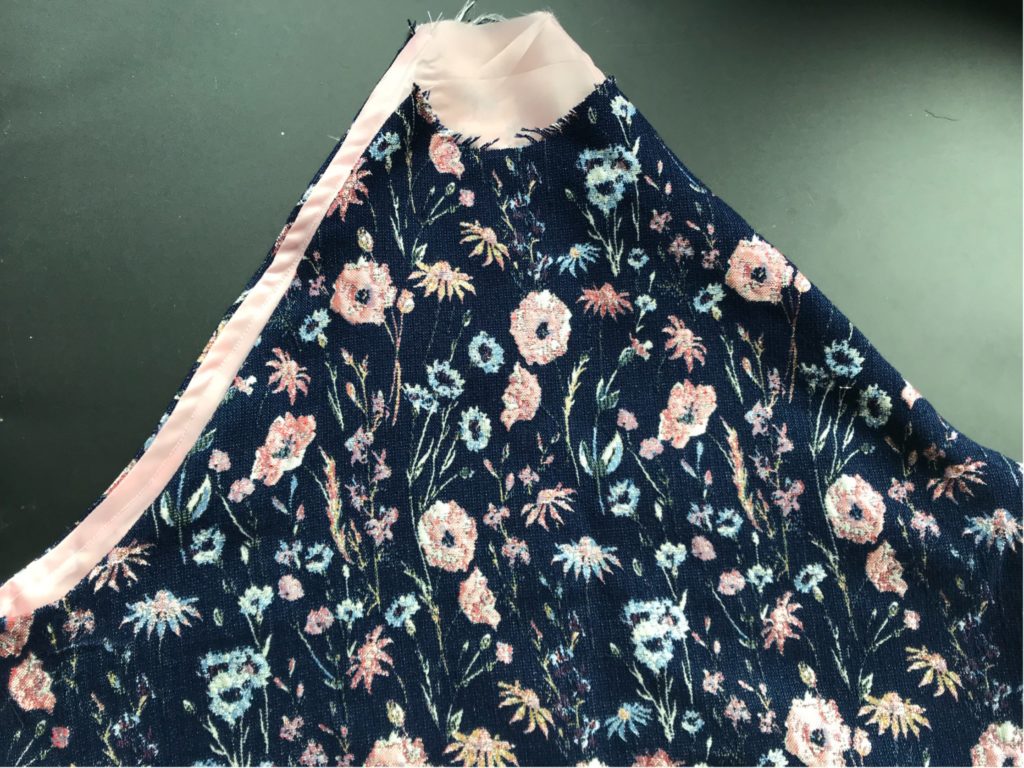
I had a bit of a struggle with the instructions for the collar, in particular about where you should leave an opening to slip-in the back and front of the dress when you link collar and body. To avoid that, I strongly suggest you write this down on your pattern before cutting and sewing.
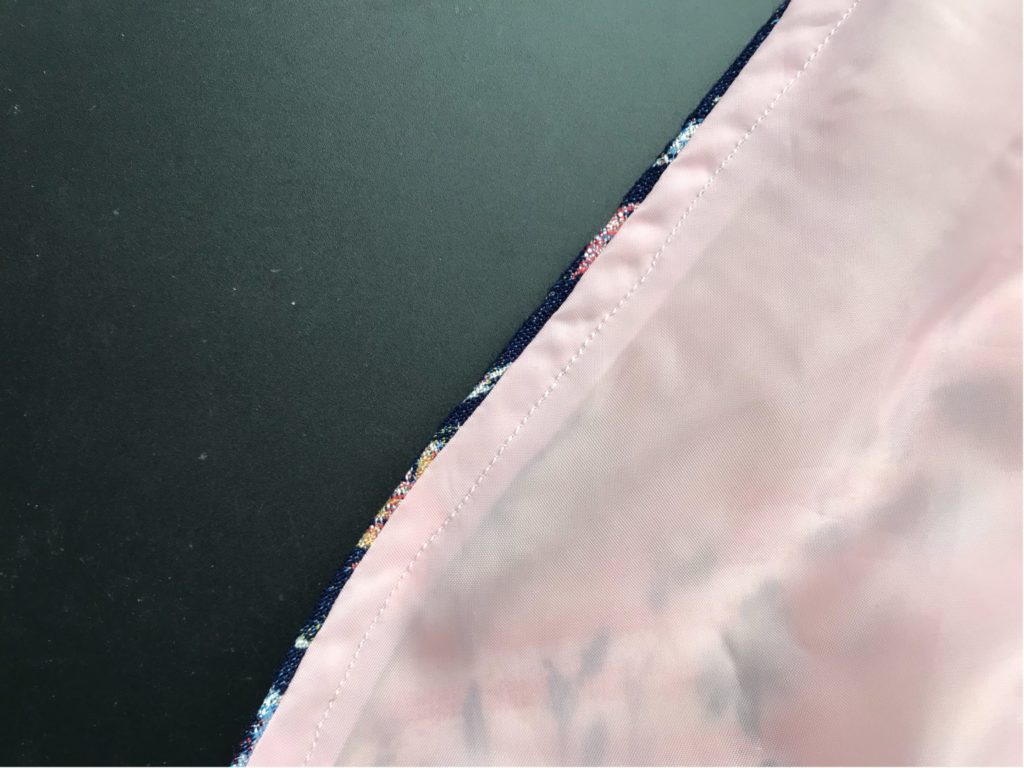
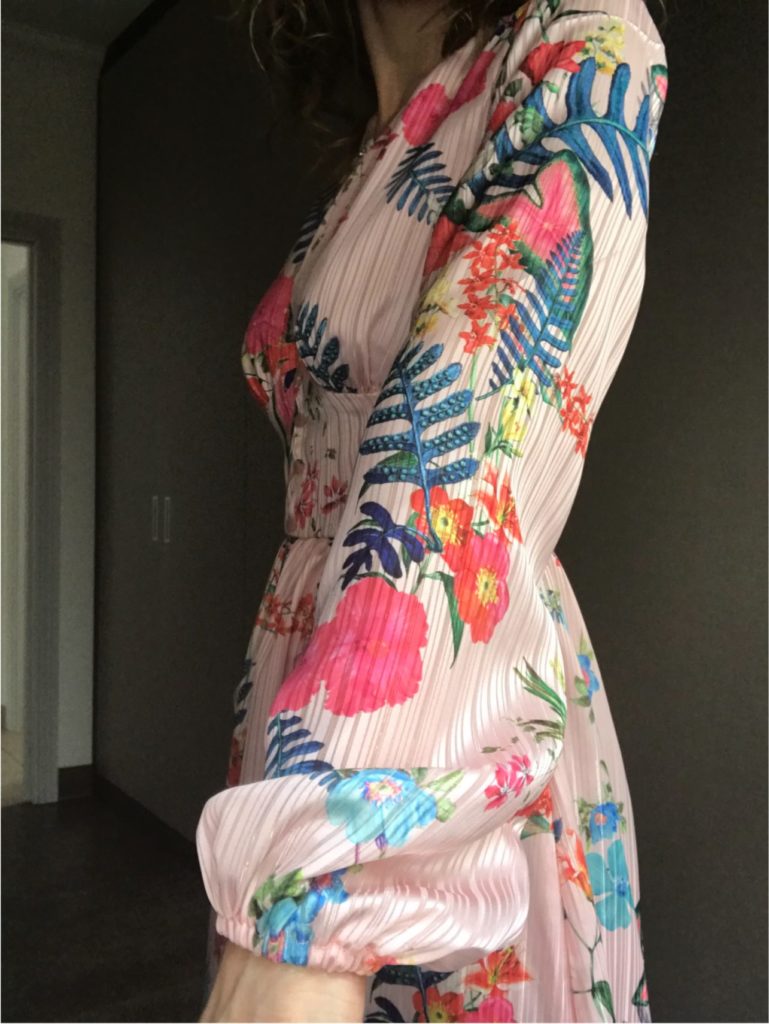
This dress is definitely a winter and mid-season piece for me, so I layer it with my beloved M&S thermals and opaque tights; and it is – obviously – fully lined! Here is how I did it:
1/ I cut the two body pieces of the dress both in the main fabric and in the lining fabric.
2/ I then sew both the main fabric dress and the lining dress by the sides – ending-up with two bodies.

3/ I attached the two by the armhole openings; trimmed the sewing allowance at the curves; and overstitched it to the lining fabric, so that it would not show from the outside.
And that’s it! I’m very pleased with this little number and I am now thinking about a summer version in fine cotton… Typical!
I Wont’ Buy It but I’ll Make It – First Attempt
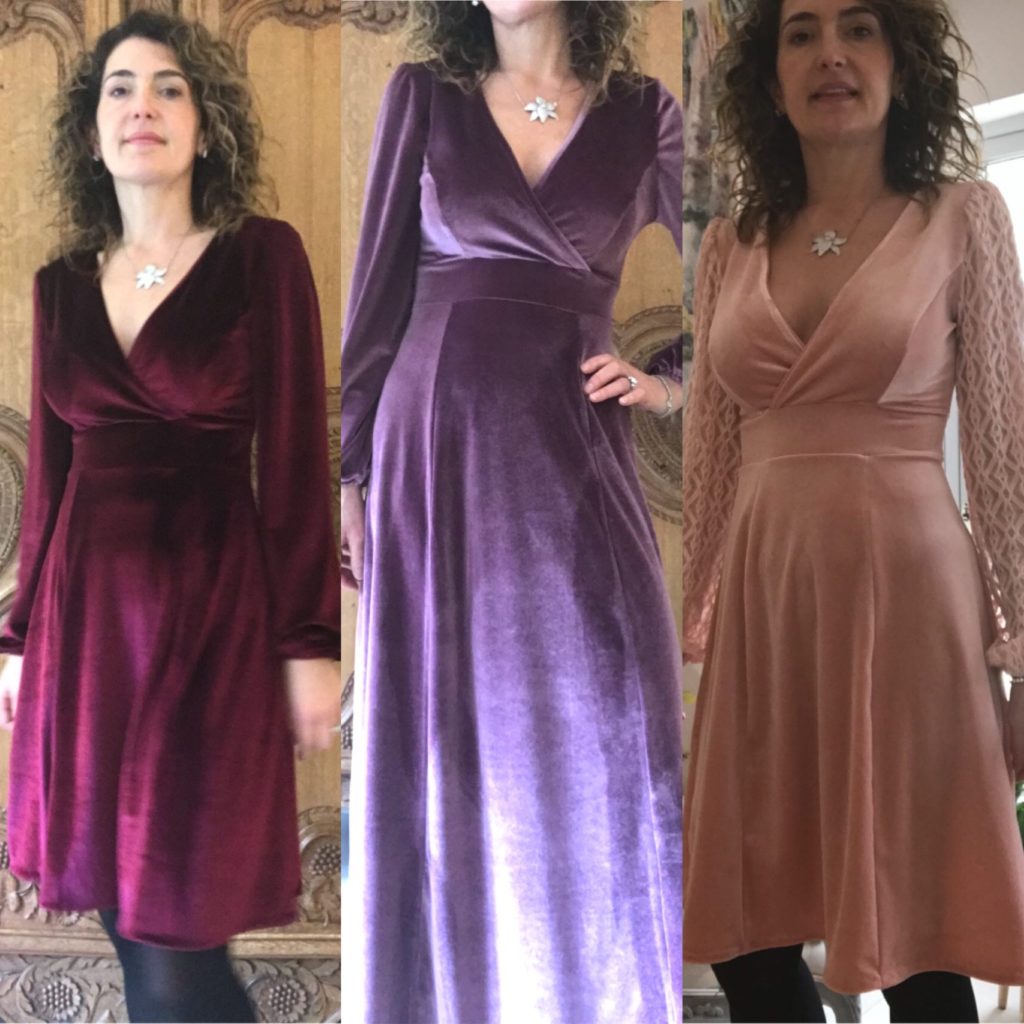
Up to now my sewing inspiration has been very much in closed circuit: I see a pattern I like, I find a fabric which matches my colour and texture obsession of the moment (this winter: wine hues, velvet texture) and then I get going. This usually results in a number of quite similar garments – you probably remember my (compulsive addictive) velvet Magnolias…
But recently, after years of restraint, I’ve been back to clothes shopping – and this has generated a whole new thinking about how I should approach sewing! I realised they are actually quite a few things I like in shops, but it is usually not the right fabric (I hate synthetic, I want wool, cotton or silk), not the right fit (my very narrow shoulders and large boobs rarely work for standard sizing), not lined (so transparent in the summer and itchy in the winter), or just outrageously expensive. Oh well…
So my big plan for this year it to look for more inspiration from my favourite designers (Red Valentino is my absolute fashion crush currently), look for compatible patterns and fabric and make the garment if I find the match … but buy it I don’t! – because sometimes it is just impossible to source the right fabric.
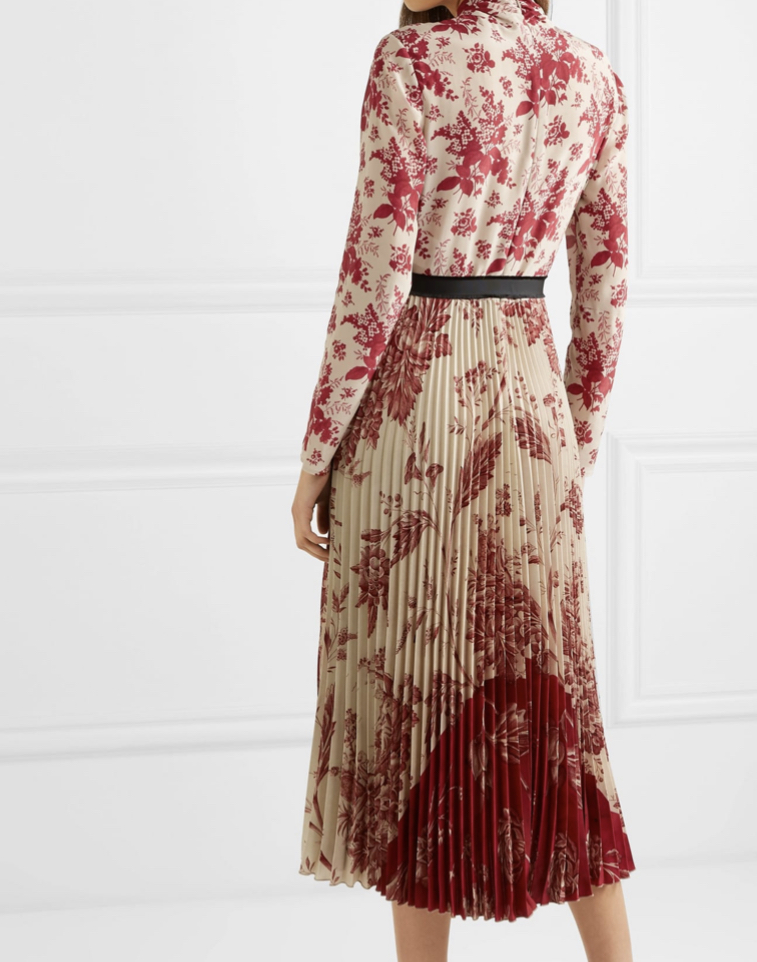
This Red Valentino dress is a good exemple. Finding a matching pattern was very straightforward (V9197 would work wonders) ; but finding matching pleated and unpleated fabric, respectively for the bodice and for the skirt, is just impossible – the closest I got was with Stragier, which has « sun pleated » fabric like this one and matching plain fabric – but not perfectly fabric for top and bottom! So here… I bought the dress.
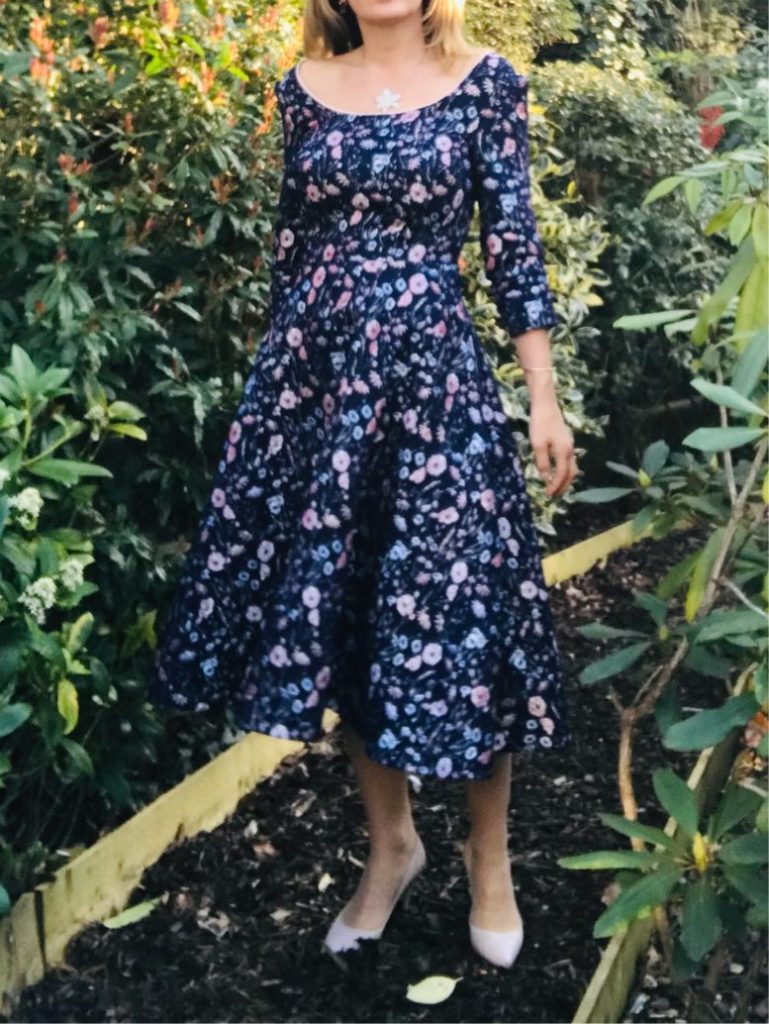
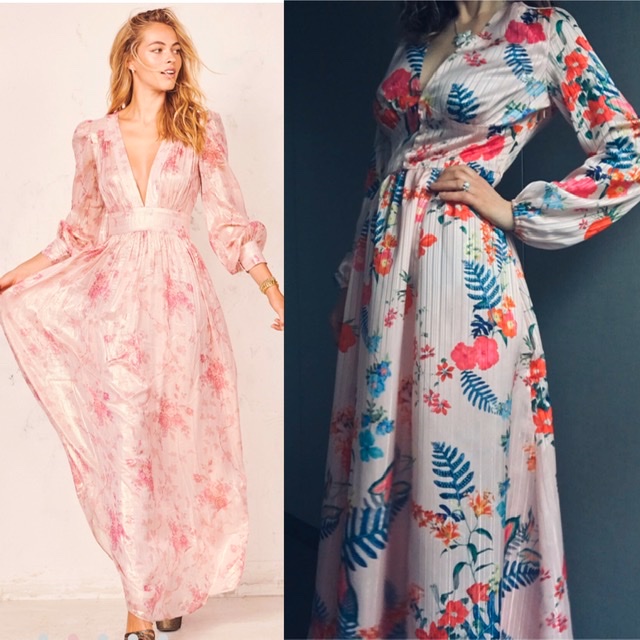
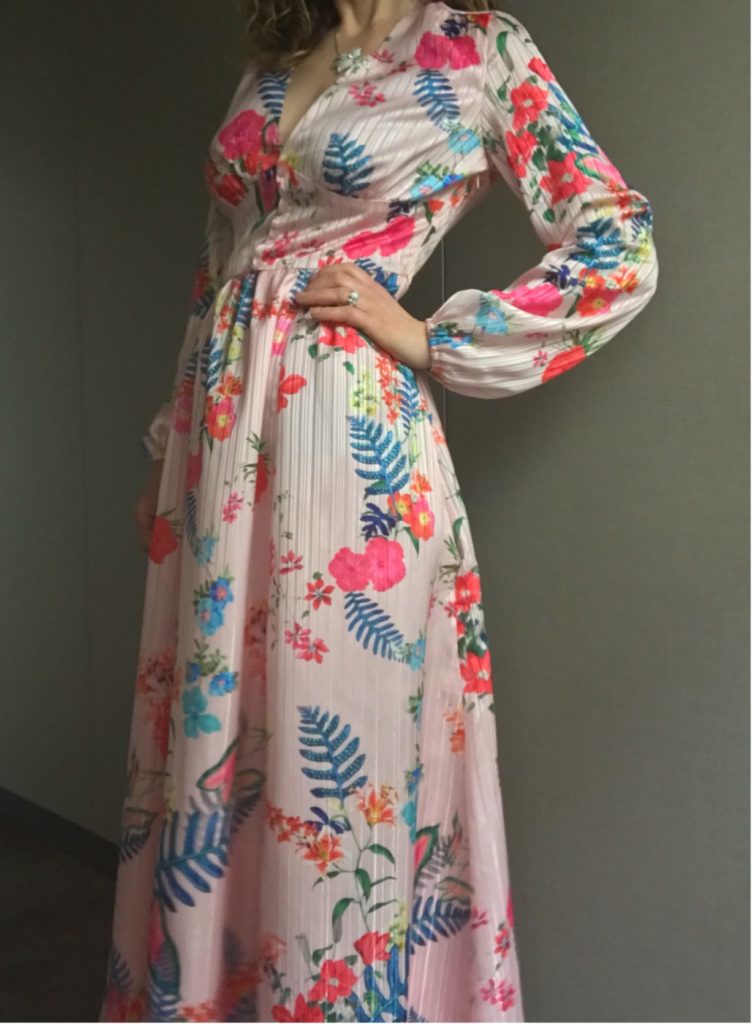
Back to reachable targets now! I saw this magnificent dress early January, fresh from the new 2020 Spring/Summer collections being put out on display. It is floaty, long and blush pink – everything I want for Spring! But the cleavage is far too low to be able to wear a bra; and in any case there is no room for any breast whatsoever!
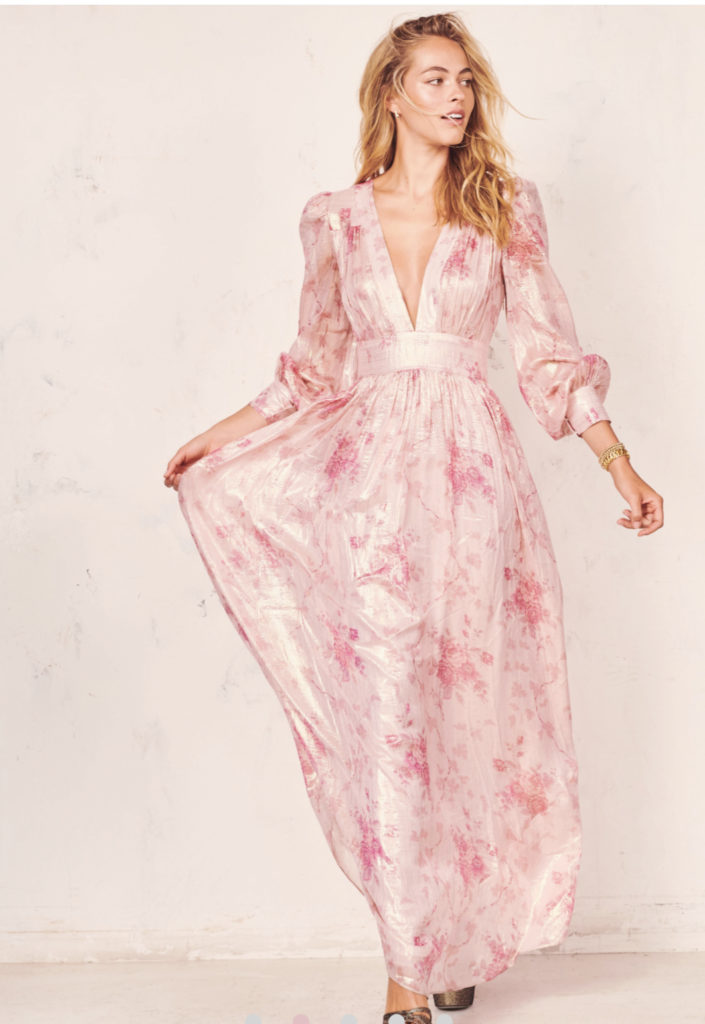
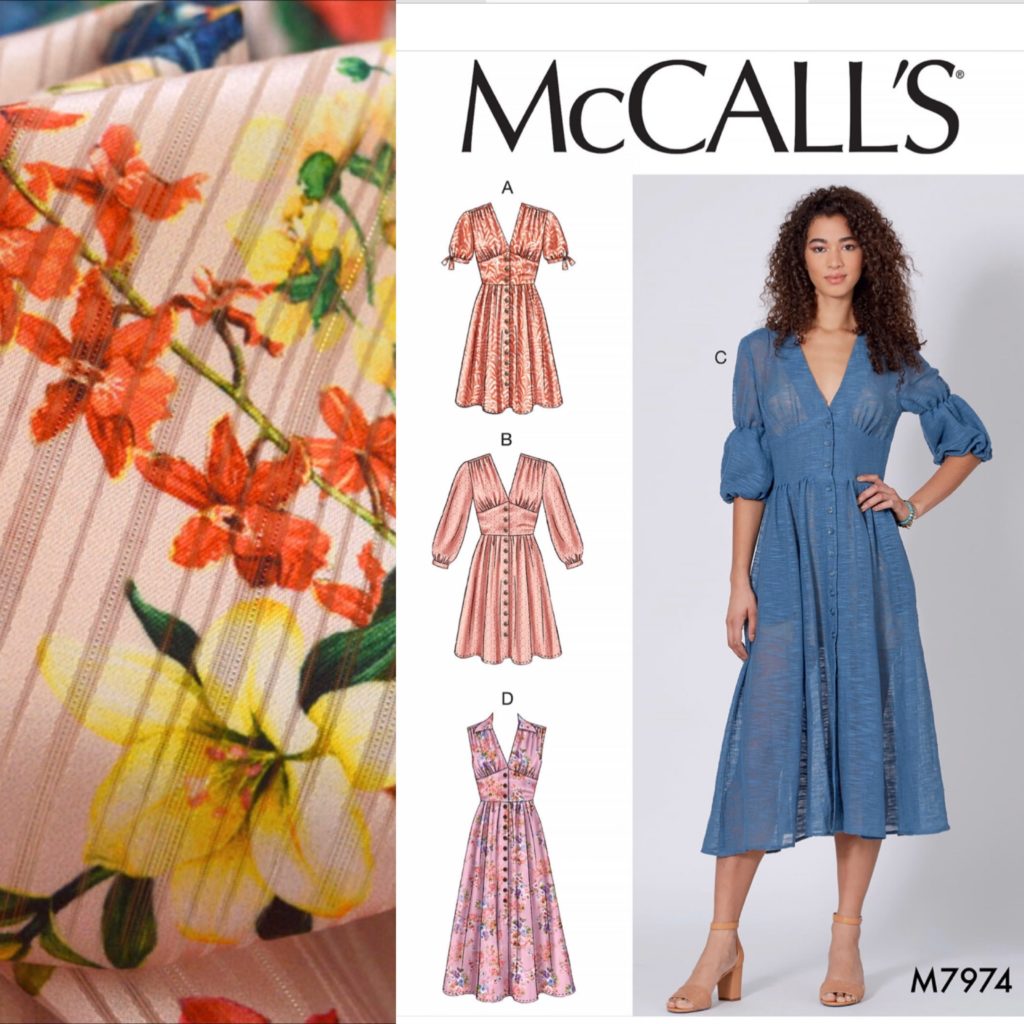
Here, the pattern and fabric match was very easy. I had been eying for a while this pale pink fabric from Croftmill without any idea of what to do with it – I ordered 3m immediately (and then another 2m when my daughter asked for a dress for herself). And M7974 had just be highlighted on McCall’s Instagram as an inspiration for replicating another dress – lengthen the sleeves, omit the front opening and we’re good to go!
So here the fabric and pattern:
And here the inspiration and final dress:
I have sewn a number of McCall patterns over the past year (most of which are on the blog!) so I bought the pattern without hesitation and made a size 10 muslim of the bodice without even looking at the finished measurements – I knew everything would fit except for the bust.
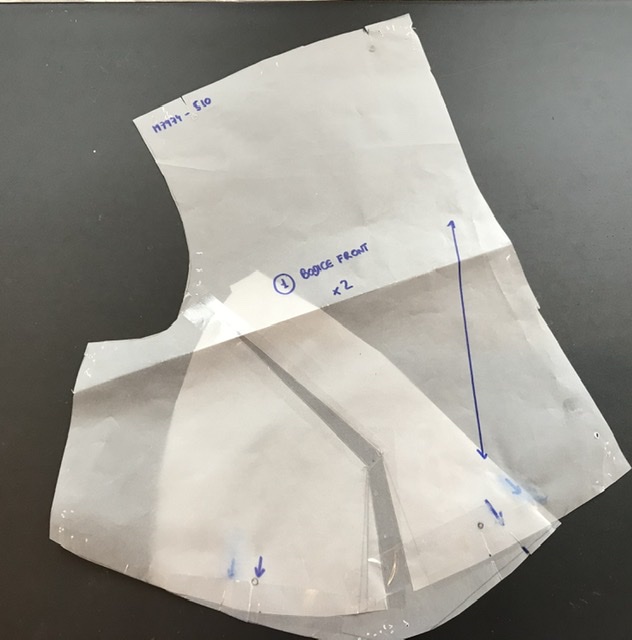
Using the muslim on myself, I made a non-conventional FBA – I added some fabric lengthwise in the bust area, so that the belt would sit below (and not over) my breast – I just traced the line of my bra underwire into the muslim; and I also (rather randomly) added about 1cm of width (I traced my bust apex on the muslin too. Then I re-did a muslin and it was perfect .
The other changes I made to the pattern are the following:
- I omitted the buttoning for the skirt (I cut the front skirt piece on the fold, on the center front line indicated on the pattern), put an invisible zip on the side but kept the buttons at the belt, as I was worried I may not be able to put the dress on and off because of the sleeves (I had a painful experience in the past). I shouldn’t have worried, the zip if enough.
- I increased the sleeve opening by 1.5cm, without making any changes to the sleeve itself, which is something I always do for the McCall and Vogue patterns.
- I used the initial view B pattern for the sleeves, but overlapped it with my (self-modified) Magnolia sleeve pattern to lenghten it; and put 19cm of 5mm-wide elastic at the wrist, exactly the same as for Magnolia – I just adore my Magnolia sleeves.
- I lined the entire thing, no small matter – by now you know that I am a lining freak… It obviously doubled the time of making the dress.. Oh well…
This dress is definitely more Spring than end-of-winter, so it will have to wait for the right weather in my cupboard… I don’t mind though, I am very excited at my replication achievement!!!

In the meantime I’ve already found new inspiration for another dress, this time in embroidered tulle with a silk lining – how complicated can I make my fabric search?…
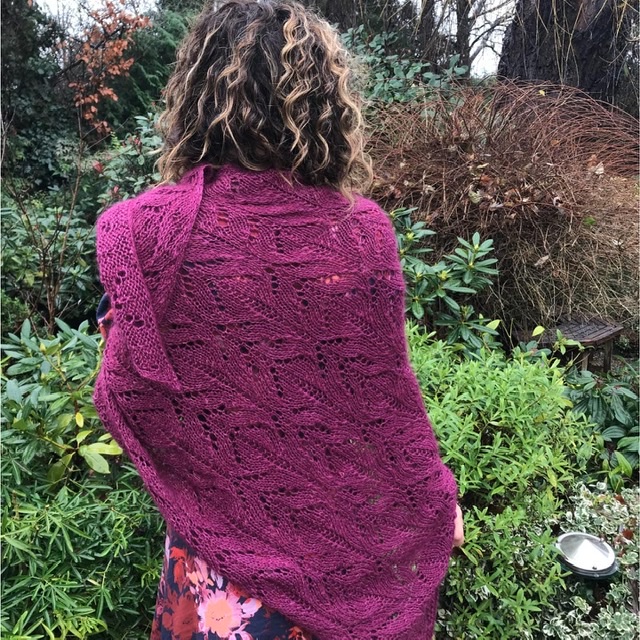
First Knitted Lace : the Blossom Shawl
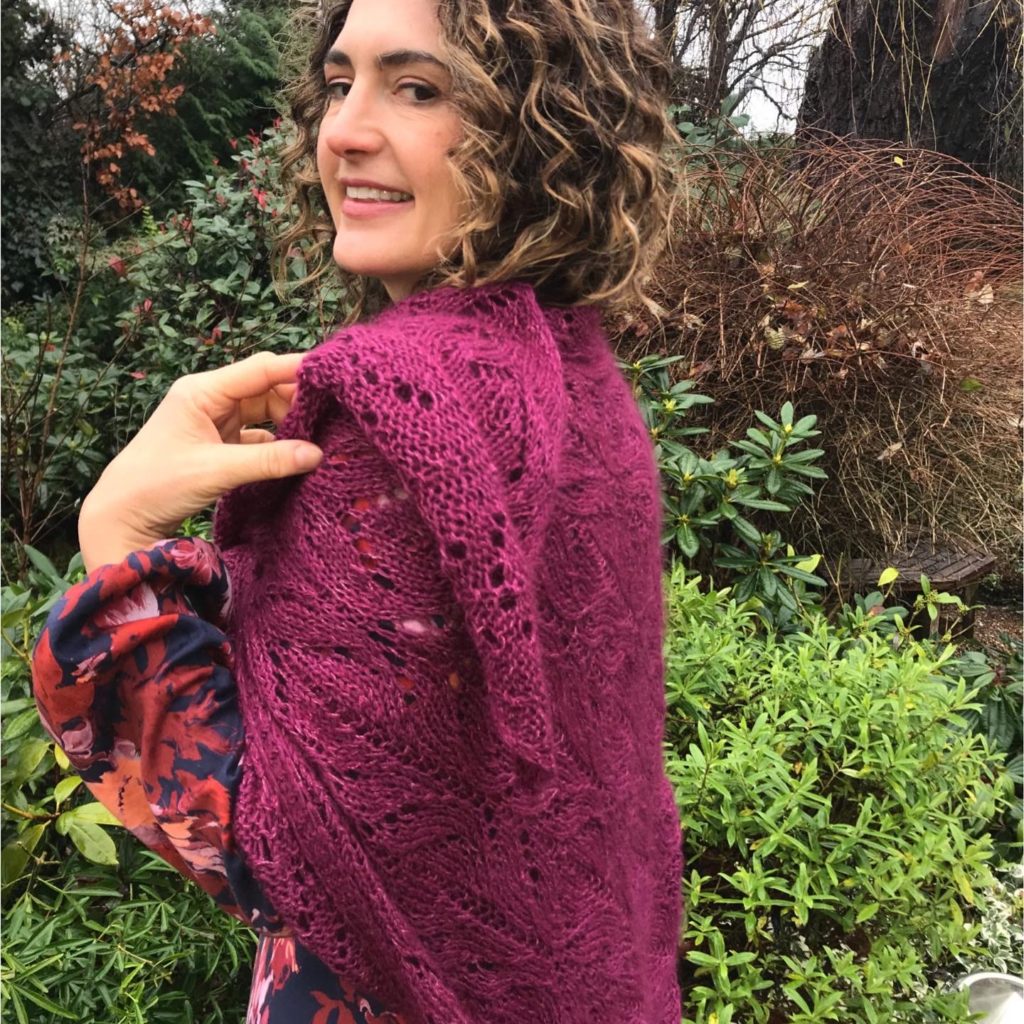
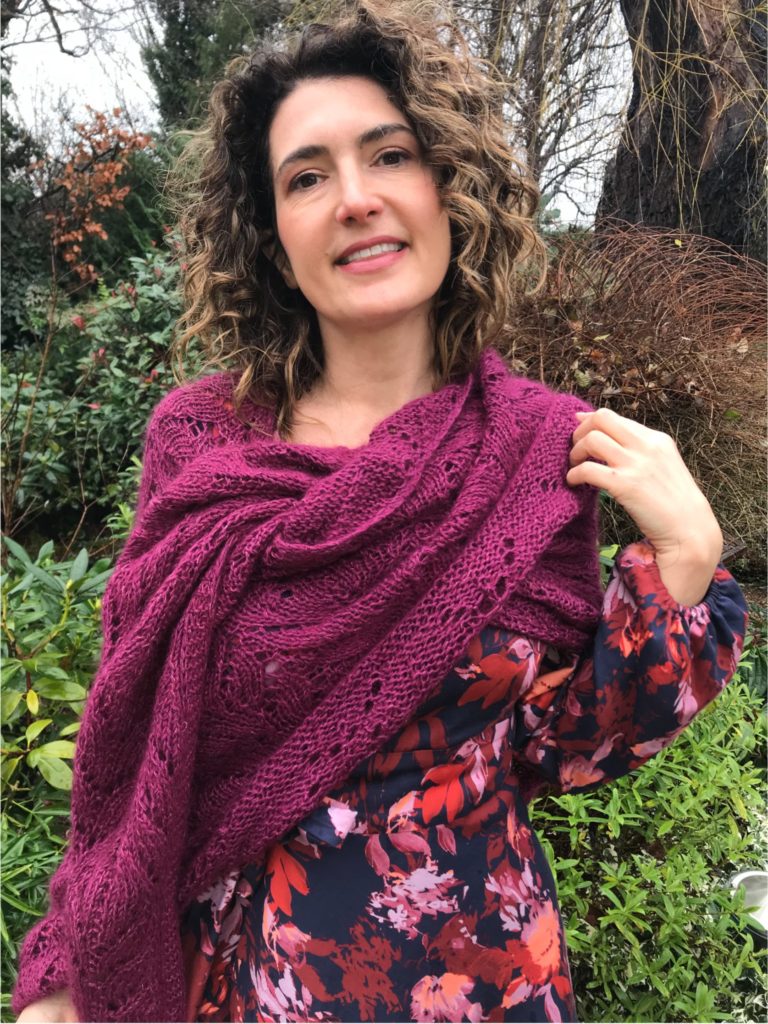
After many years admiring hand-knitted lace shawls but being terrified to commit, I finally took the plunge… and it wasn’t that difficult actually! Let me introduce you to the Blossom Shawl by Along Avec Anna, in burgundy, of all colours!
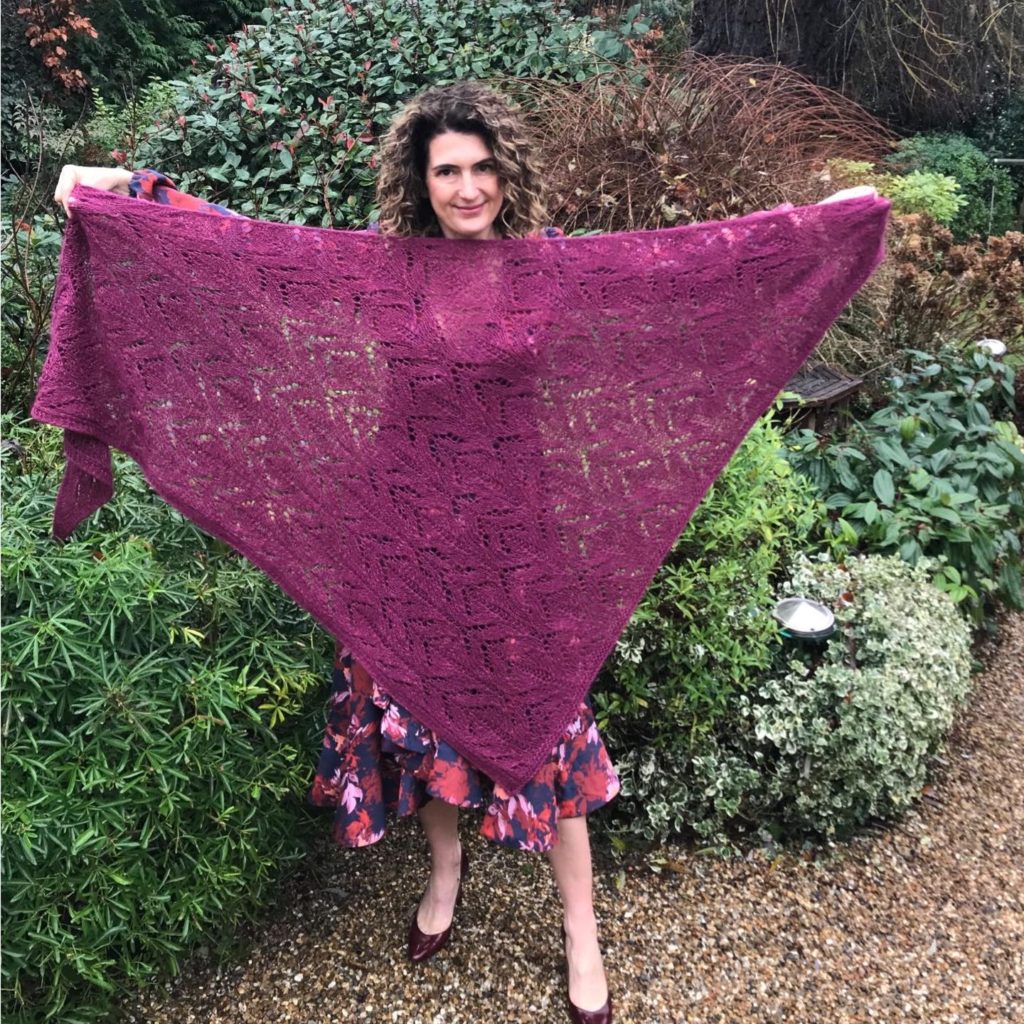
I wear shawls a lot and own a large collection of “Trendy chale” – the easiest knit ever! You start with three stitches, increase by one stitch on each side at each row and knit your way through six skeins of Drops Brushed Alpaca Silk, knitted in double thread on size 6 to 8 needles.
Trendy helped me to get back to knitting. However after about ten of them and a number of self-drafted jumper ( because I feared the complexity of knitting patterns), I was fully ready for something more challenging. When the Blossom Shawl pattern was released, it was love at first sight! – I particularly like the pattern.
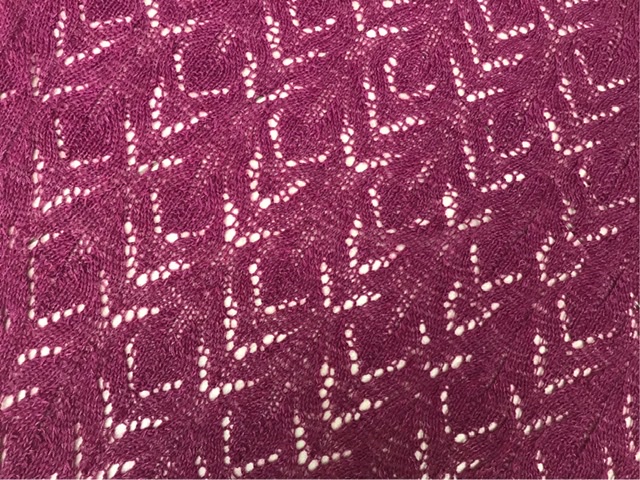
This shawl is perfect for a novice like me, because it does not have any of the shaping inherent to a jumper – you create a triangle by making increases every other row; and because the number of “exotic” stitches (other than knit and purl) is very limited
Before starting, I made sure I knew what all of them meant by using my favourite ever website for this purpose (which also exists as an app), which shows all stitches you can imagine both in the continental and the English methods. The ones you need to know for Blossom, on top of knit and purl, are:
- yo = yarn over
- k2tog = knit 2 together
- SSK = slip slip knit
And that’s it! Not a lot of technique frankly. What I found most difficult what not to get lost in the chart, especially at the beginning of the shawl, when the rows are quite short and the lace motif doesn’t repeat. Do not lose hope though as it get easier with longer rows, as the lace motif starts repeating and is easy to memorise. The other positive is that you get a break every other row, as each wrong side row is only purl stitches.
I knitted with size 4 needles (instead of the recommended 4.5, my knitting is very loose) and I used a combination of Drops baby merino in Heather (34) and Drops kid silk in Dark rose (17) – which gave me recommended gauge. As a result of the inclusion of kid silk, my shawl is a bit fluffier than the one shown on the pattern, slightly hiding the lace pattern, but I like if this way.
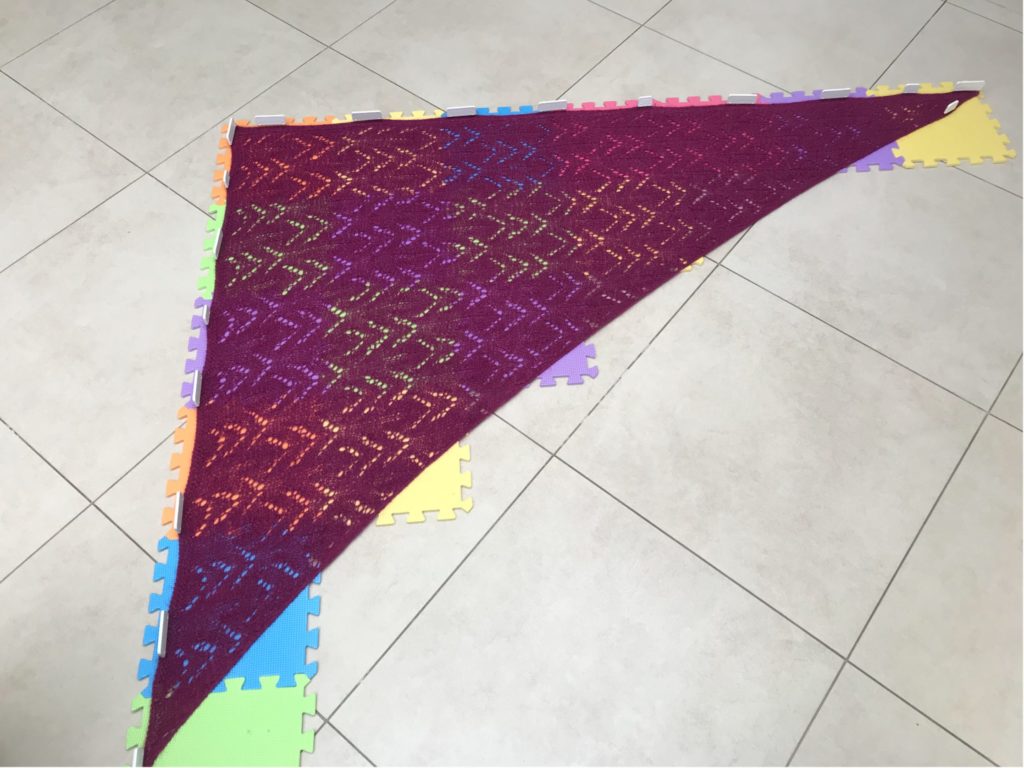
I also invested in blocking material and I am so pleased I did – it makes a massive difference for shawls, I wish I had blocked my Trendy’s this way! So my purchases were:
- 2 set of 9 foam tiles – the cheaper I could find on Amazon, as baby safety is not my concern anymore sadly. To block this shawl, I definitely used all tiles.
- Some proper knit blockers, comb-shaped.
Here is the shawl during blocking…
All in all, this shawl took me about three week of non-intensive knitting to make. Although it was not the most relaxing knitting I have done, I am very pleased with the result. Will I be brave enough to make another one? – time will tell…
YOU WILL PROBABLY LIKE THIS BLOG POST: