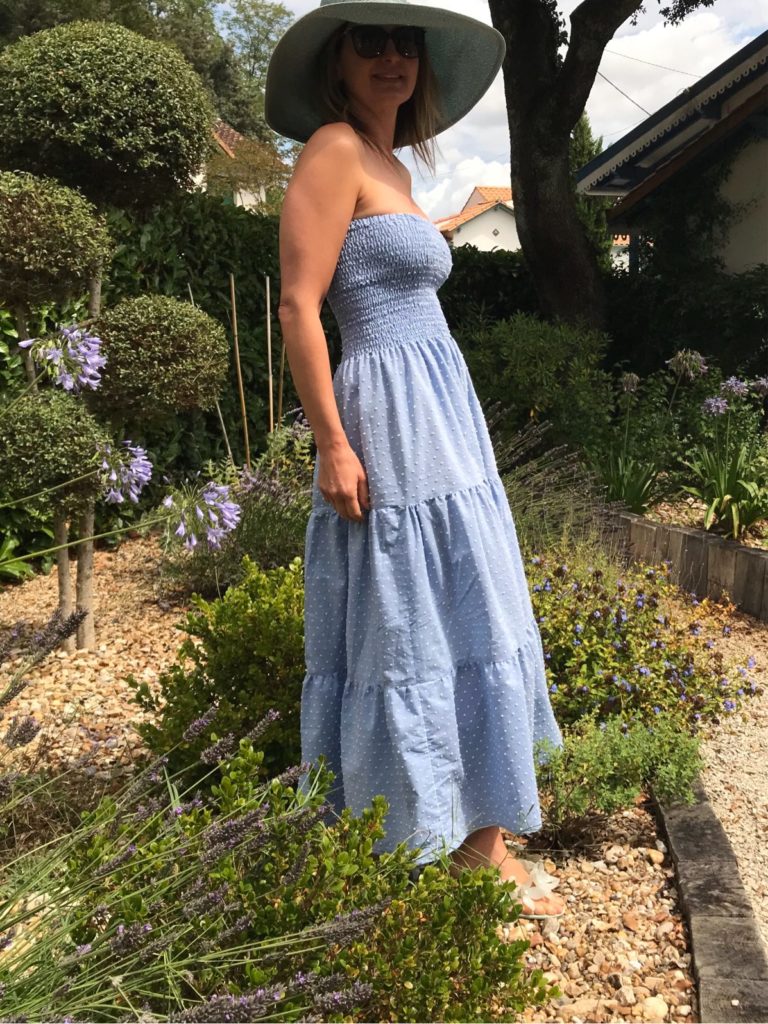
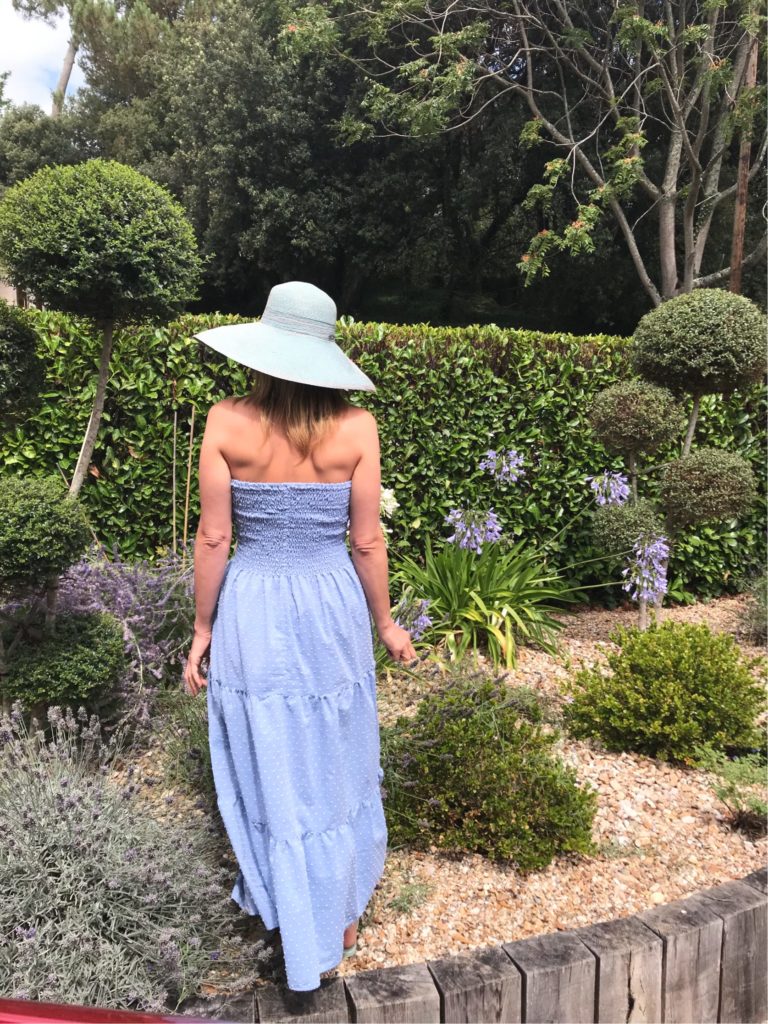
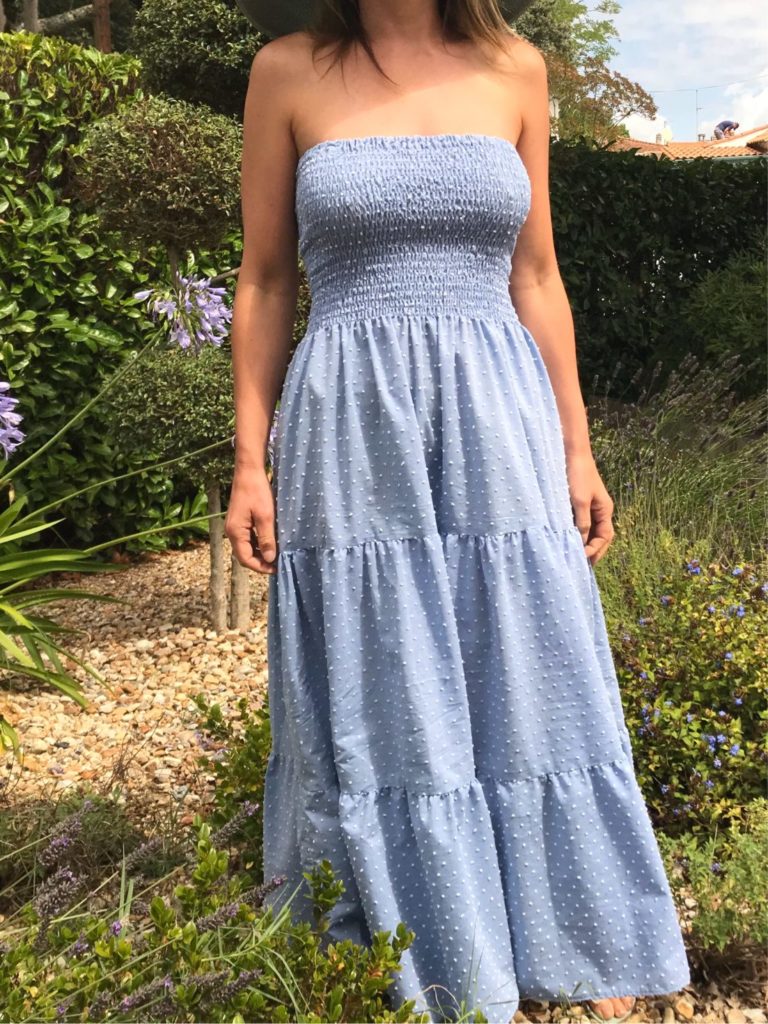
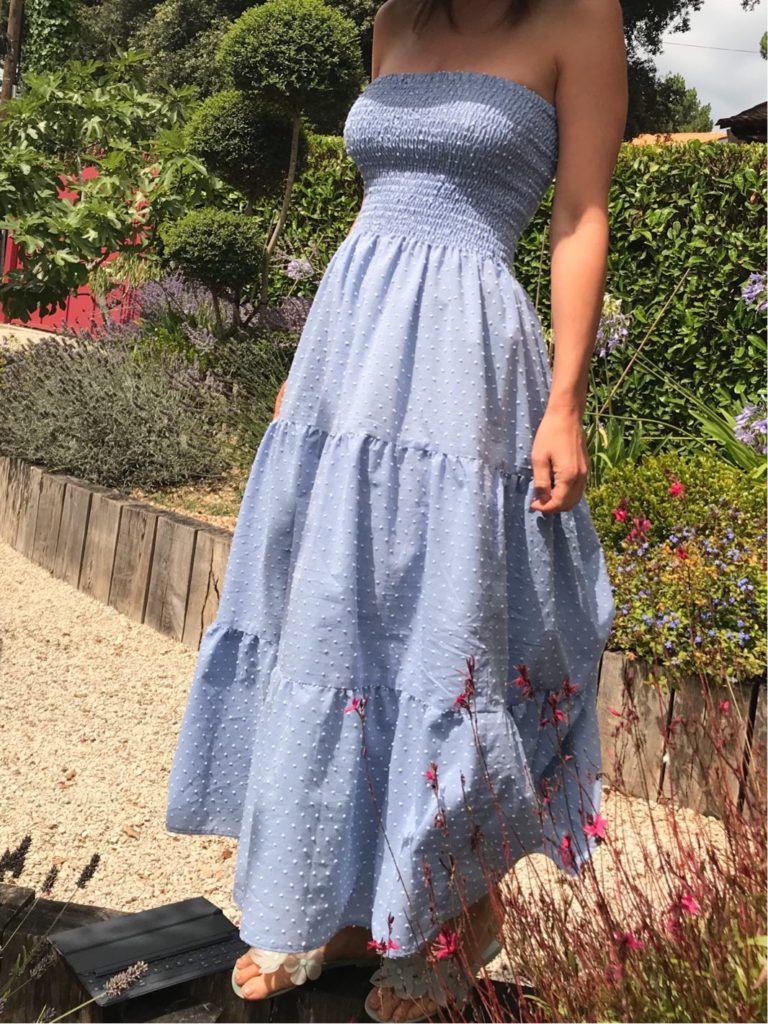
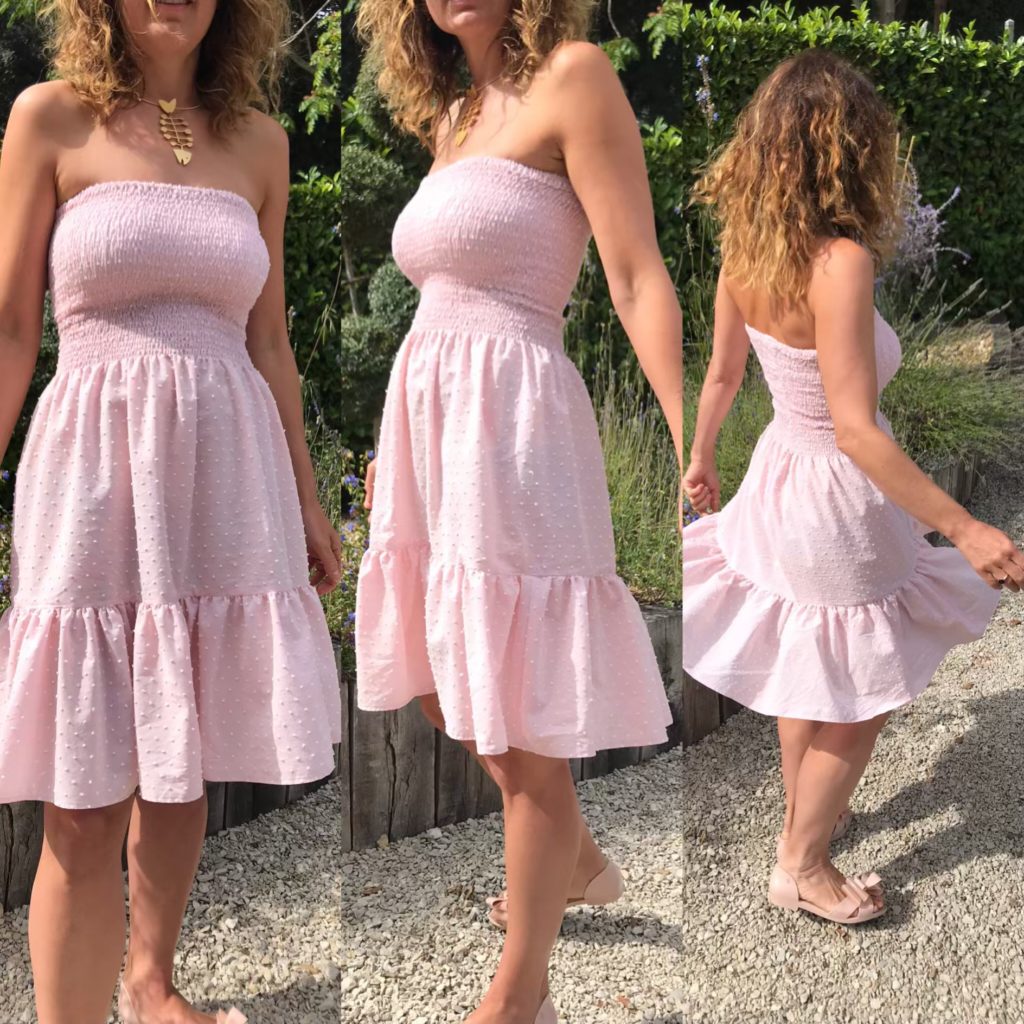
Tutorial: Maxi Dress, Tiered and Shirred
If you make a smocked dress with one of my tutorials, do not hesitate to use the hashtag #smocksmignons so that I can admire and re-gram it!!
After sewing eight of these dresses last summer, I though I was done and over with shirred dresses with ruffles… Well, apparently not!
This year, I had something quite precise in mind: a maxi dress, with a shirred top as usual but also with tiered ruffles. However I pondered for ages about the proportion: how long and wide should the ruffles be to get the right proportions? In the end I think I nailed it down, so if this dress inspires you to sew something similar is here the full tutorial!
SUPPLIES
- 2 x 1.5m of fabric (or width 1.4 but not less, 1.1 will not be enough); ideally some light fabric: cotton voile, Swiss dots, satin. Do not forget to wash and iron before starting any work.
- Elastic sewing thread of 0.5mm wide, like this one (2x20m just in case).
- 1m of flat 5mm wide elastic , like this one.
- Classic sewing thread matching your fabric and and all your usual sewing equipment.
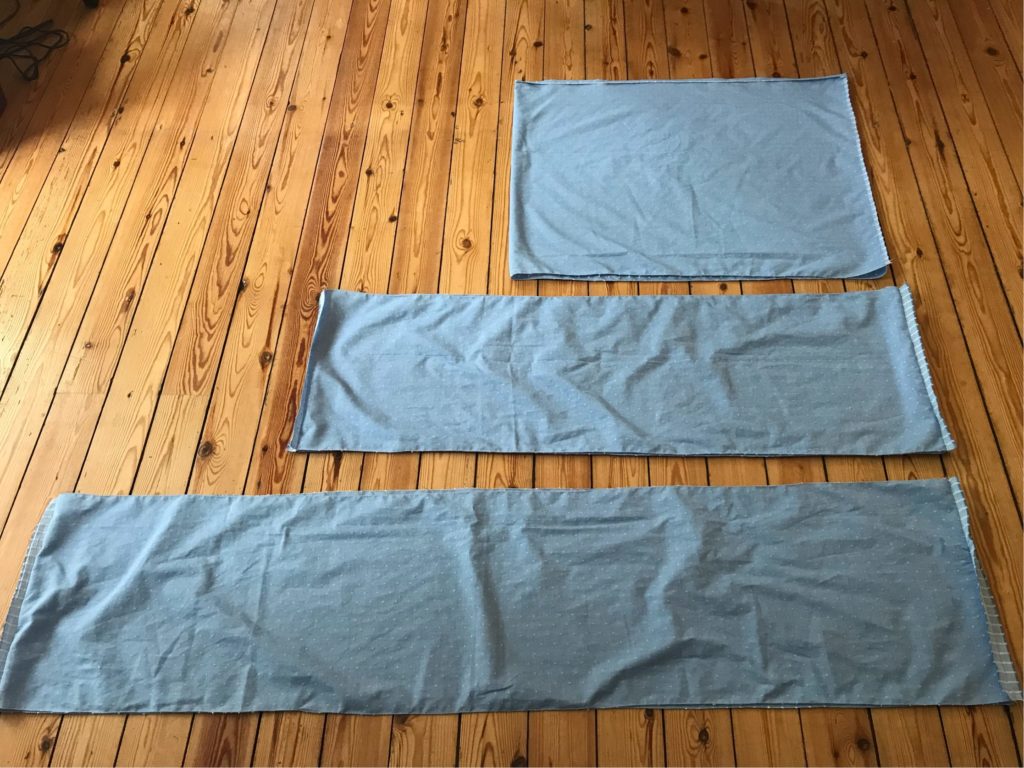
PREPARING ALL THE PIECES
Cut:
- 1 rectangle of 150 x 56 cm
- 2 rectangles of 110 x 32 cm
- 2 rectangles of 150 x 32 cm
(For those wishing to adjust this dress to their measurements, I am 1m68 tall and the length of my dress allows me to wear it barefoot without stepping on it).
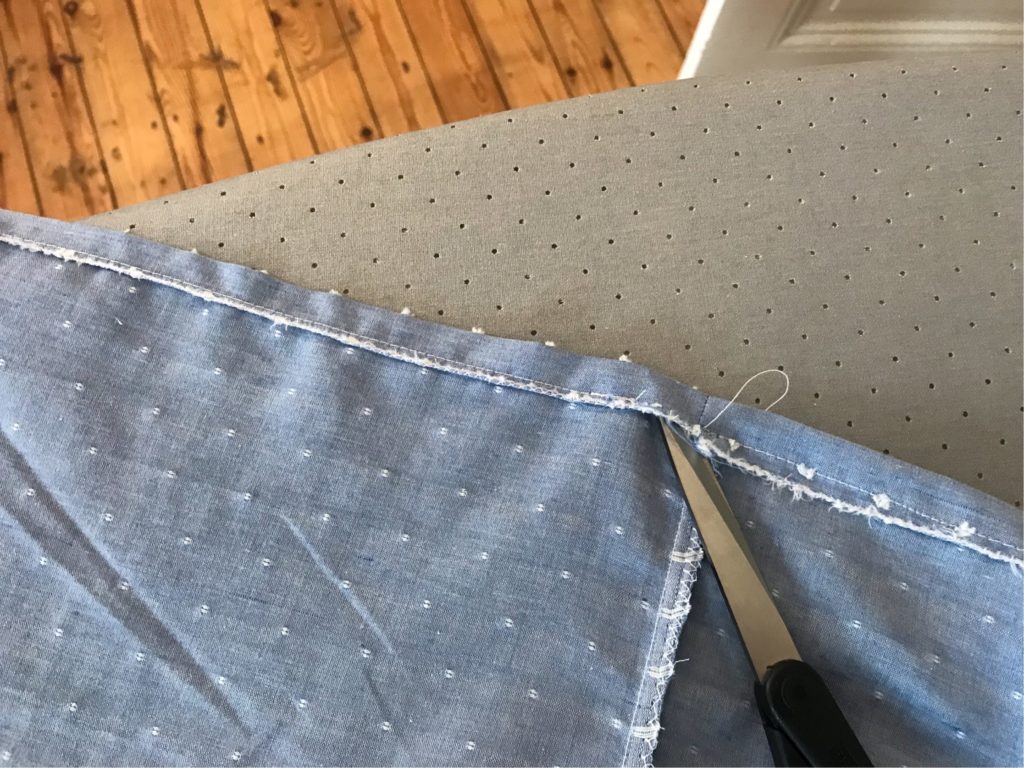
Overlock all the faces of the rectangles with a zigzag stitch on the sewing machine or with an overlocker.
Make three tubes with the rectangles as follows:
- For the 150×56 rectangle, fold in two right side against right side of fabric, stitch the 56cm sides together, 1cm from the edge (1 seam).
- For the 110×32 rectangles, lay them on top of each other, right side against right side of fabric, stitch the 56cm sides together, 1cm from the edge (2 seams).
- For the 150×32 rectangles, lay them on top of each other, right side against right side of fabric, stitch the 56cm sides together, 1cm from the edge (2 seams).
- Open all seams with an iron.
You should end-up with this:
On the narrowest tube, prepare the elastic tunnel: on one of the large sides, turn the fabric 1.5cm inside , mark with an iron and stitch 1cm from the edge, leaving an opening of about 2cm of the back.
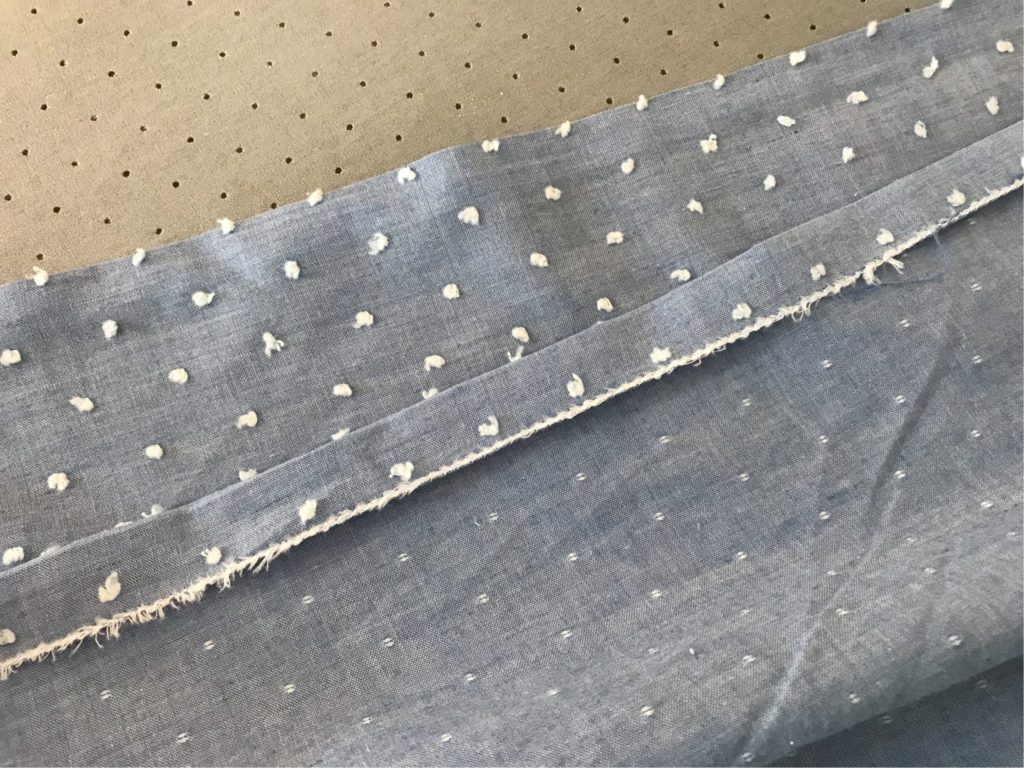
On the largest tube, make the hem: on one of the large sides, turn the fabric 1.5cm inside , mark with an iron and stitch 1cm from the edge, leaving no opening.
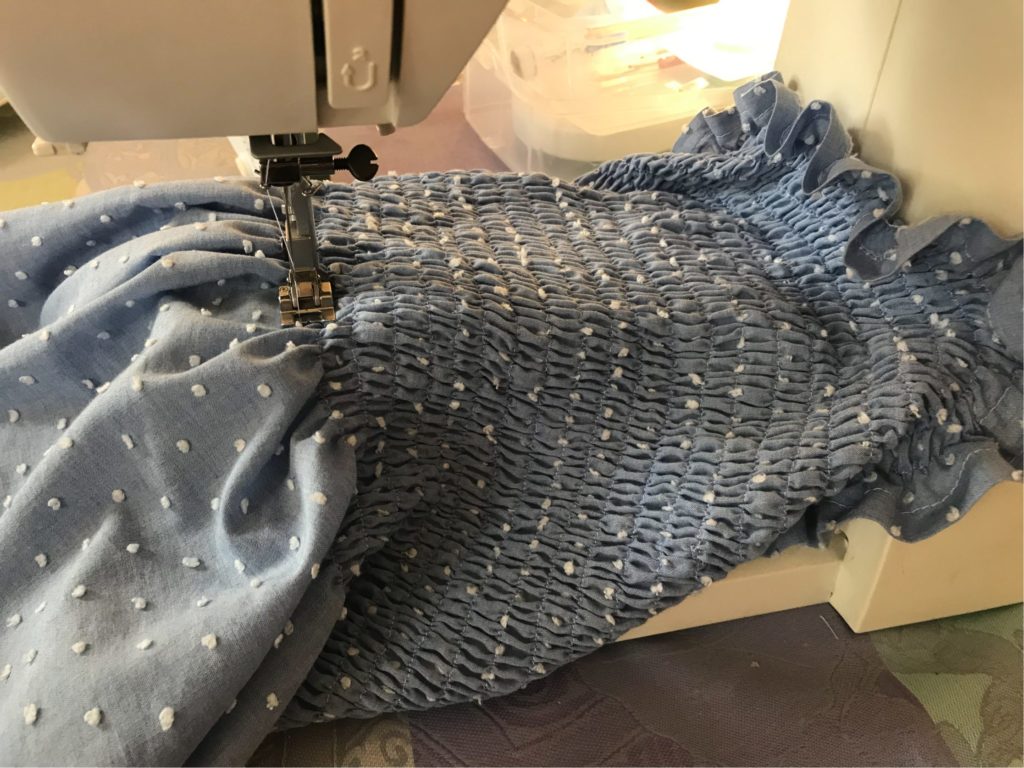
START SHIRRING
I already made a shirring tutorial for this dress, so the one here is extremely similar
First, get your sewing machine ready:
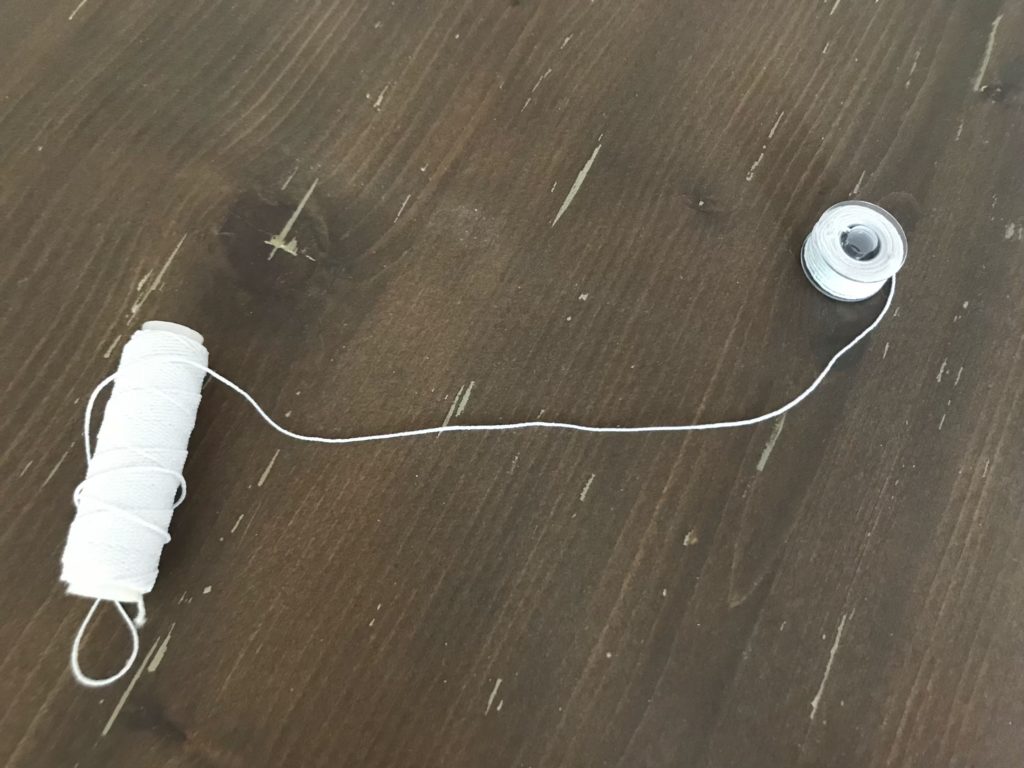
- Mount a spool of elastic thread by hand (without pulling excessively) and position it in your machine.
- The top yarn remains a classic yarn, with a color matching your fabric.
- Set your stitch width to the maximum (4/5), without touching the tension.
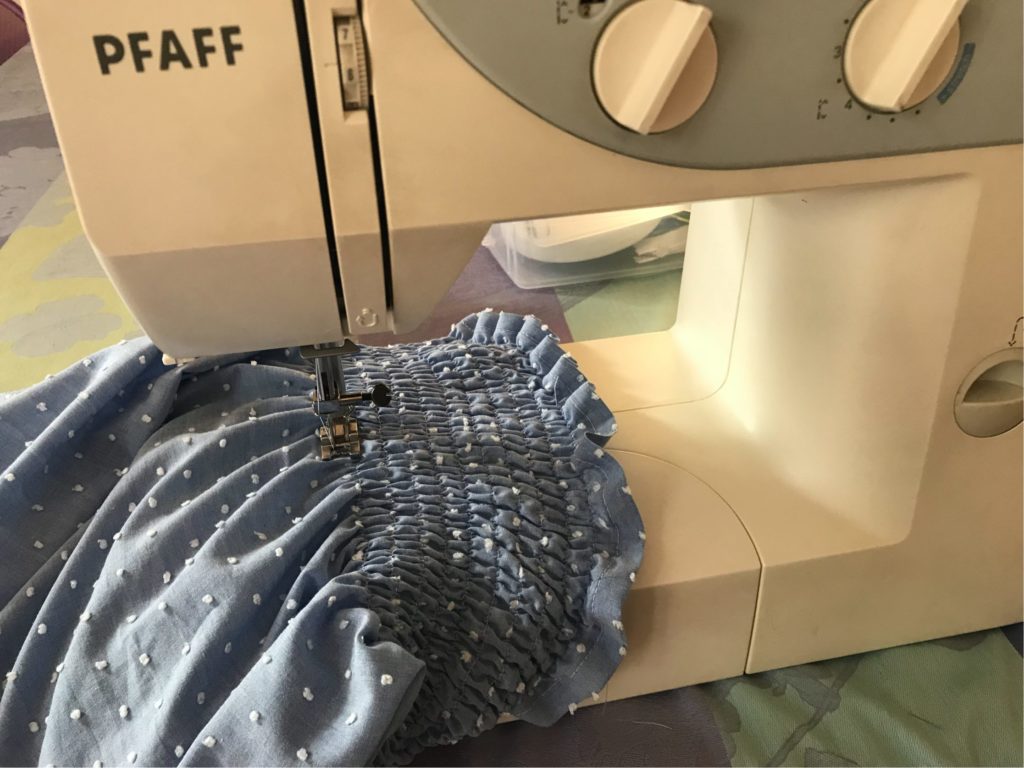
You can now start shirring:
- Place the fabric under the needle, right face of fabric facing you, elastic tunnel at the top. Place your needle 1cm below the previous seam
- Make a back-stitch at the beginning, then sew in a straight line all around the tube, finally make back-stitch the end – the elastic thread must be well blocked!
- Raise the needle and and place it 1cm below, and proceed again in the same way. A spool should cover between 5 and 8 rows. Block the thread well at each beginning and end of rank.
Your shirring should progress like this:
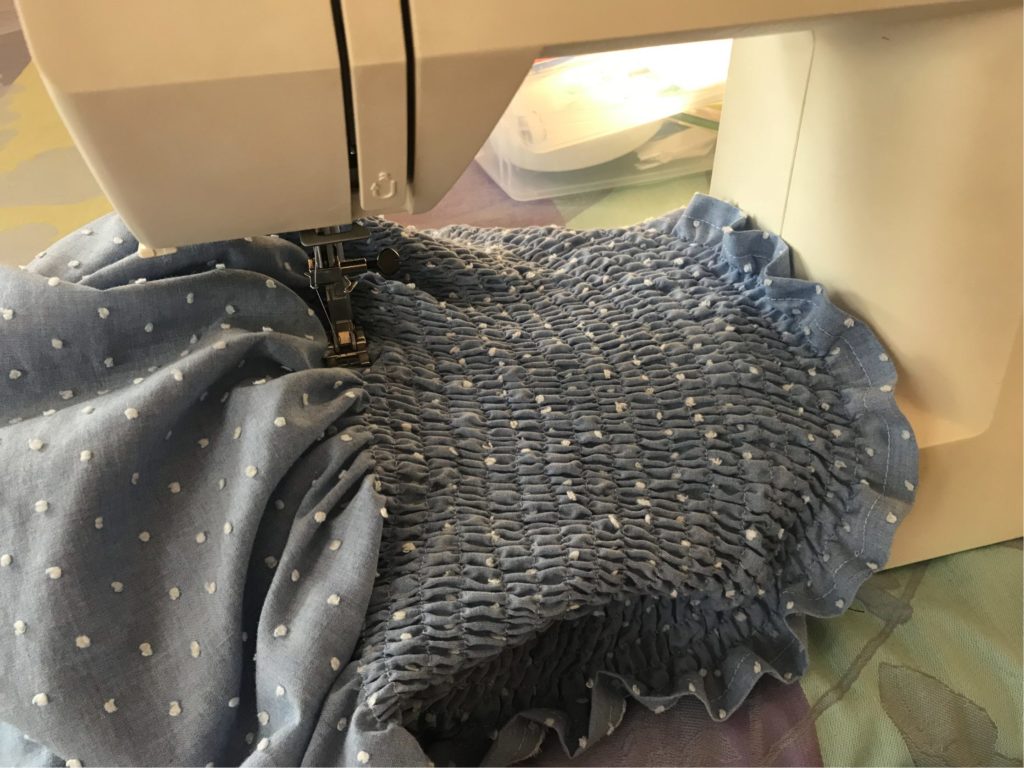
Try the dress on as you go to see where to stop shirring. I sew 28 rows (22cm), which allow the gathers to be well placed under the bust – but this will depend on your own measurements! Ideally you want the last line of shirring to reach the narrowest part of your torso, about 10 cm above your belly button.
Once you have finished shirring, here is what the top part of your dress should look like:
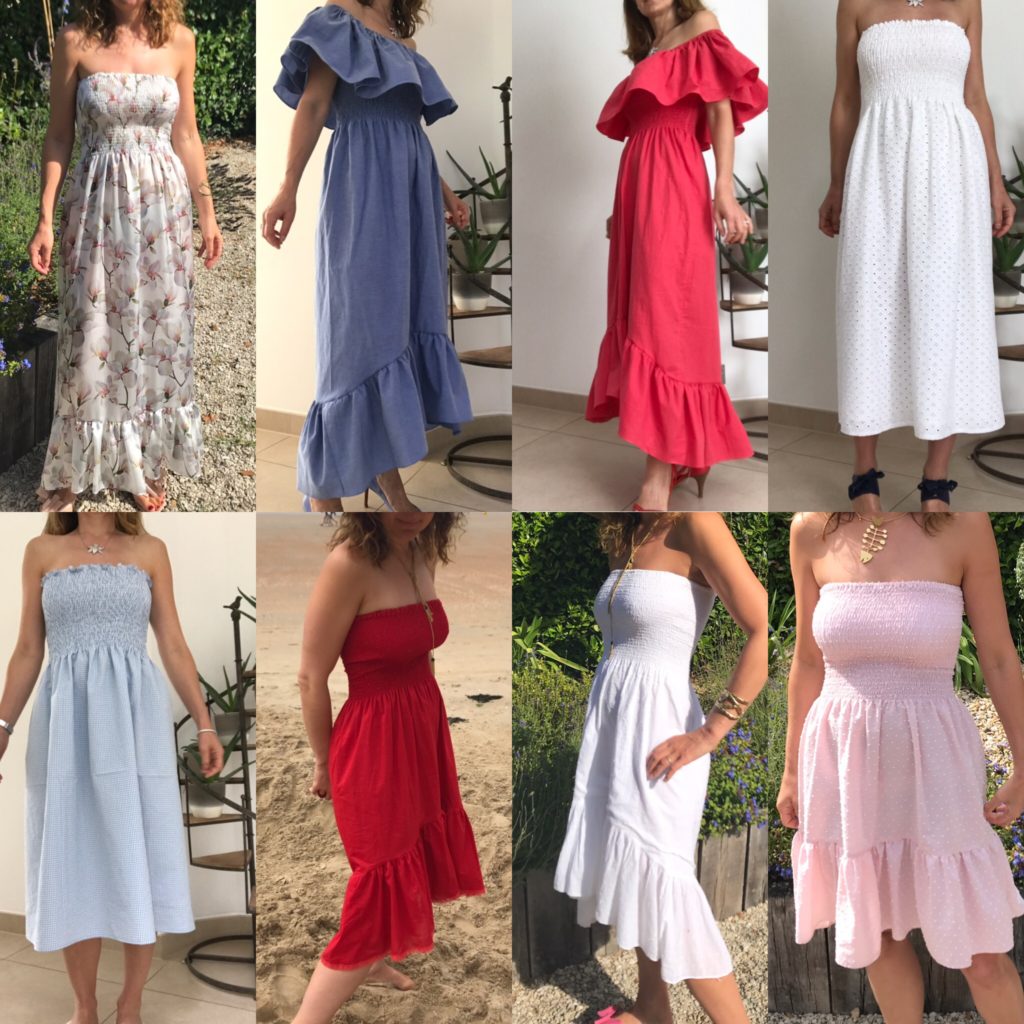
INSERTING THE RUFFLES
Change your bobbin thread: remove the elastic thread and put on the standard sewing thread.
To insert the first ruffle:
- Split the ruffle in 4 equal parts with pins; do the same for unshirred side of the top part of the dress.
- Insert gathering lines: set your machine on a large straight stitch (4/5) ans sew two parallel lines, one 0.5cm and the other 1.5cm away from the fabric hedge. Do not forget to leave enough thread at both beginning and end. To make the gathering easier and more regular, I divide my fabric in two (so four sewing lines in total, parallel 2 by 2).
- Assemble the ruffle and the top part of the dress together, matching the pins you’ve just laid. Pull on the threads to create gathers, until the width of the ruffle fabric matches that of the dress. Pin as you go along, being careful to keep your gathers regular.
- Put your sewing machine back to a normal-length stitch (around 2.5), put your fabric under the needle face up, and straight stitch 1cm from the fabric hedge.
- Check that you have caught all of the gathers and only then (calmly) get rid of your (meters of) gathering threads.
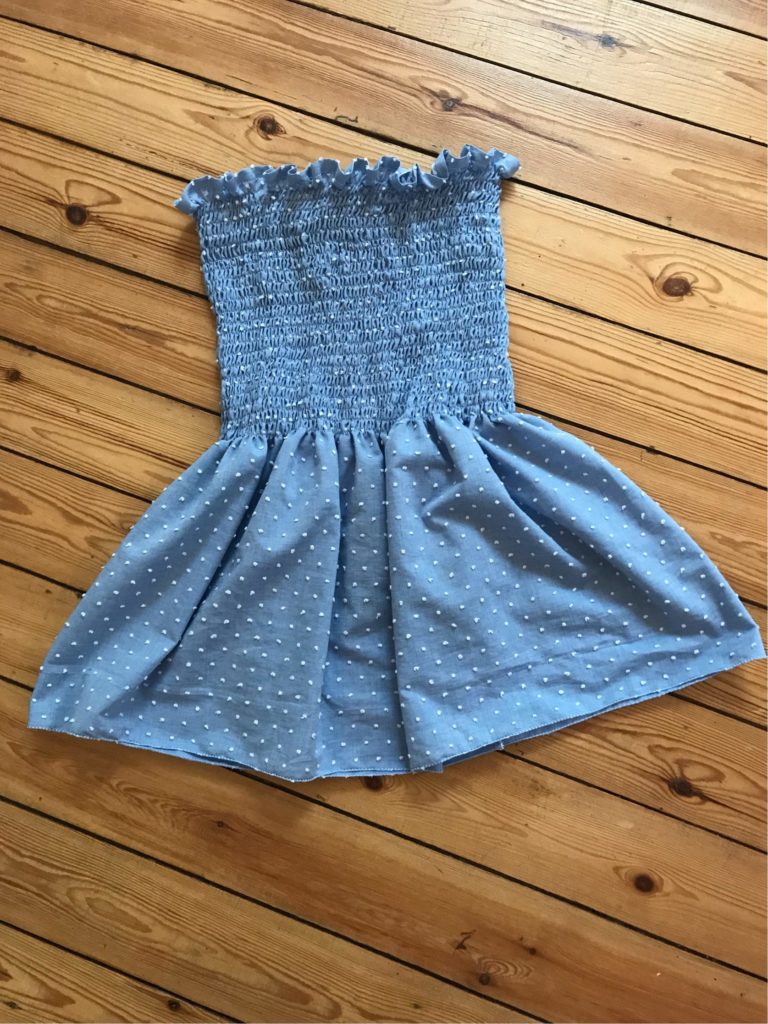
Here is the dress with one ruffle.
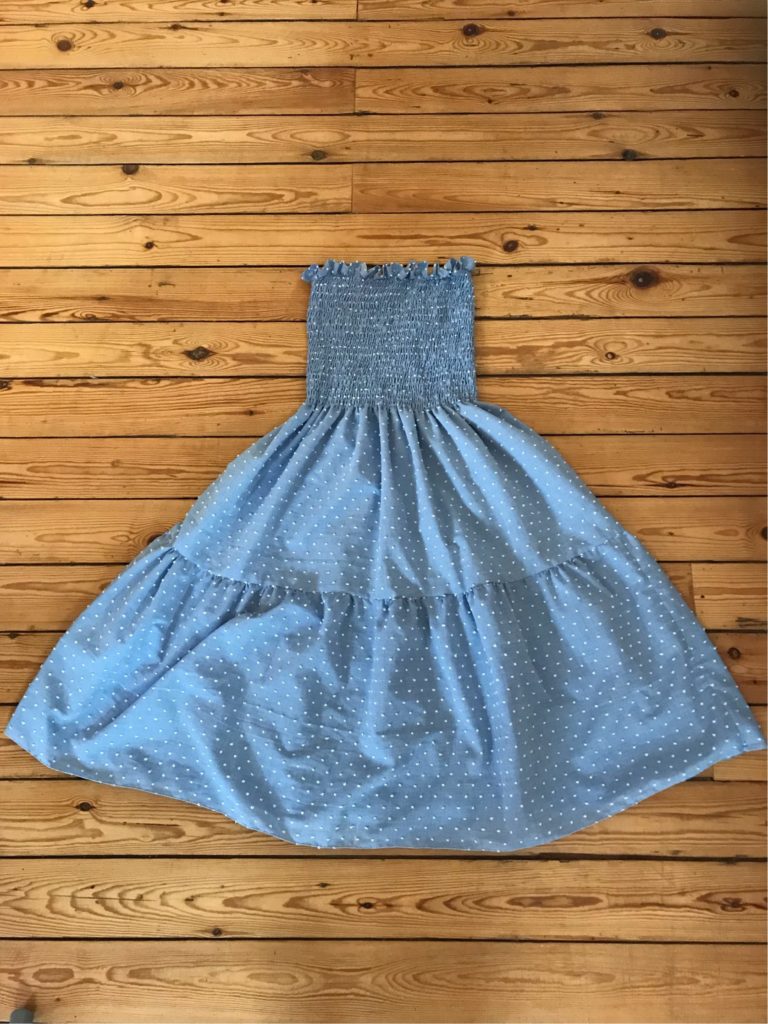
Proceed in the same way for the second ruffle, gathering the side of the largest rectangles which hasn’t been hemmed, and joining it to the first ruffle. Here is what things now look like!

INSERTING THE ELASTIC
On the previous photo, you can see that the fabric at the top of the dress is making some small folds, not very pretty, Let’s insert an elastic to solve this problem.
At the top of the dress, put the flat elastic in the tunnel you prepared at the beginning – you can use a safety pin, a skewer or any other tool that suits you. Put the dress on to determine the width cut the excess of elastic sew both side in a zigzag stitch. Make sure that the elastic does not turn in the tunnel before sewing.
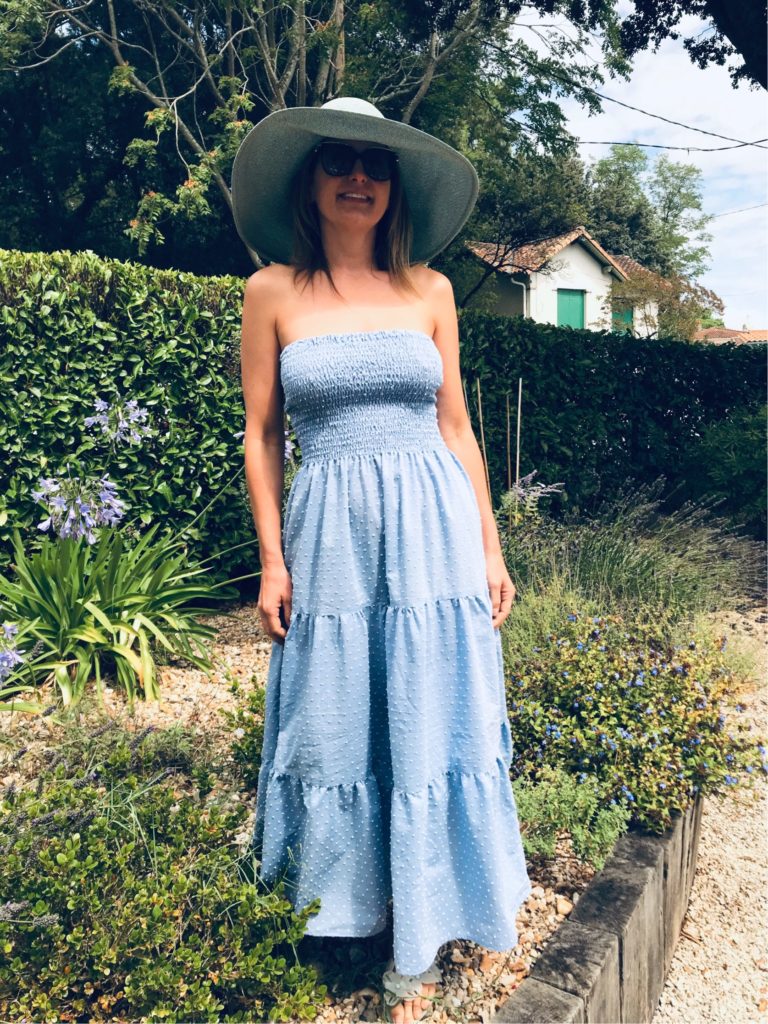
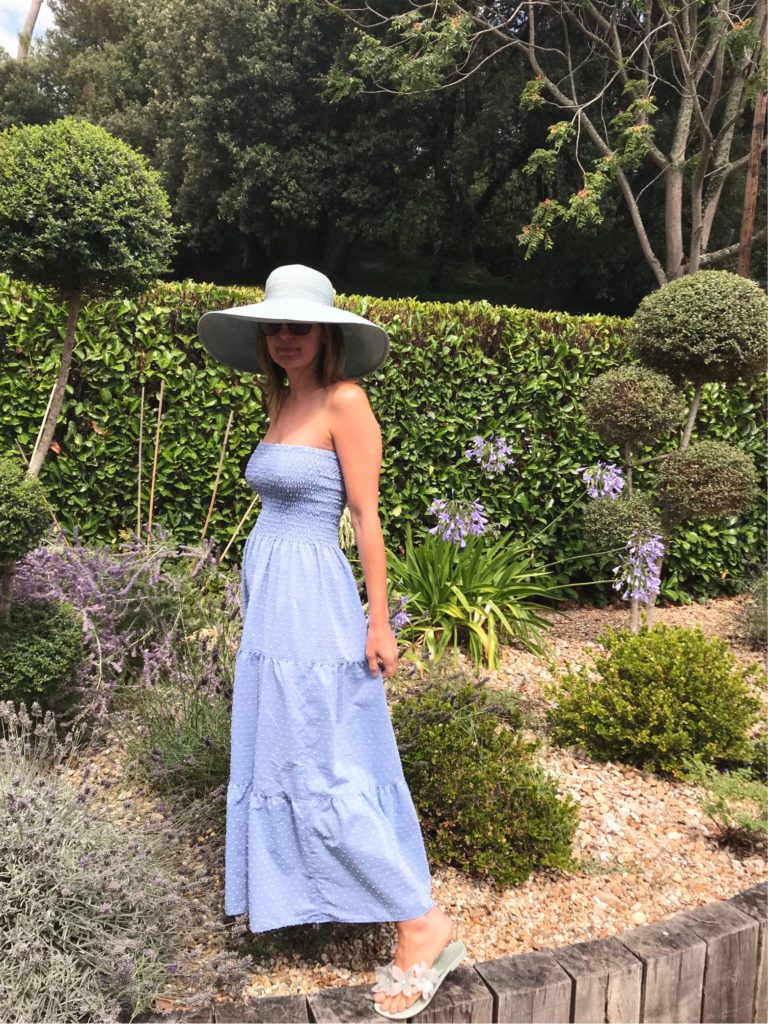
Close the open section of the tunnel AND VOILA, your dress is ready!
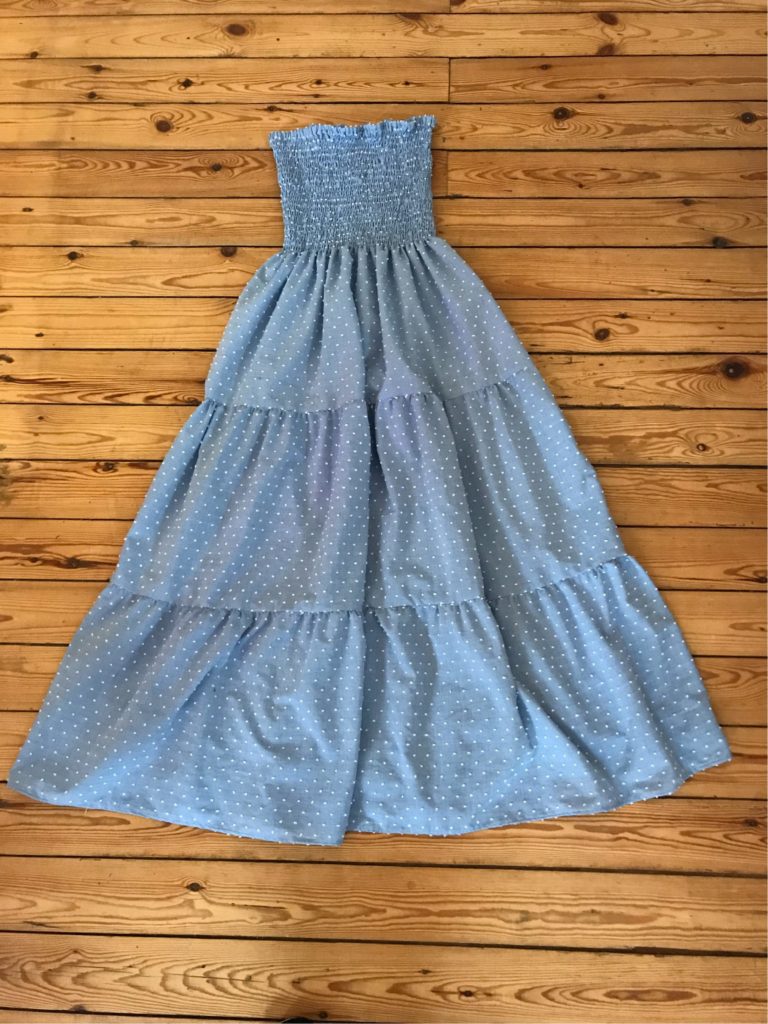
Even better worn! Fresh and nice for the summer!
THIS OTHER FREE TUTORIAL MIGHT BE OF INTEREST:
If you make a smocked dress with one of my tutorials, do not hesitate to use the hashtag #smocksmignons so that I can admire and re-gram it!!
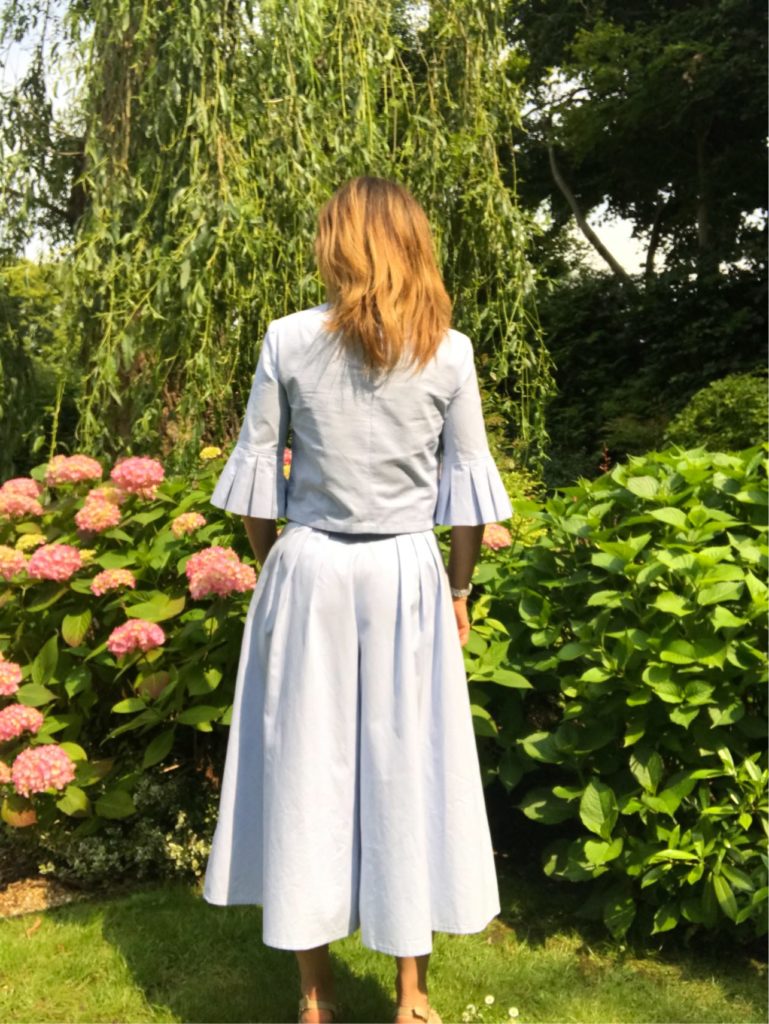
The Jumpsuit That Never Was
I discovered the V9075 jumpsuit while browsing for ideas for another jumpsuit, the famous Sirocco by Deer&Doe, which I’ve sewn and reviewed twice – here and here.
But Sirocco has a major advantage over any other jumpsuit: going to the loo is not an issue! While for V9075, I really wonder how on earth someone can get undressed unaided: the zip is a the back and the neckline is very high up, the fabric is non-stretch, how on earth does that work?
I considered several solutions to make the jumpsuit more user-friendly: moving the zip to the side – not great with sleeves; making a lower back neckline for the top – but still quite a bit of gymnastics needed to undo the zip; using a sleeveless top pattern – but weird with such long, chunky bottoms. Eventually I realised that what I liked most in the pattern was the bottom culottes, not necessarily the overall jumpsuit. So here we go: let me introduce to you the jumpsuit that never was.
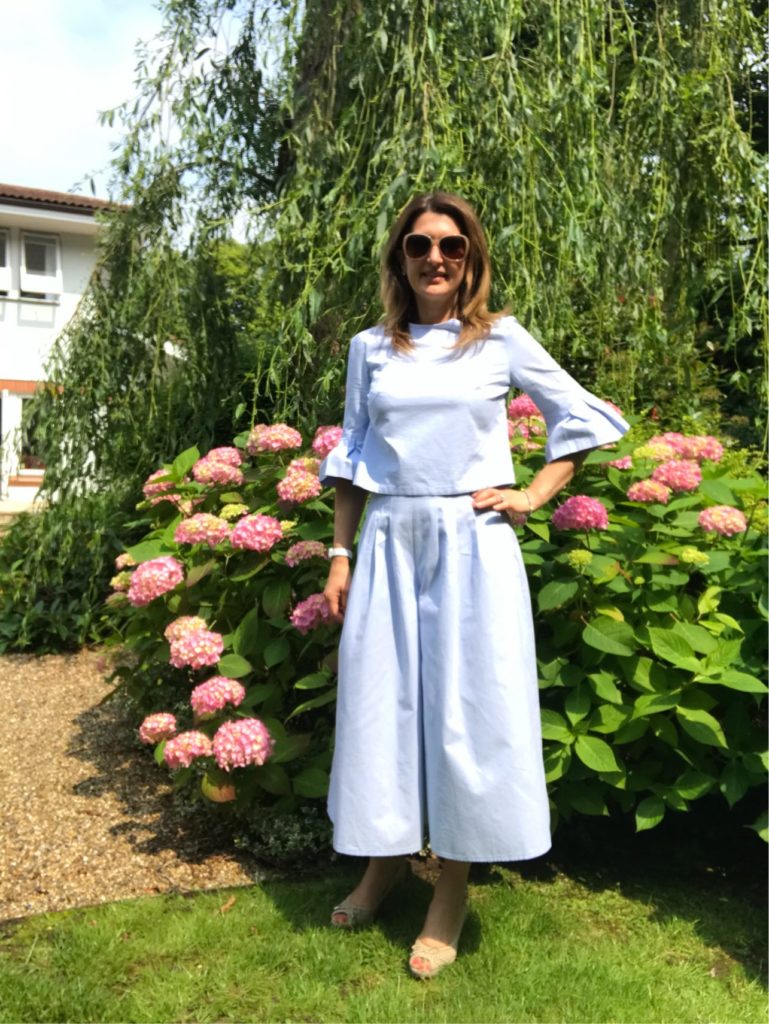
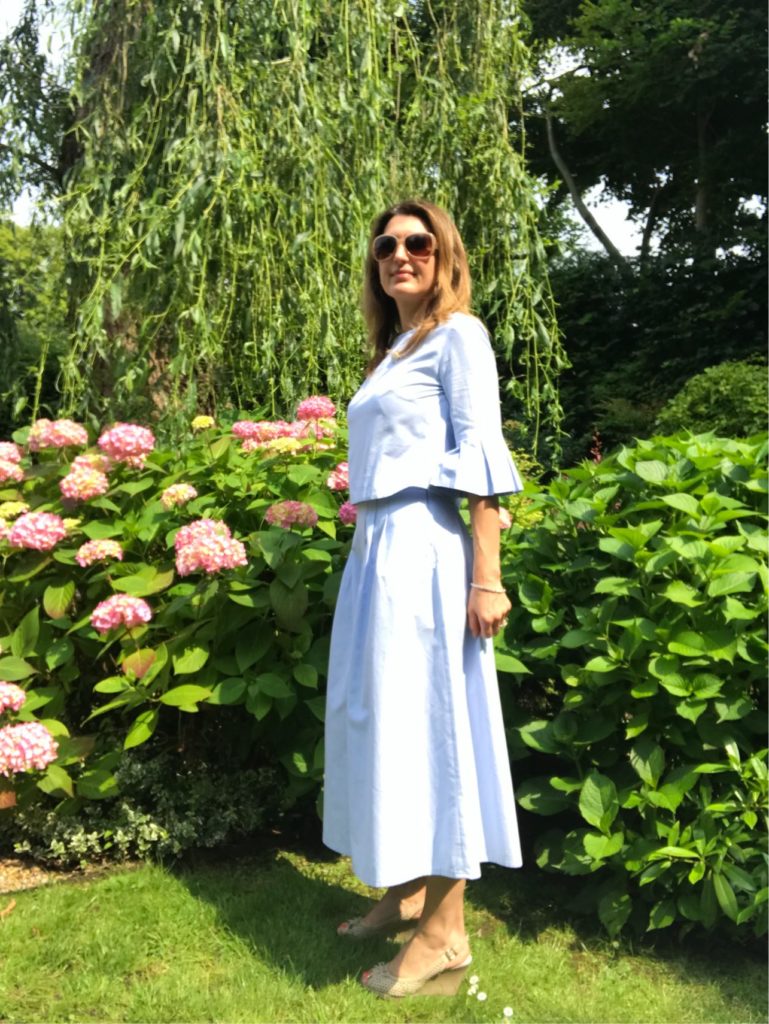
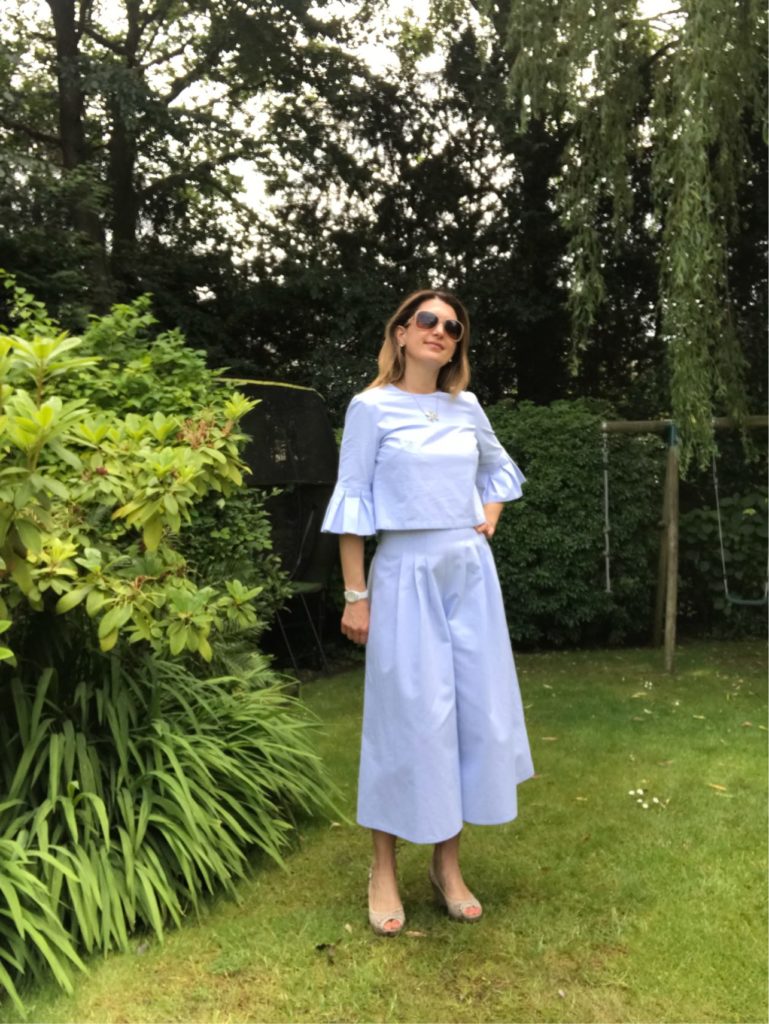
My key takeways from this pattern are the following:
- As usual for Vogue patterns, I went a size down versus the enveloppe indications: I chose size 10 instead of 12 (I am a 8 UK/ 2 US/ 36 French for ready-to-wear). Beware the sizing!!!
- I lowered the crotch to that of the largest size on the pattern (16 I think), as I had read in pattern reviews that it was definitely a problem with this jumpsuit. No other alterations and it fits very well this way.
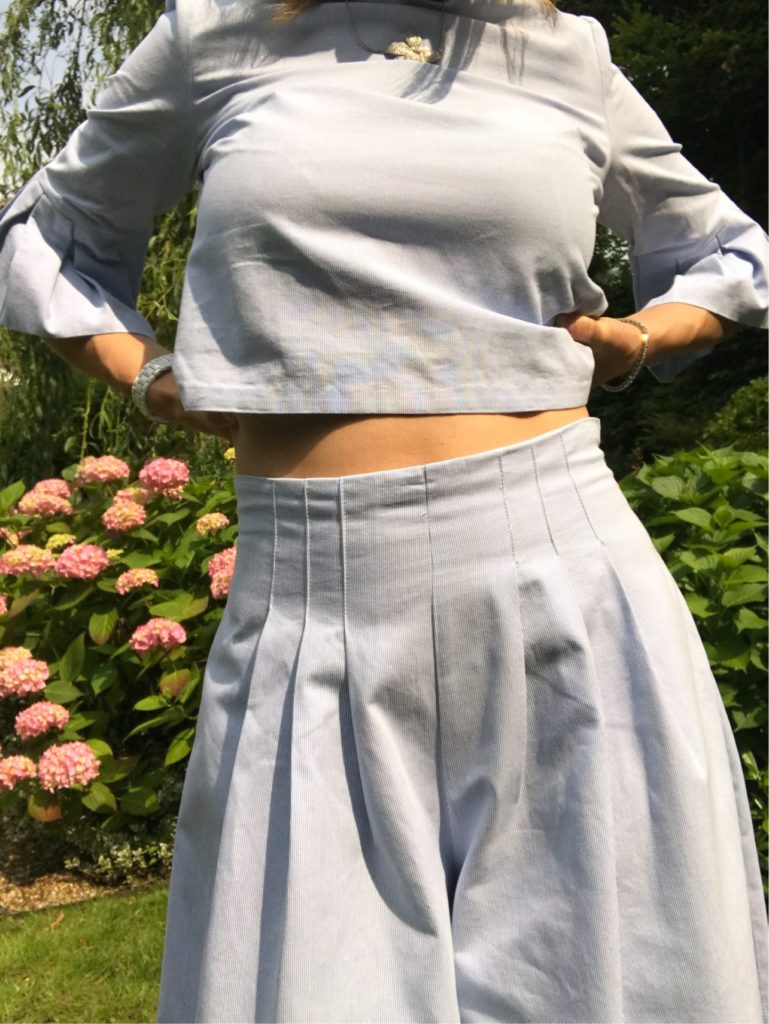
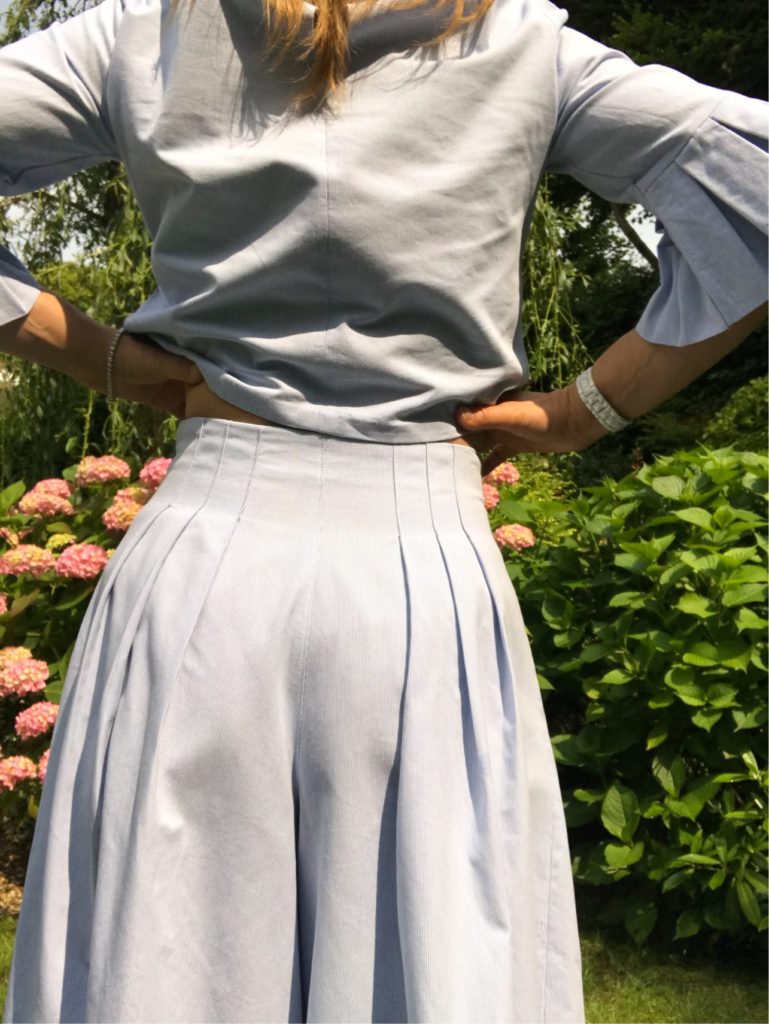
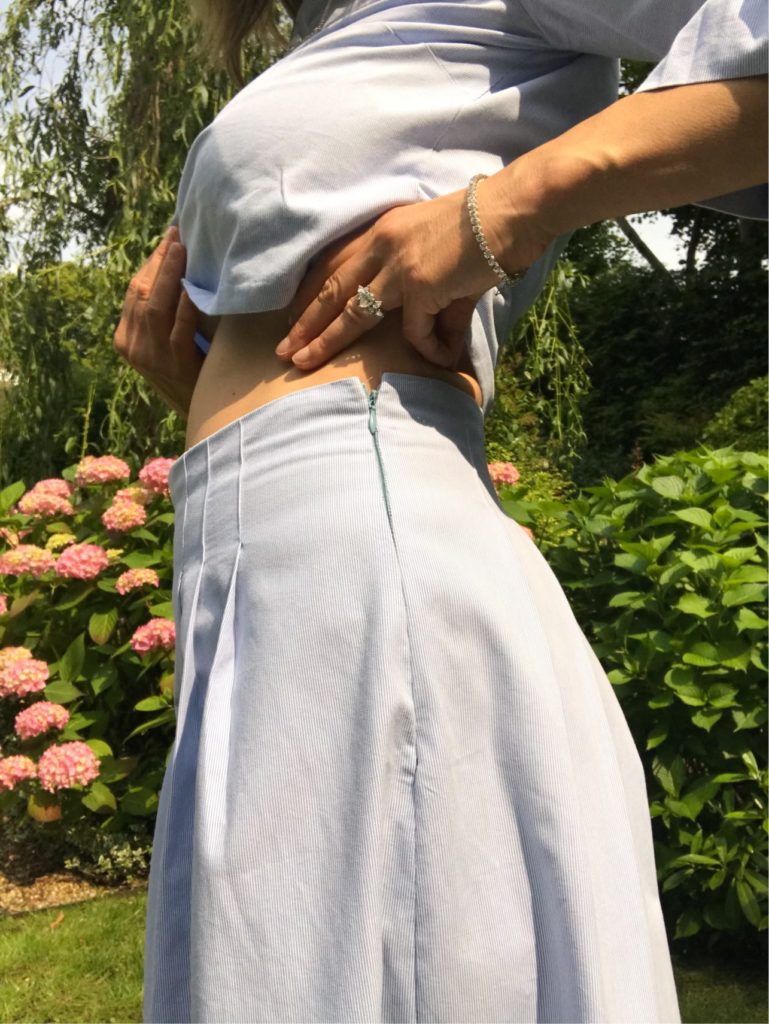
- To finish the top of the culottes (instead of joining them to a bodice), I drew a facing which I interlined and then added a side zip (I am not big fan of back zips, for an obscure reason).
- I particularly love the waist pleats, which emphasise the contrast between the very fitted waist and the large legs and create an utterly flattering silhouette, particularly from the back.
My only disappointment is in my choice of fabric. Instead of the rather rigid cotton from Fabrics Galore I picked, I could have chosen a slightly looser fabric to make the culottes a bit more floaty. Anyway…
However this fabric works really well for the top I chose to match with the culottes. This is another pattern from the McCall/Vogue company, this time M7542 – a very simple top, very well fitted thanks to the cup options, and with different options of funky sleeves, which I discovered thanks to Emily Halmann’s hugely inspiring blog. I chose option C, which I love with a passion – those pleated sleeves, I just can’t have enough of them!!! I absolutely adore this top pattern, I have already made a dress out of it and I am fully planning to use it many more times! Here is size 8, C cup.
So in the end I managed to keep the jumpsuit spirit, but in a much more manageable way. I am the only one having being hesitations about the practicality of jumpsuits? Sometimes I wonder…
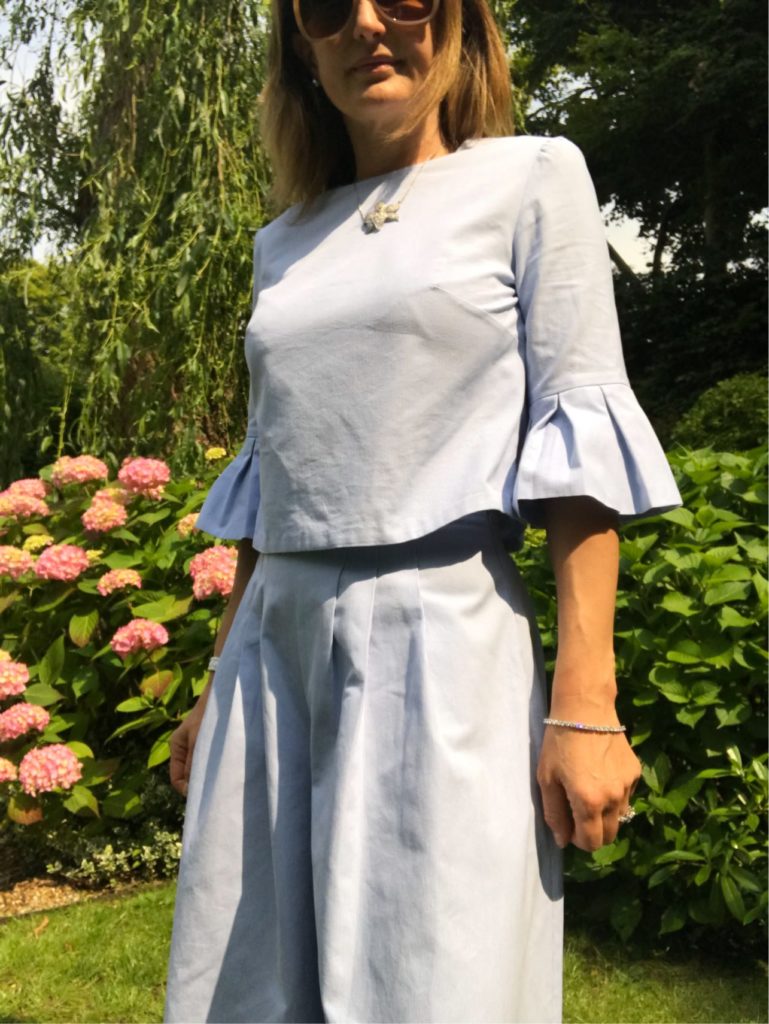
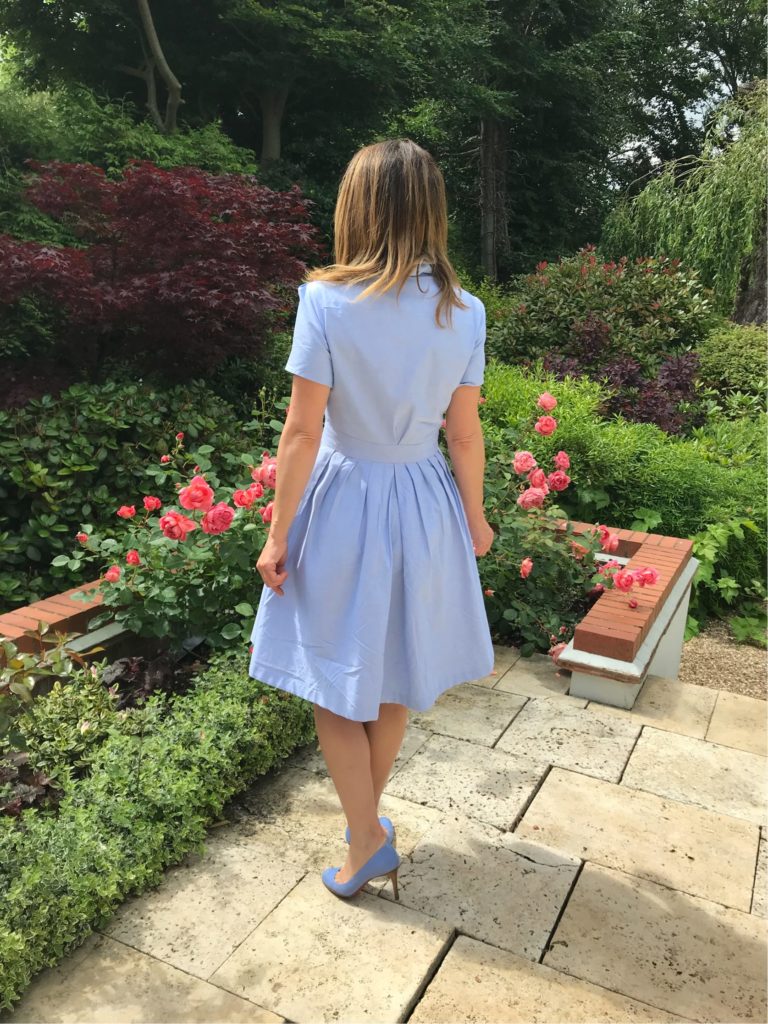
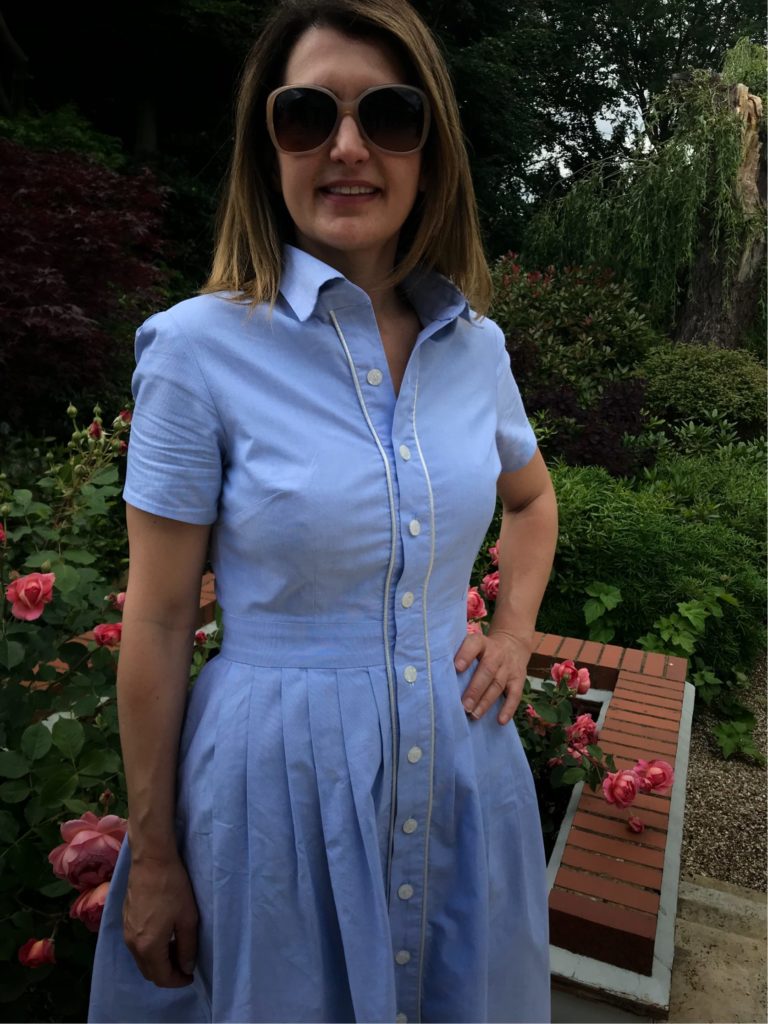
Piping and Buttons – but Sparkly Please!
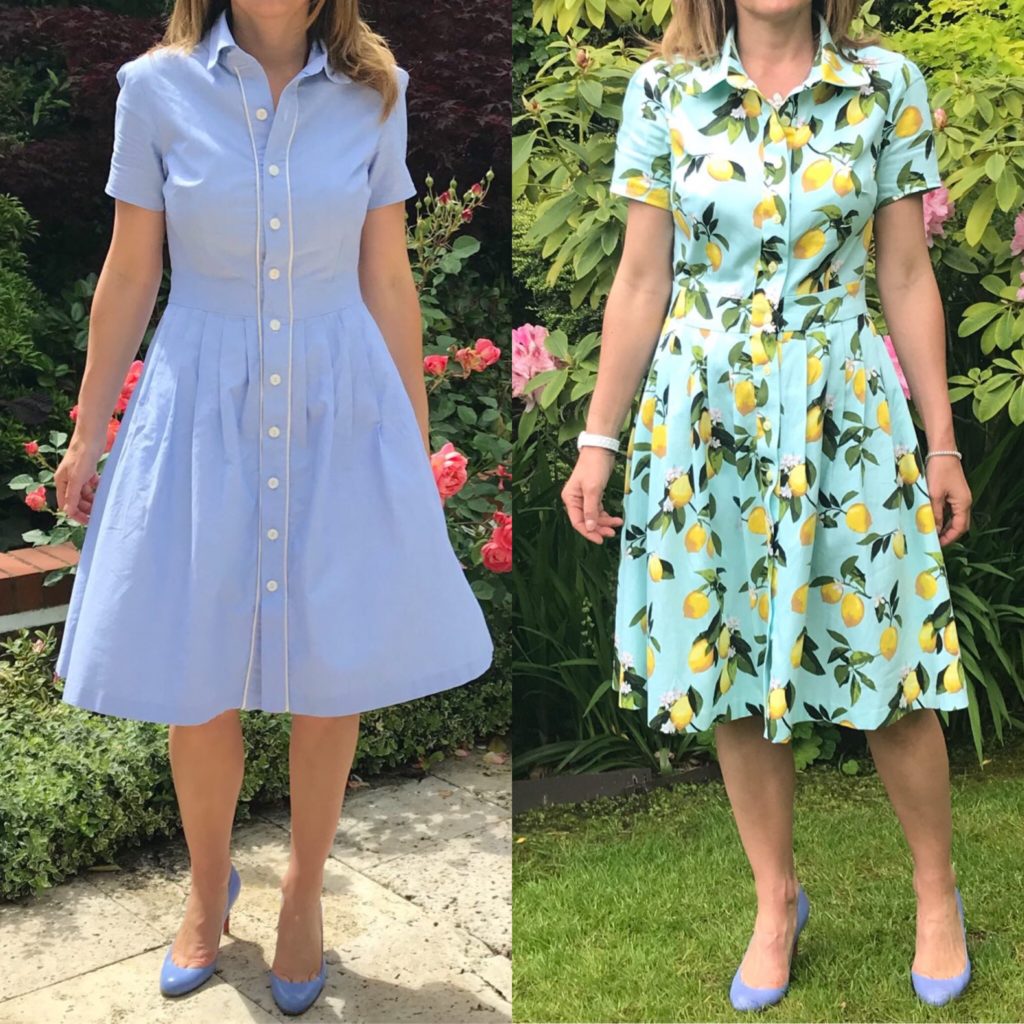
After my lemon version of M6696, reviewed in details here, I definitely absolutely vitally needed a plainer version. But as you’ve probably guessed, my vision of plain is not exactly common view, I the lady who never ever wear jeans on the school run. So here is M6696 number 2, in a blue chambray but enhanced by silver piping and sparkly buttons – why not?
I used the pattern pieces of my lemon dress and made no changes whatsoever – so the size is 8/ C bust cup, instead of the 12 recommended by the pattern, and the fit is absolutely perfect. Each time I work on these Vogue or McCall pattern, I really wonder why the sizing is so completely off – it does not matter when you’re aware of it, but I’m convinced it is a massive put-off if you don’t know. Anyway, for me, perfect fit everywhere!
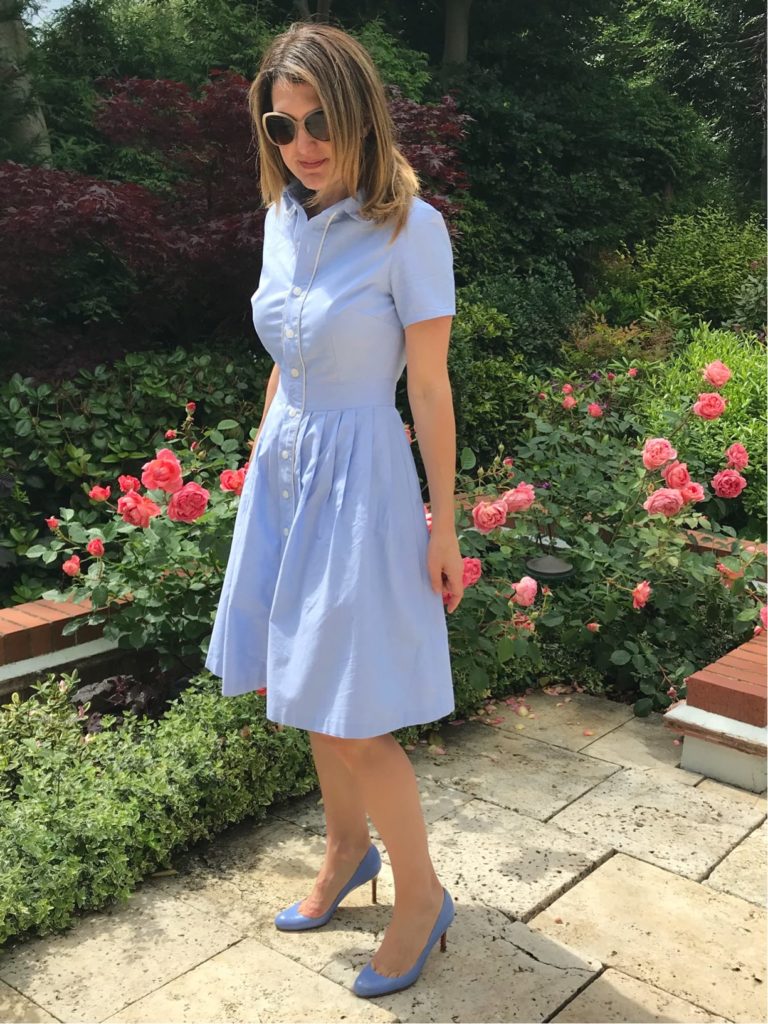
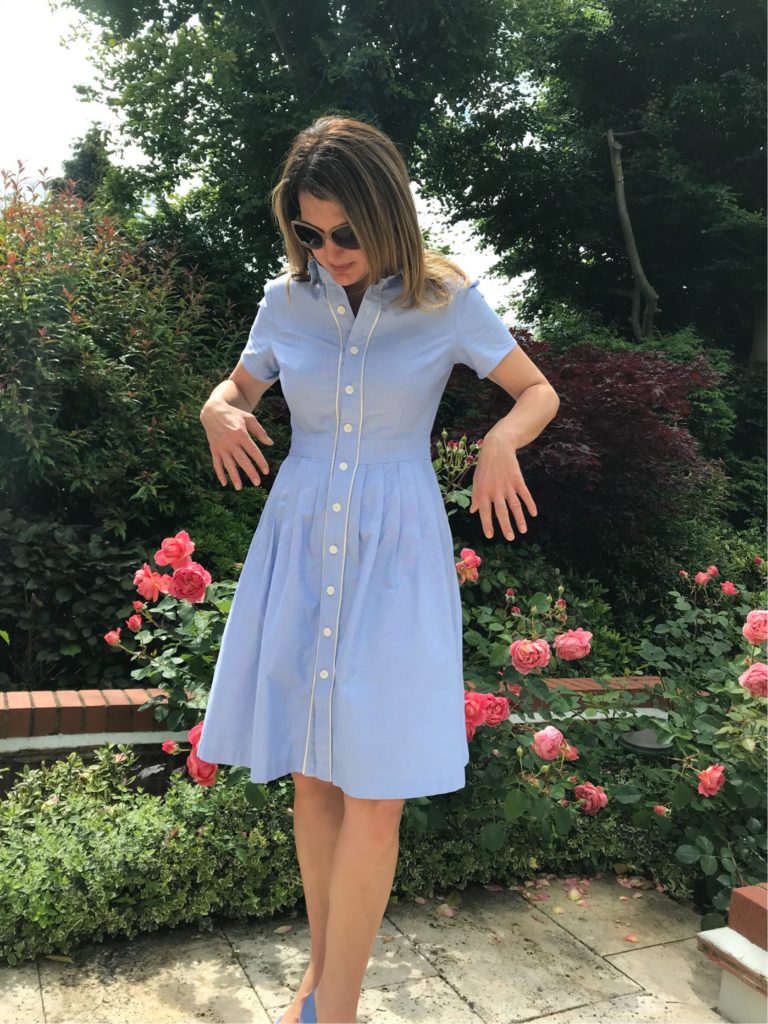
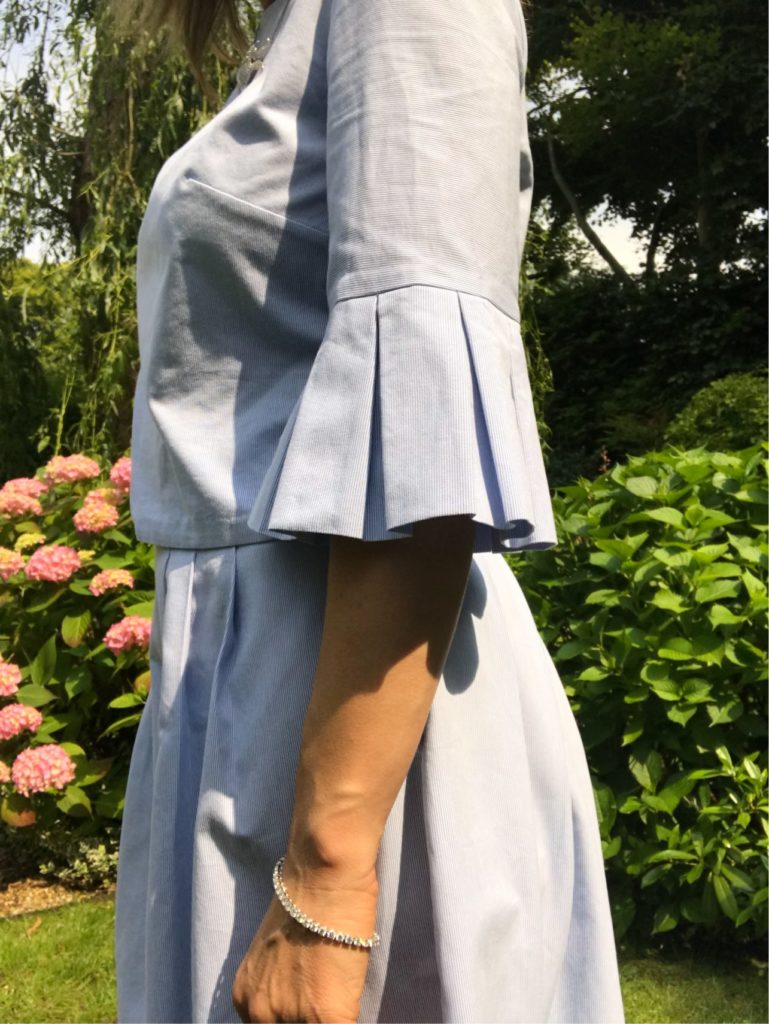
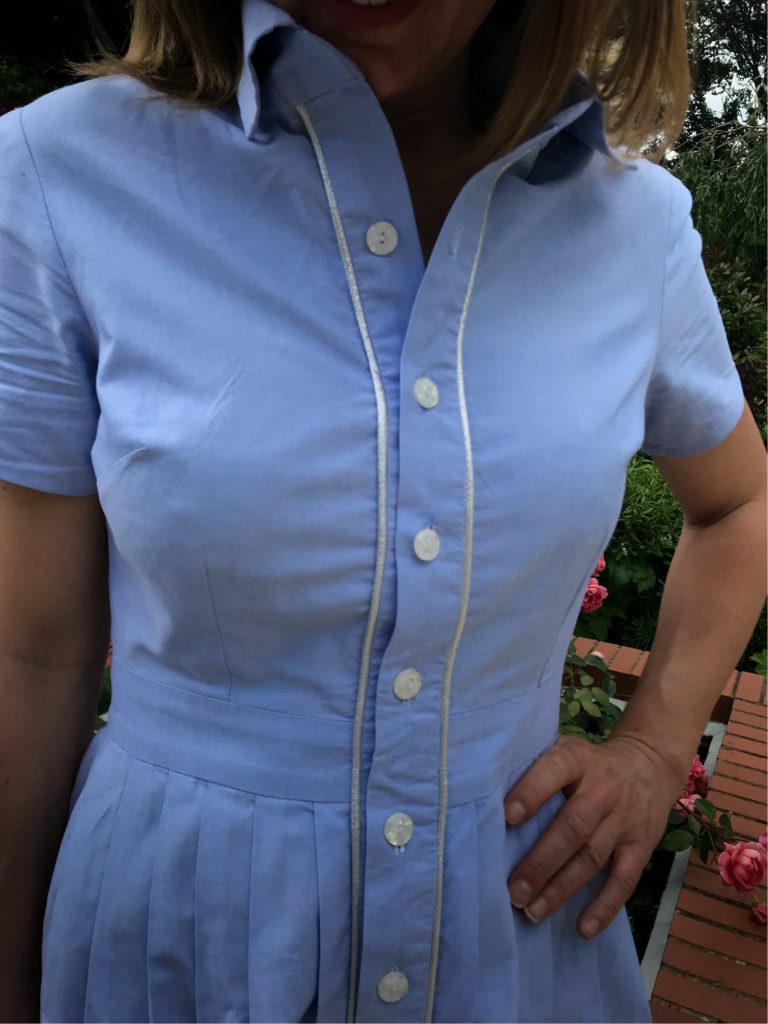
For this dress, I used a blue cotton chambray from Fabrics Galore – a beauty of a fabric, somewhat on the thick side hence perfect for mid-season (with sleeves) but not for full summer. To counter the schoolgirl effect, I added silver piping along each side of the button plackets and some sparkly buttons. The end-result is well beyond my expectations: I am absolutely thrilled with this dress. Next time however, I will add the piping on each side of the superior button placket instead, as here they do not stay parallel when the fabric pulls. Oh well…
In any case I am overly pleased with this dress, even more so because it is so different from its lemon sister. There is no doubt a third version will be sewn for the autumn, with three-quarter sleeves this time!
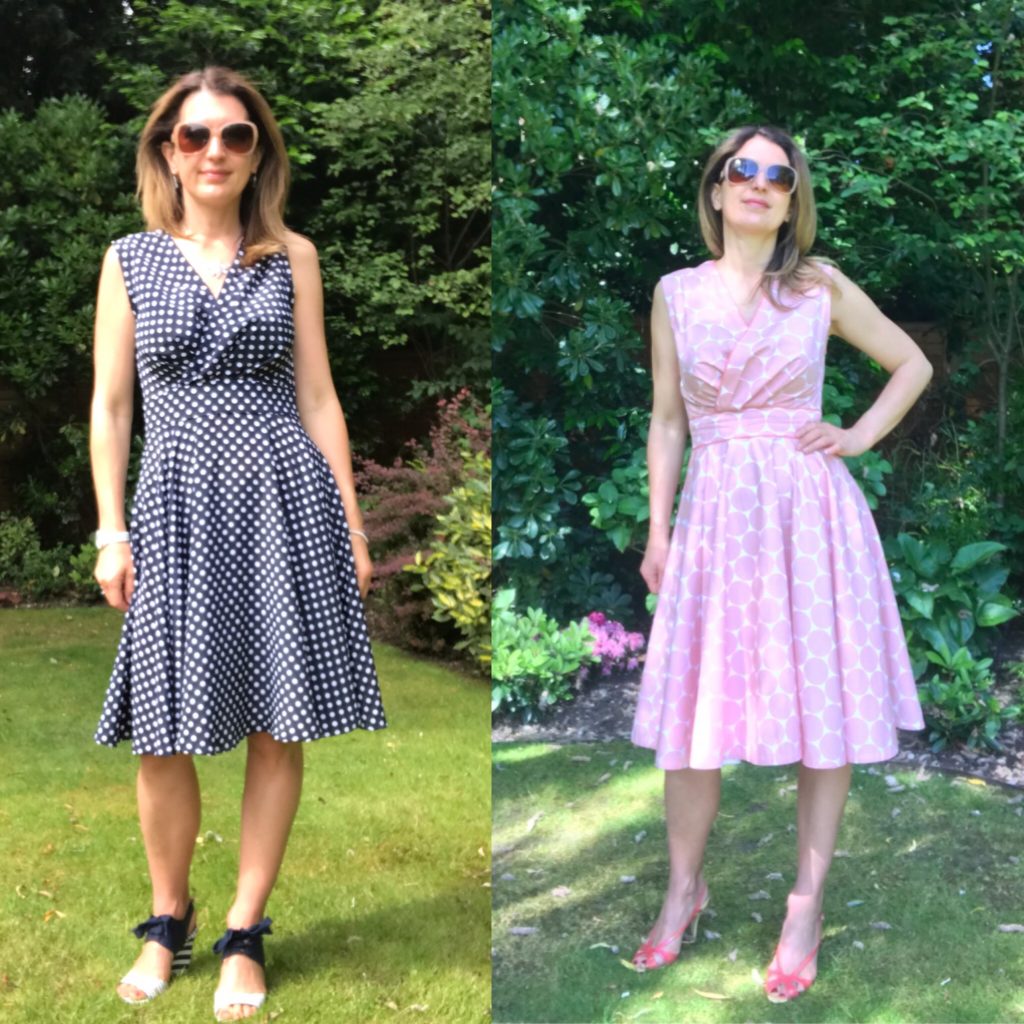
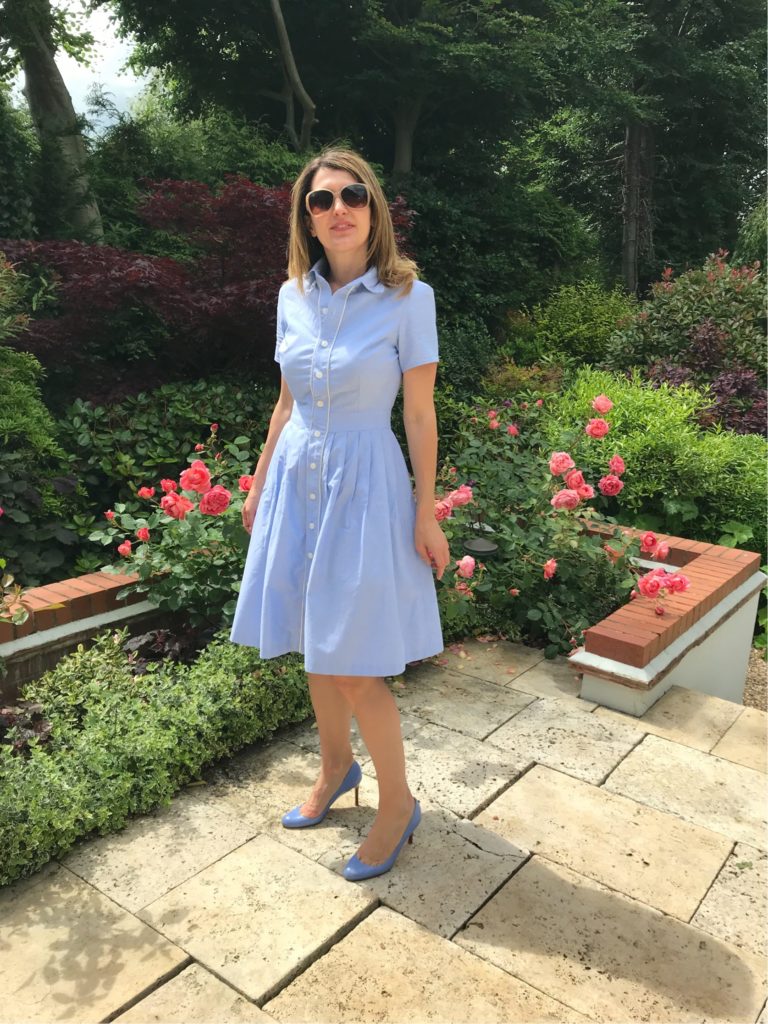
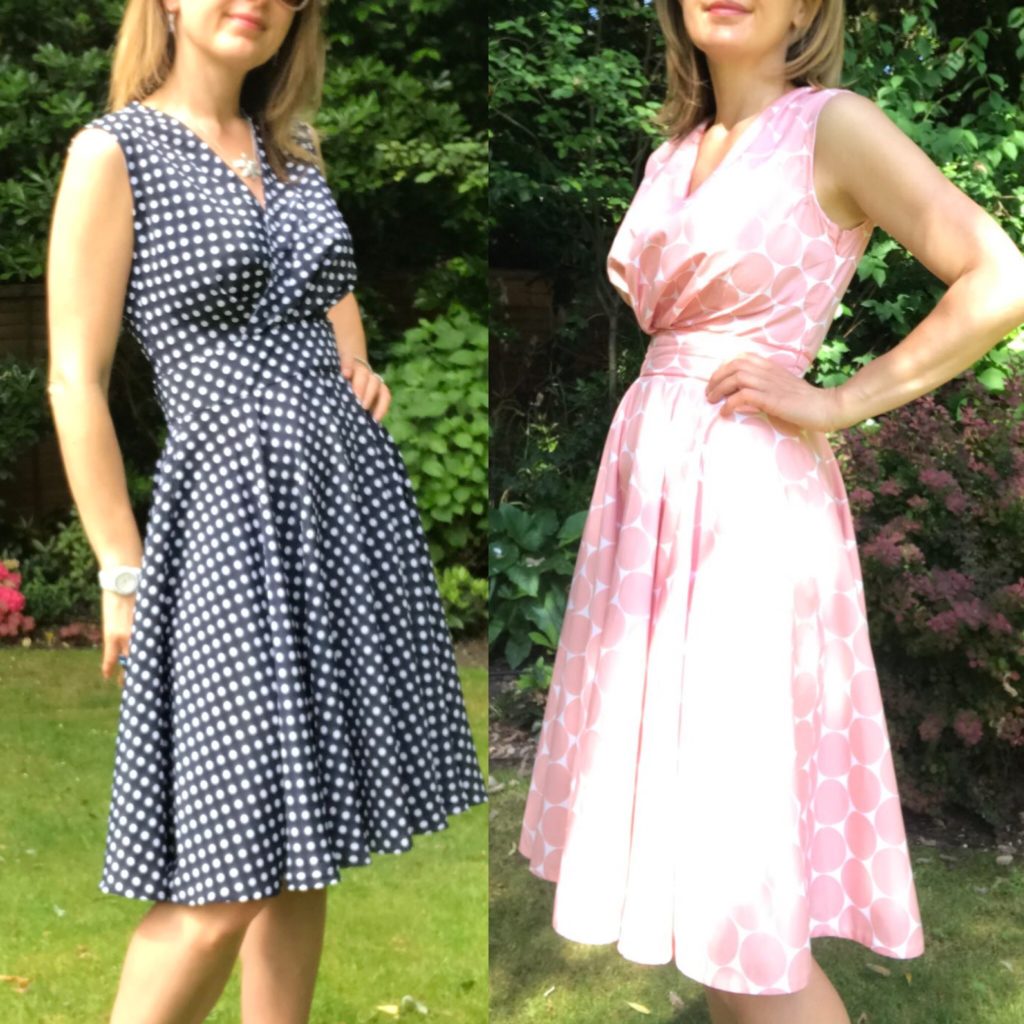
Compare and Contrast: the Summer Wrap Dress
As I told you in my previous article, I did make a second navy version of the M7081 dress, pretty much immediately after the first coral one. So here it is, in a little compare and contrast exercise with its twin sister!
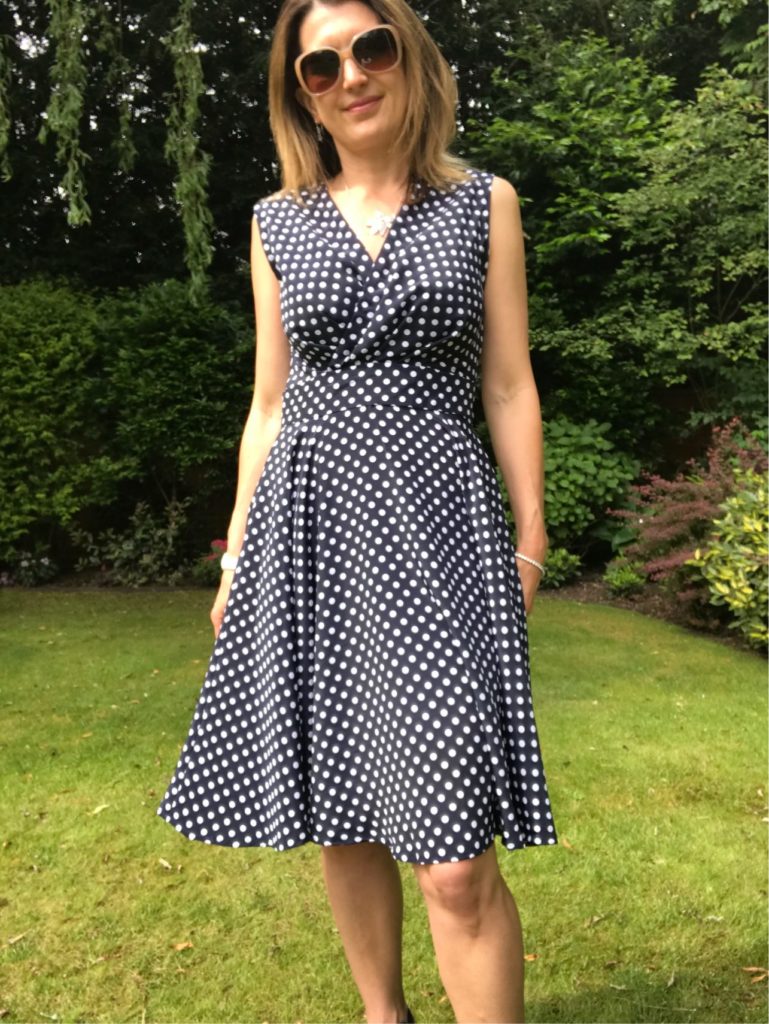
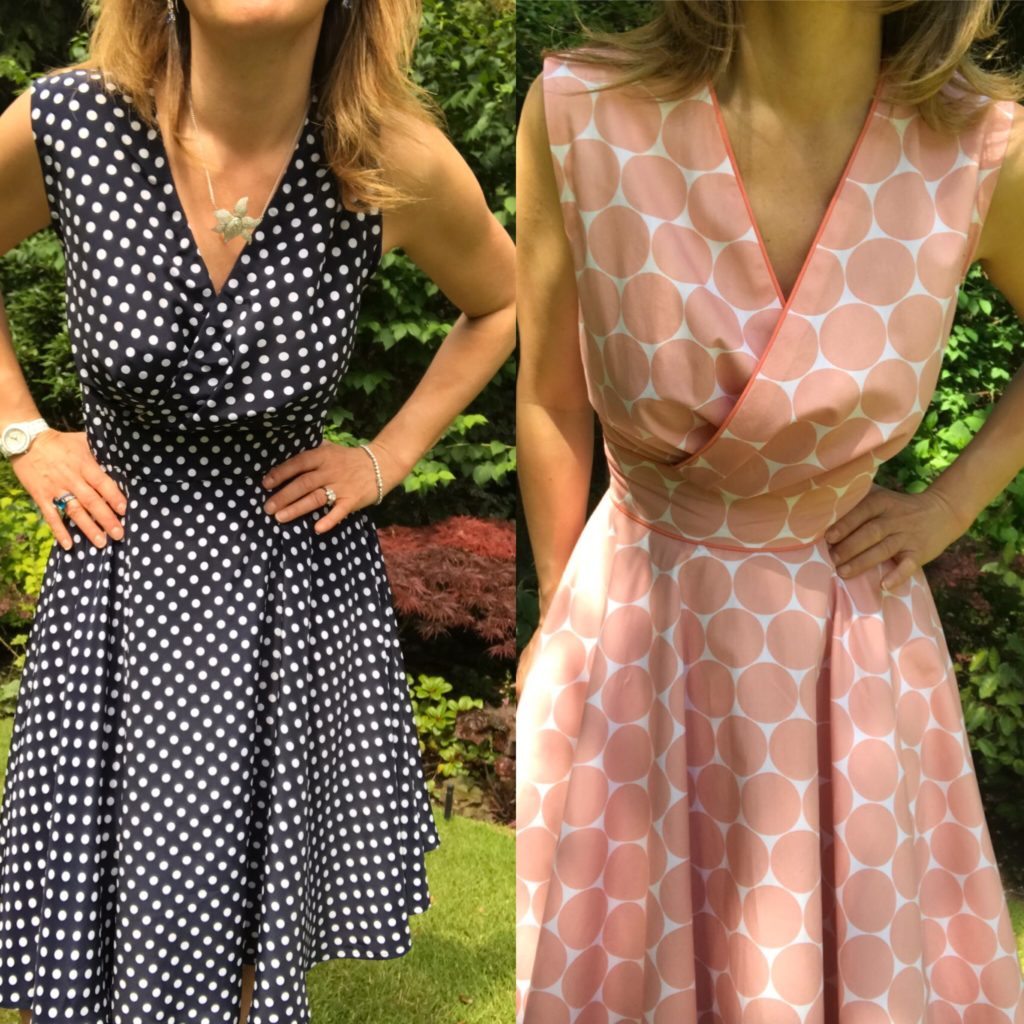
I reviewed this pattern in full details here, so I’m not going to do it again – in summary I absolutely love everything about it: the wrapped bodice, the belt, the full-circle skirt! I also love the fact that it is so versatile, as a 3/4 sleeve version is offered, so a winter version will probably appear in my wardrobe at some stage.
The main difference between the two dresses is, quite obviously, the fabric – I chose spots for both dresses, quite a funny coincidence which I did not even notice until putting the pictures ! Both fabrics come from my beloved Fabrics Galore. But the coral fabric is a lightweight cotton, which despite its weight has the inherent rigidity of cotton; while the navy fabric is a viscose (I think, although could also be polyester) fabric, quite heavy and with a wonderful drape. I was convinced that a drape fabric would lead to a much better result with this dress but the result is not so clear-cut – each fabric has is pros and cons.
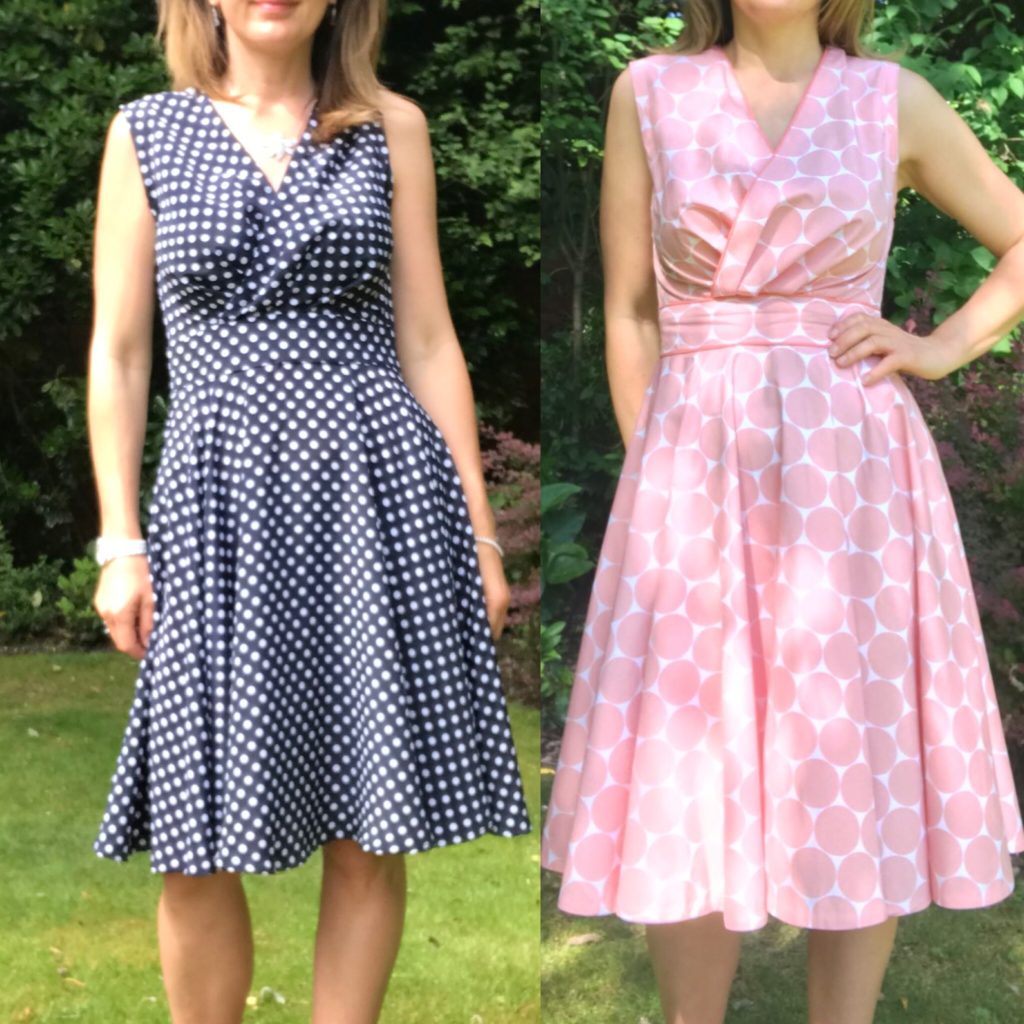
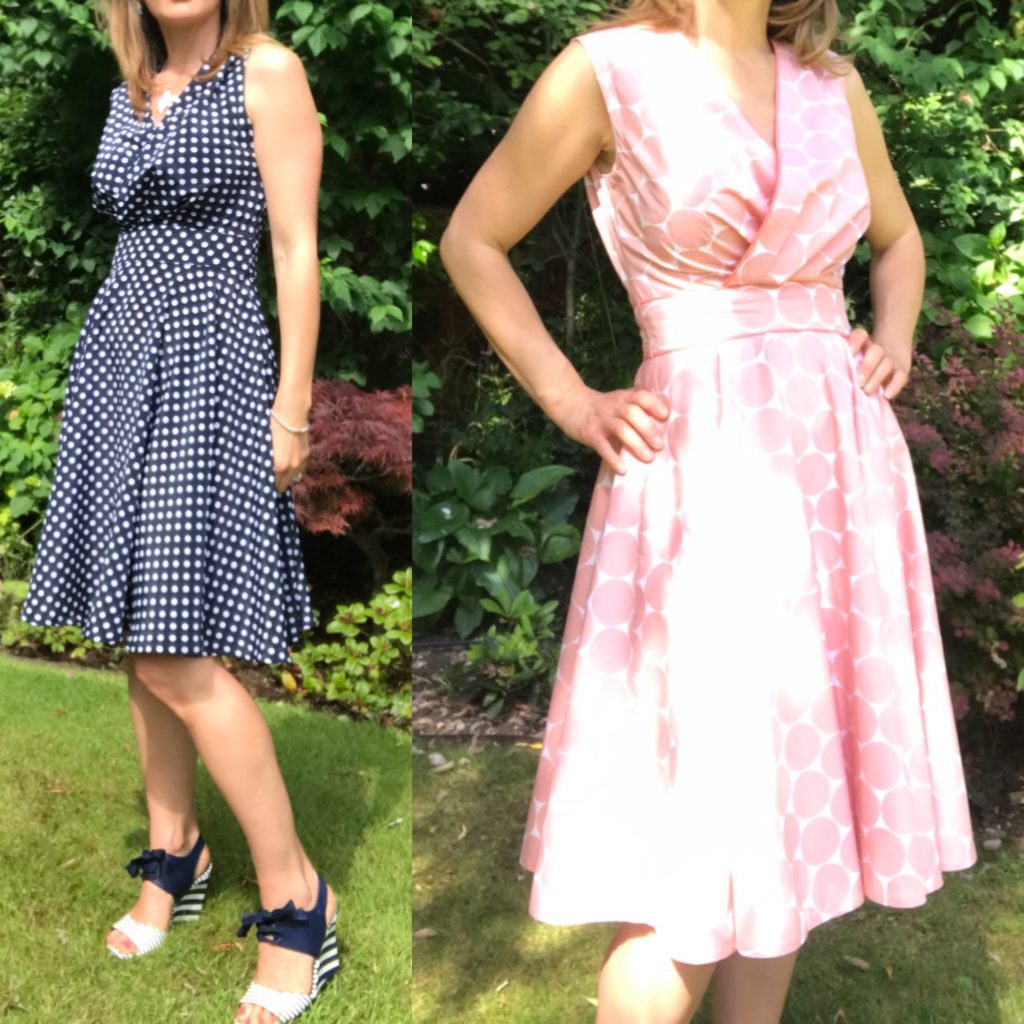
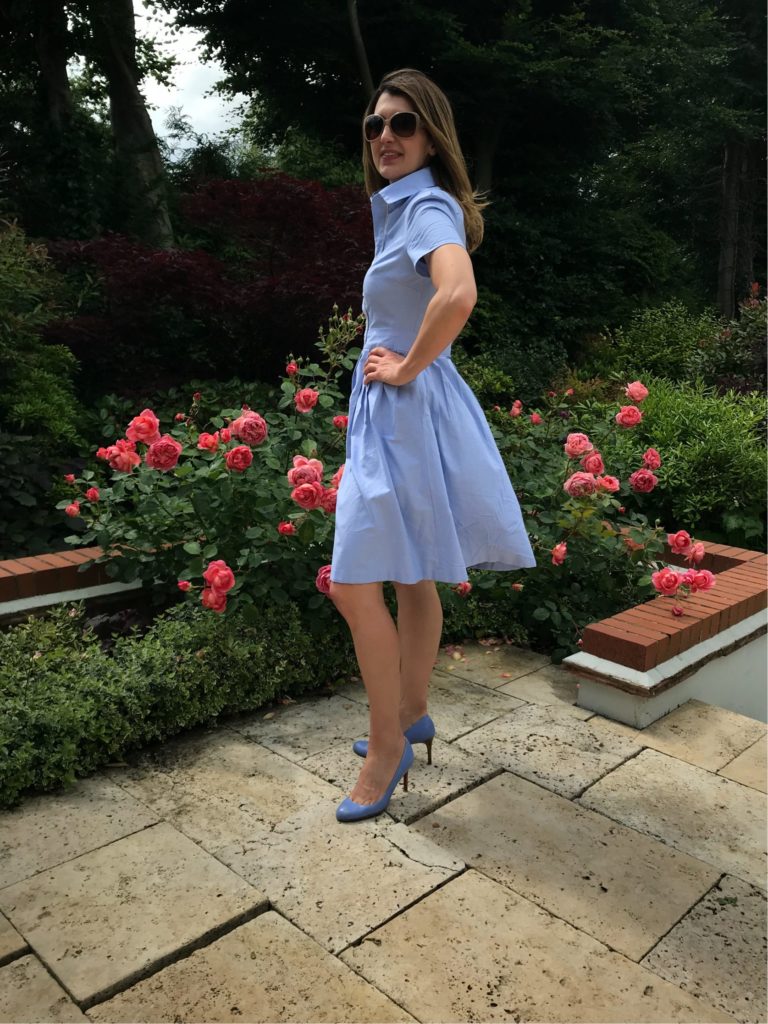
If you have eagle yes, you will have noticed two minor changes between the coral and the navy dress. First, I added a few cm at the belt, to have more ease – but I think it was a mistake as the dress does not sit so well on the hips. Second, I had to substantially shorten the skirt of the navy dress, after a bit of a hemming disaster… Oh well…
Appart for that, the pictures speak for themselves. I find the bodice nicer in the cotton fabric, as the pleats are very neat, while the navy version has somewhat of a saggy boobs effect. But maybe the piping helps – I did not add piping to the navy version for fear of pattern overload!
I also find that the back sits better in the coral version, but that’s probably more related to the tighter belt than to the fabric. To be honest, I actually quite like both version from the back…
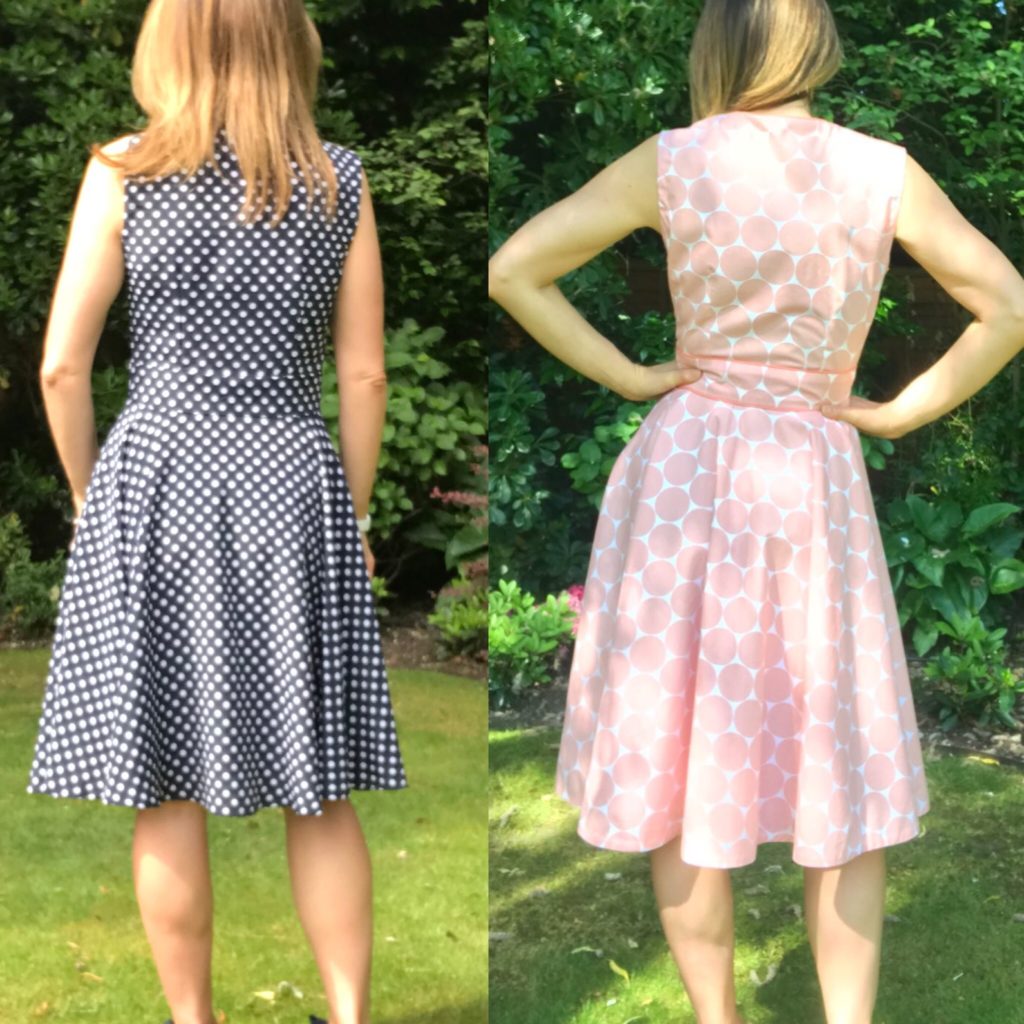
But the most striking difference is in the circle skirt. In cotton, it does look much fuller, due to the rigidity of the fabric and also to the fact that I had to line the skirt. In viscose, the skirt drapes marvellously, especially when in movement. I actually love both equally.
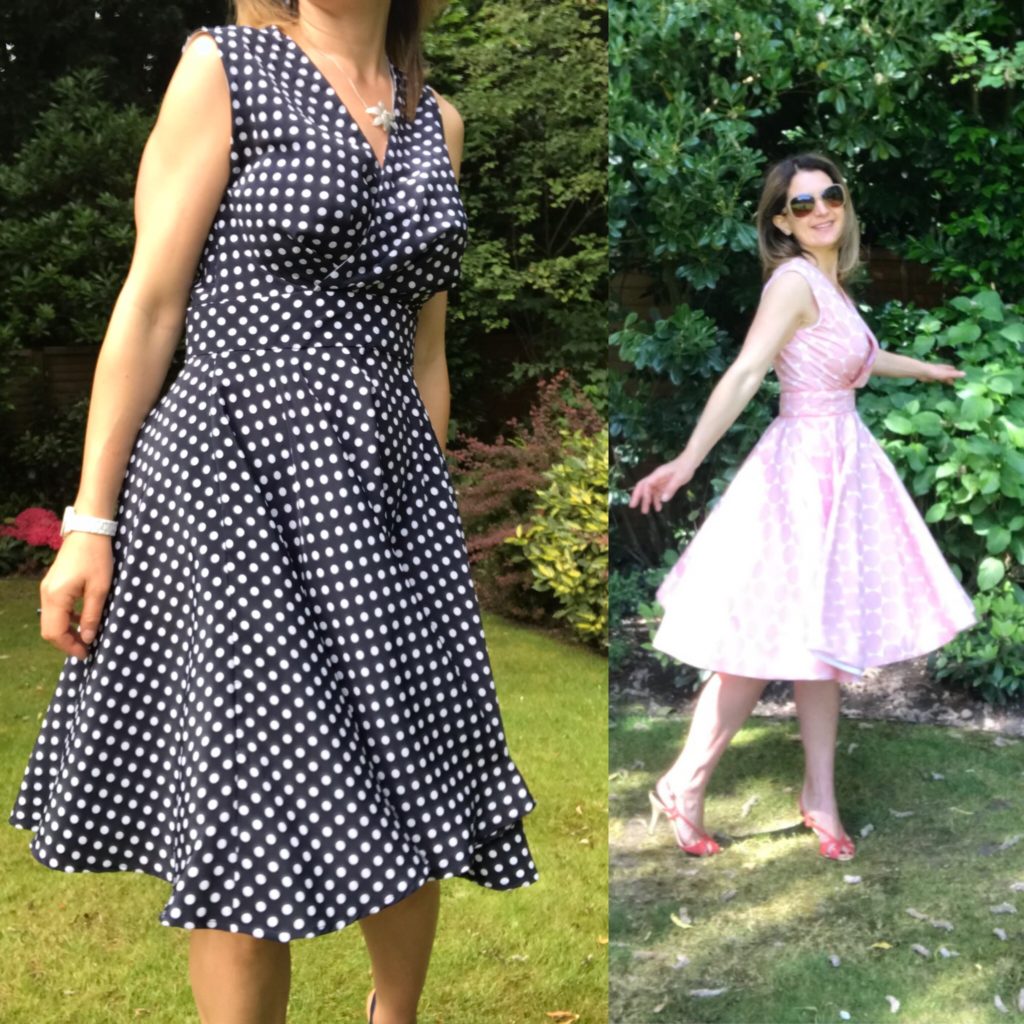
The only think I disliked was hemming the viscose. I initially used the same method than for the cotton, using bias tape sewn on one side with the machine and on the other side by hand (don’t ask how many hours it took!). But then the bias created too much weight, or I hadn’t let my fabric rest enough, or both, and my hem ended up completely uneven. So I had to remove the bias tape, cut back my skirt to an even level, and then I did a machine hem because at this stage I had lost all patience!
This little accident appart, I am very pleased with both dresses. They are light and pretty, so I’m sure I’ll get a lot of use from them… when the sun comes back!